
![How to Manage SharePoint Storage Limits [Microsoft 365]](https://www.mrsharepoint.com/wp-content/uploads/2021/12/cloud-service-concept.jpg)
Last Updated on August 26, 2023
SharePoint Online is a good investment, especially for companies that have large teams and multiple files.
Part of your potential concern may be about the storage limits (like how much you will have out of the box).
In this article, let’s talk about the storage limits in SharePoint Online, how you can manage the limits, as well as some of the questions you may have.
Let’s get started.
Table of Contents:
SharePoint Online comes with 1 TB per organization, with 10 GB of additional storage for every licensed user.
The additional storage stacks up — which means you can have an additional 1 TB of storage if you have 100 licensed users (100 x 10 GB) = 1 additional TB of storage space.
On the downside, if you need more space than what SharePoint Online provides out-of-the-box, you will have to pay.
Currently, SharePoint extra storage pricing sits at $0.20 for every GB per month (or $200 for a TB per month), which is pricier than what other cloud storage applications provide.
The free 1 TB storage is already big. But if your organization has a lot of files, that size is clearly not enough.
Fortunately, there are some things you can do to manage your SharePoint Online storage space before you invest in more space.
Sign up for exclusive updates, tips, and strategies
The truth is, $200 for a single terabyte per month is a lot, which is why you must make sure you absolutely need to expand your storage space.
More often, you don’t actually need the additional storage — all you might have to do is manage your storage limits and check for obsolete or redundant files or documents.
Before you buy additional storage, do these things first:
1. Delete old and unimportant files and documents
If you’ve been using SharePoint Online for a few years already, it’s likely that you will find old files and documents lying around.
You may have some spreadsheets and documents that are unimportant anymore that you can delete without repercussions.
When going through your files, check out the modified or the created dates and refer to the retention policies of your organization (if you can delete these files or not).
All these is the reason why you need to set up document management policies in your tenant.
Note: For creating retention policies, read this admin guide: Admin Guide: How to Create a SharePoint Retention Policy.
2. Check for redundant or duplicate files
It’s normal to create backups (and even backups of backups).
When you go through the contents of your storage space, check for duplicate files and folders and delete them.
You might also find different versions of the same document which you can combine into a single file.
3. Check for personal files and documents
It’s a good practice to upload files and documents to SharePoint Online that are usable to others in the organization.
Personal files and documents don’t need to be in SharePoint Online (there actually no point in doing this in SharePoint Online).
If this might be an issue with other users, recommend to them to transfer their files to OneDrive for Business which gives 1 to 5 TB of personal storage to users.
Now, if after doing all the things above you still end up short with all the storage space you need, then you may need to really buy additional space.
Remember, with Microsoft SharePoint Online, the price is $0.20/GB/month.
The other option is buying storage with Azure, which costs $0.058/GB/month. The Azure option is equivalent to $58 per TB per month.
The good news is that you can use Azure Connect so you can see your files with the search functionality in SharePoint Online.
Note: For comparison with a close cloud solution, read this: OneDrive vs Google Drive: Cloud Storage for Business?
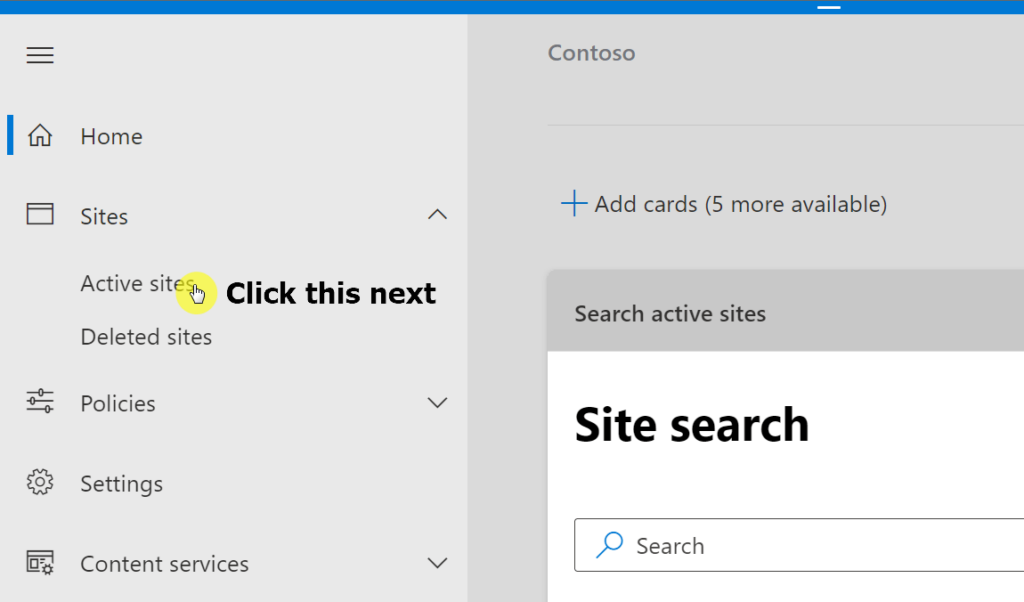
If you want to check the total space available in your SharePoint Online tenant, you need to visit the SharePoint admin center.
From your SharePoint Online site, click on the launcher icon and click on the “Admin” option.
From there, go to the bottom part of the navigation menu on the left side and show all the available options.
On the admin centers, select “SharePoint”.

Once you’re on the SharePoint admin center, visit the active sites page.
On this page, you will find the total and available space of your SharePoint Online on the upper-right side of the page.
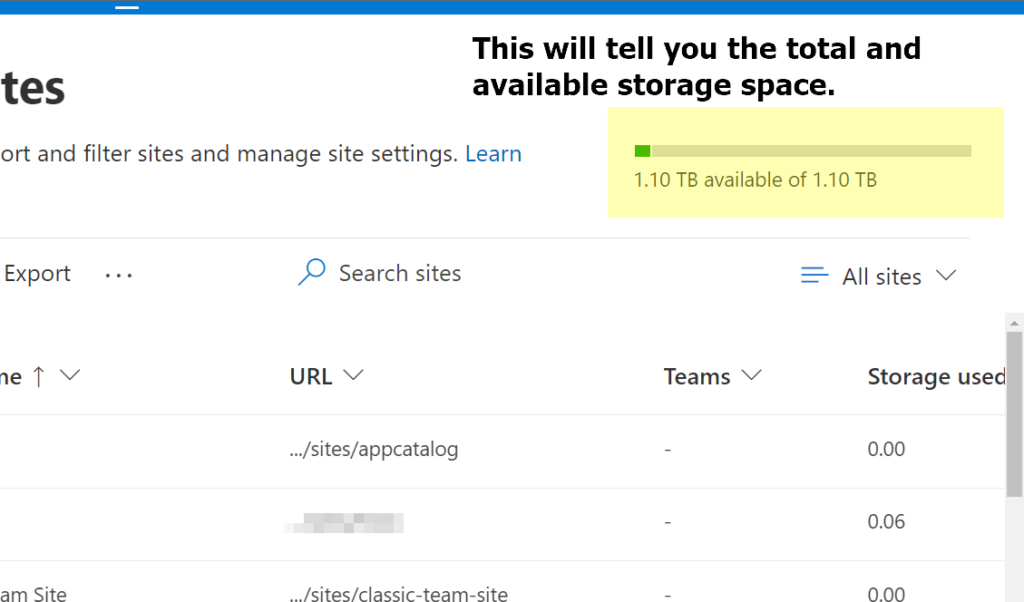
You can also see on the same page here how much storage space each site is using up.
If you want to check on the individual site, you can go to the storage metrics on the site settings (under site collection administration).
By default, storage space management is automatic and the system will allocate the same storage space per site.
But if you want to manually manage each site’s storage limits, you can easily do so right in the SharePoint admin center.
If you don’t know how to get to the SharePoint admin center, here are all the steps (illustrations are shown in the earlier section):
- From your tenant site, click on the app launcher on the top-left side of the page.
- Click on the “Admin” option from the app launcher.
- Once you’re in the Microsoft 365 admin center, focus your attention on the left-hand side panel and show all available options.
- Under the admin center group, click on the “SharePoint” option.
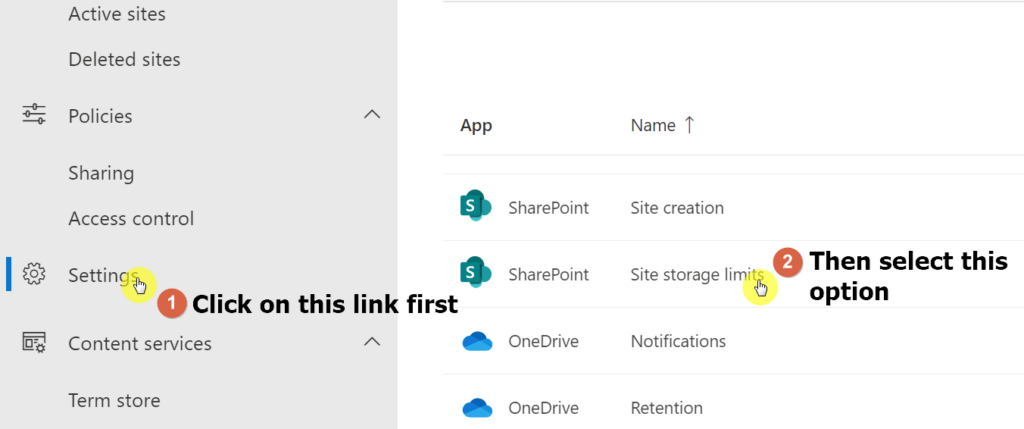
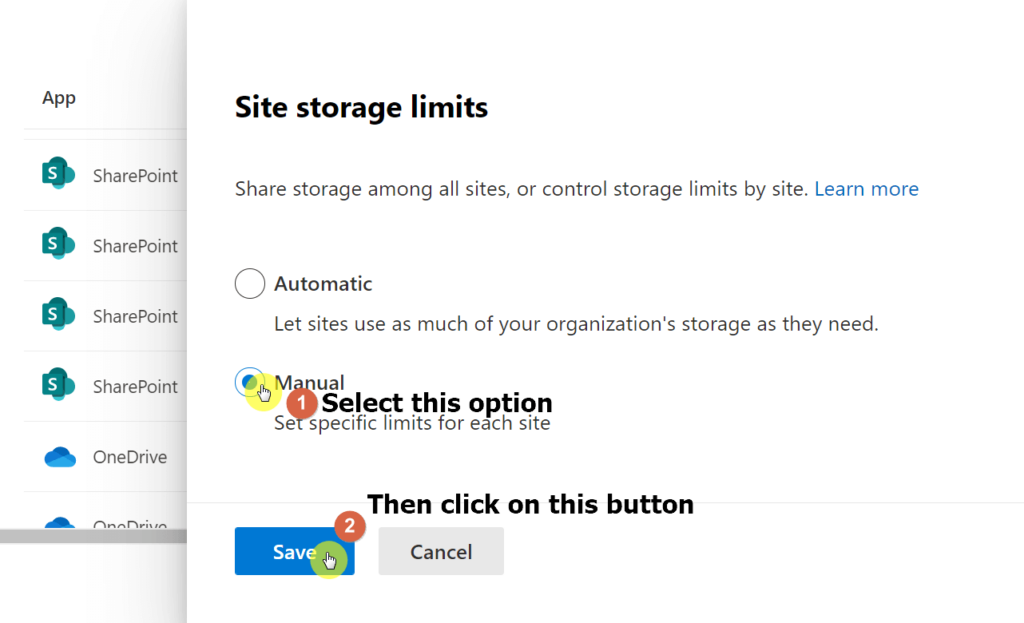
Now, once you’re in the SharePoint admin center, click on the “Settings” link on the left-hand side menu.
Then, find “Site storage limits” on the page and click on it.
After you click on it, you will be able to select the manual method of storage management. Don’t forget to click on the “Save” button.
To set the storage limit of an individual site, head over to the active sites page first.
Once you’re on the active sites page, select the site you want to manage. Then, on the top menu, find and click on the “Storage” option.
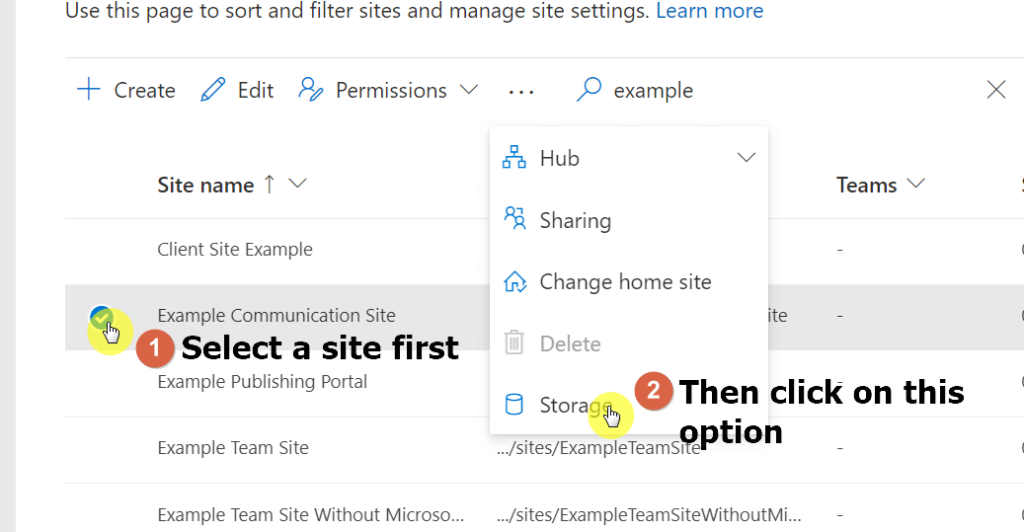
A panel will then slide in from the right where you can edit the maximum storage limit of that site.
Simply enter the maximum storage for that site and click on the “Save” button.
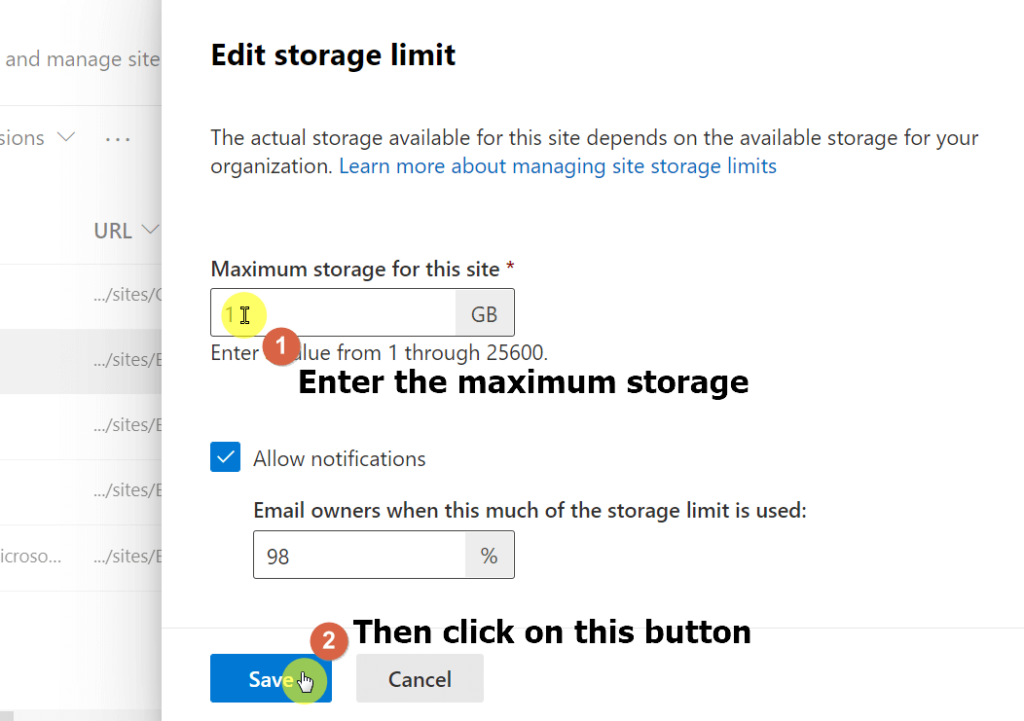
You can also disable the notifications part (although I recommend that you keep it enabled) or adjust how much % is used up before the system sends you an email.
Note that when you check on the storage metrics on an individual site, it may show it has 25,600 GB available even if your organization doesn’t have that much allocation.
Check first before buying additional space
In the end, if you still need additional space after cleaning your SharePoint Online storage and allocating the maximum storage per site, you don’t have a choice but to buy additional space.
Like I have written in the first part of this article, the storage space in SharePoint Online is expensive, so the better choice is to go with Azure instead.
If you’re worried about having your files in different places, don’t worry since there’s an Azure Connector available.
If you have additional questions regarding SharePoint Online storage space, drop a comment below, and let’s talk about it.
For other concerns and inquiries, send me a message via this site’s contact page and I’ll get in touch with you as soon as possible.


“SharePoint Online comes with 1 TB per organization, with 10 GB additional storage for every licensed user.
The additional storage stacks up — which means you can have an additional 1 TB of storage if you have 11 licensed users.”
Doesn’t make any sense, 10GB x 11 doesn’t make 1 TB
Good catch. I have just fixed that in the article. Should have been 100 x 10GB = 1TB.
Actually it is base 1TB + 10G per additional users.
Correct. I updated the post. Thank you.
Hi Ryan
Great post, could you explain to me, how can a site have 25TB and sharepoint only 5TB depending on the organization? How do I decrease this space?
Greetings from Brazil
Hi Edvan – You can change site storage limits from the settings page in the SharePoint Online Admin Center. It uses what’s know as “Pooled Storage” where SharePoint resets all of the site storage limits to 25GB. This is the case even if your tenant has less space available than this. Pooled storage means that each site can use the space it needs (within your tenant’s limits) without the need for manual intervention.
hi Ryan,
Great doc, i have a question. I have about 1600 E5 licenses and my storage is showing as 22TB approx. lets say if i purchase additional storage of more 3TB and go till 25TB. What will happen if i reach to the storage full of 25TB? What will happen next. Can i purchase more storage or its limit to 25TB per tenant/Oraganization. (ex. ABD.SharePoint.com)
Great question. Once you hit the 25TB storage limit, the site collections will go into read-only mode. You can still purchase more space though.
Hi Ryan,
Great article – One thing that caught my eye was the ability to see files that were migrated on Azure storage through SharePoint Search
“The good news is that you can use Azure Connect so you can see your files with the search functionality in SharePoint Online.”
How would I achieve that?
Two questions:
Can I allocate more than 25GB for a site? I have a user who needs 50GB.
If I change the site storage settings to “Manual”, can I increase the storage on a single site, then change the storage settings back to “Automatic?”
does it make any difference if we do a yearly payment