

Last Updated on June 17, 2024
Did you know that you can set up a document management system in SharePoint?
Well, it’s certainly not a whole feature that’s out-of-the-box in SharePoint — but more like a combination of different features.
In this article, I’ll show you how to create a modern document management system in SharePoint that’s up to date.
Let’s get started.
Table of Contents:
- What is a document management system in SharePoint?
- How to create a SharePoint document management system
- Step 1: Plan how you will organize your documents
- Step 2: Define the categories and metadata of your documents
- Step 3: Create the metadata columns for your documents
- Step 4: Create the content types for your documents
- Step 5: Create the document library with content type management
- Step 6: Add the custom content types to the document library
- Step 7: Add a metadata navigation feature to the document library
- Using a SharePoint Document Management System
Technically speaking, document management systems enable you to control and track the life cycle of your documents.
There are various third-party software available outside SharePoint (with some of them that allow integration with SharePoint).
However, there is actually a way that you can create a document management system right inside SharePoint based on metadata.
The supposed flow of this system is like this:
- A user uploads a document to the library.
- That person can then tag the documents according to their document type.
- Others can then search for that document using keywords and tags.
Related: Search Guide: SharePoint Search Tips and Tricks Overview
Unfortunately, like I wrote in the introduction, there really isn’t a ready-for-deployment feature in SharePoint for this use case.
That means you need to assemble the different features and make them work together flawlessly — though doing it is actually simpler than it sounds.
No need to worry about anything though since I can assure you that even if you’re new to SharePoint, you can still follow my instructions.
Sign up for exclusive updates, tips, and strategies
Many of the features that I will discuss below are already ones that I covered in previous articles. I’ll be sure to link to them if you want to read more.
Let’s get started with the first step:
Step 1: Plan how you will organize your documents
Using a document management system is no excuse to unnecessarily dump all your documents into one library and hope for the best.
The truth is — if you want this to work, then you need to focus on documents that are related and don’t vary in terms of permissions or security.
The most perfect example of this is financial documents such as:
- Invoices
- Estimates
- Receipts
- Purchase Orders
- Quotes
If you have other types of documents like legal or client documents, create a separate document library for each and follow the same steps.
What’s important here is to remember that users will access the document library, so make sure that it’s okay for those persons to see the files in the library.
Step 2: Define the categories and metadata of your documents
The next step is to plot out the categories and metadata of the documents that will be uploaded to the document library.
For example, in this article, I will focus on three types of documents:
- Invoices
- Estimates
- Receipts
Here are the metadata I want to include in these documents:
- Invoices
- Invoice Number
- Client
- Invoice Date
- Total Amount
- Estimates
- Client
- Completion Date
- Total Cost
- Receipts
- Vendor
- Receipt Date
- Receipt Description
Once you mapped out the metadata you want to include, you need to know the type of column you will use for each.
For example:
- Date column for all dates
- Number column for invoice number
- Choice column for client and vendor
- Currency column for the total amount and total cost
- Single line of text column for description
No need to sweat this one, though it’s important that you define them beforehand so you will be able to create the columns faster.
Step 3: Create the metadata columns for your documents
The next step is to bring those metadata columns to life.
Now, there are two types of creating a column:
- Site level (higher)
- Library (or list) level (more granular)
In most of my guides, like when I explained what a SharePoint list is, the usual type I mention is creating a column in the library or list level.
Although you can still create a column at the library level, I recommend that you do it at the site level so you can reuse the columns in other sites and libraries.
For example, you may create another document library where you will use the same metadata columns (this way, you don’t need to create another column).
To create a metadata column at the site level, follow these steps:
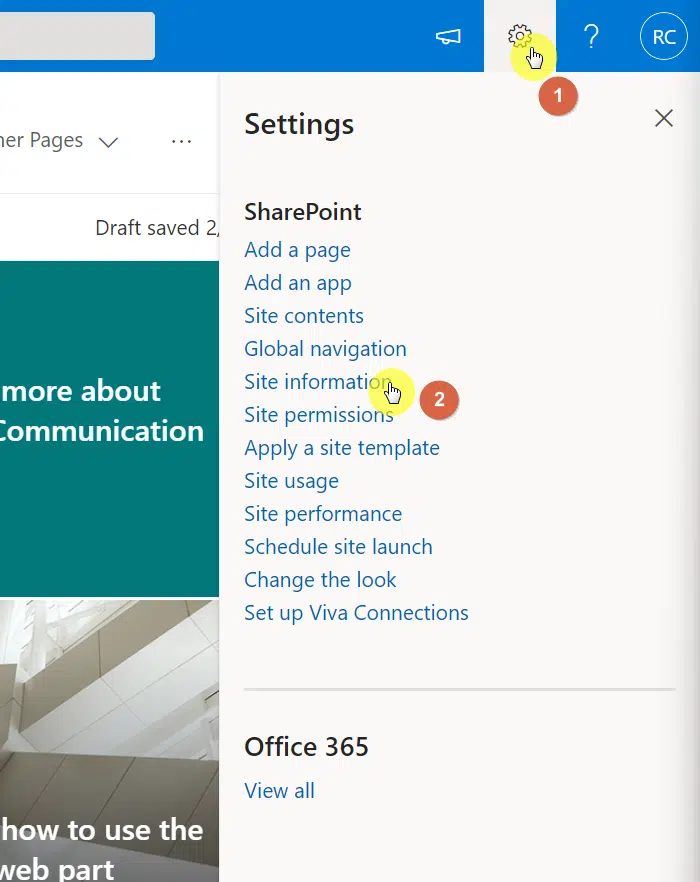
- Navigate to your SharePoint site
- Click the gear icon in the upper-right corner
- Select “Site information” from the settings
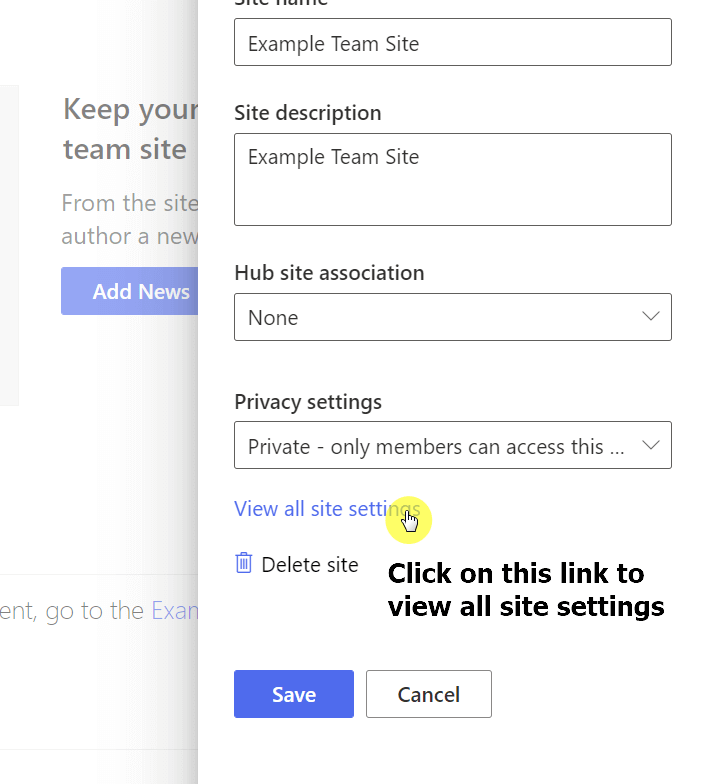
On the next panel, click the “View all site settings” link:
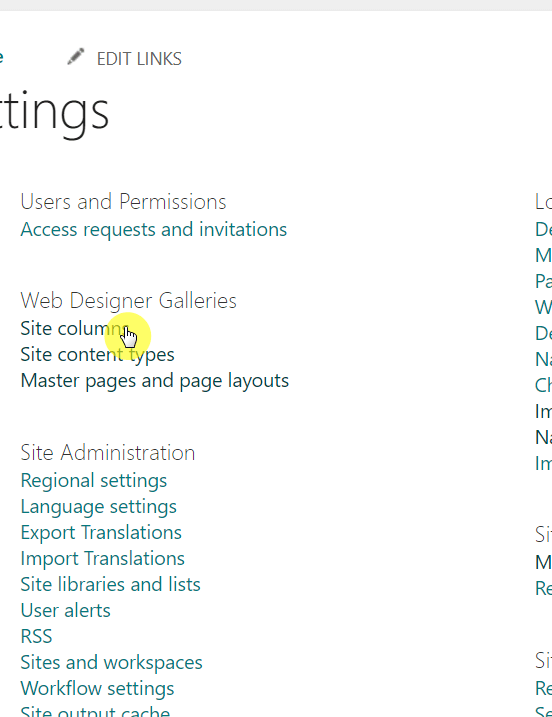
On the site settings page:
- Find the settings for web designer galleries
- Click the “Site columns” link from there
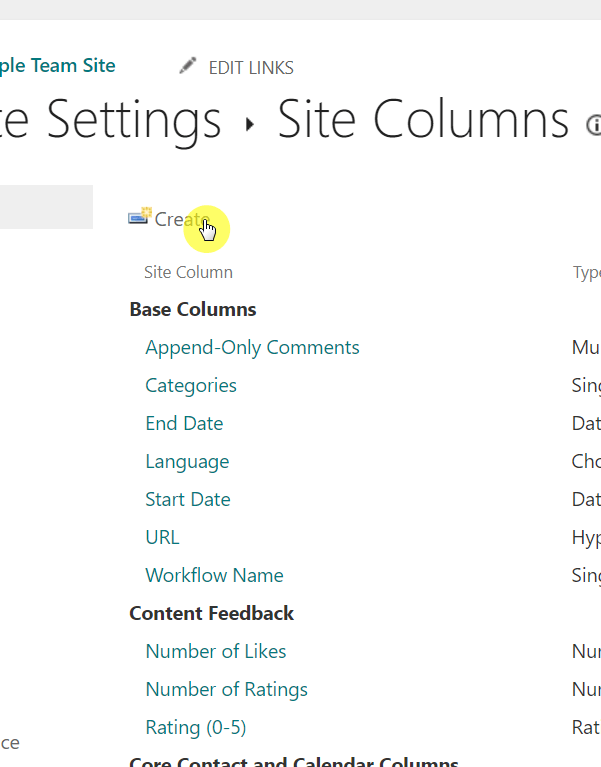
Click the “Create” button near the upper-left corner of the page:
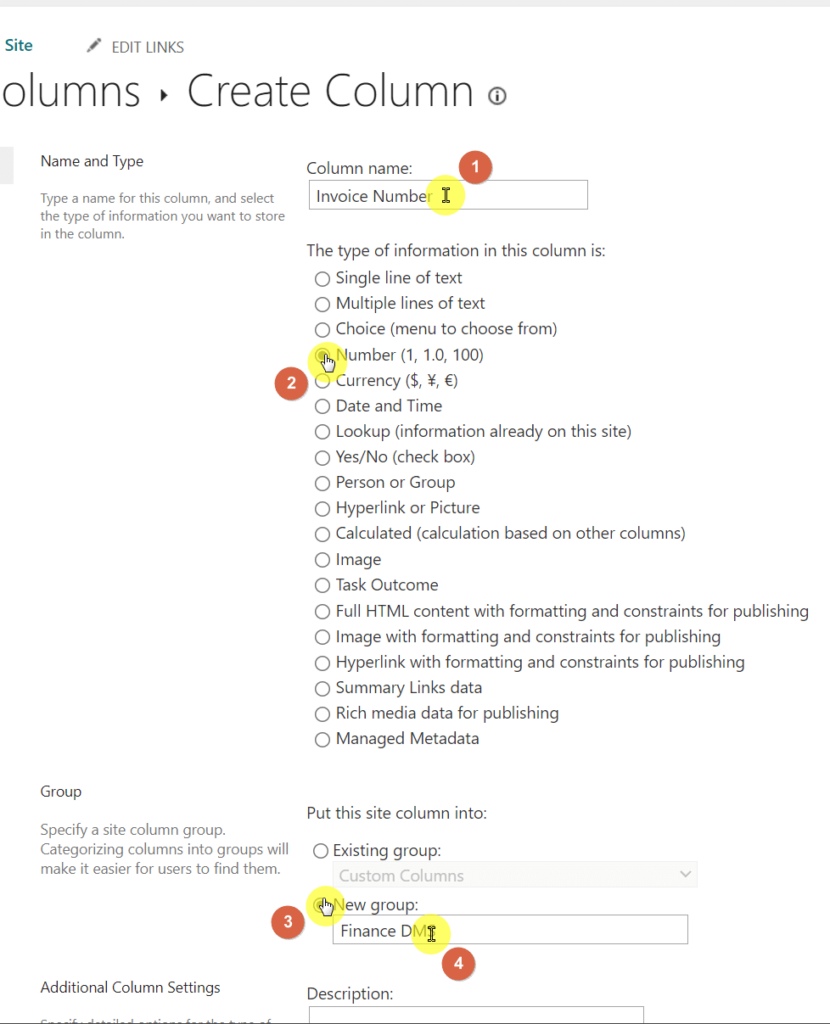
On the next page:
- Complete the required information (like name and column type)
- Indicate where you want to save the new column
- Click the “OK” button at the bottom
When choosing a location where to save the new column, I recommend creating a new group so you will have an easier time finding the columns you will need later on.
There are also other settings near the bottom like requiring the column to contain information, default value, etc.
Since different columns will have different custom settings, make sure to configure them according to what your organization needs.
From here, all you need to do is repeat the steps and create a new column for each metadata you indicated earlier.
Step 4: Create the content types for your documents
Now that the metadata columns are created, it’s time that you add them to a “content type”.
Basically, a content type is a collection of metadata columns or metadata properties that you can use throughout the site.
Note: For more information on content types, check out my beginner’s guide to content types in SharePoint Online.
Follow the steps below on how to create content types:
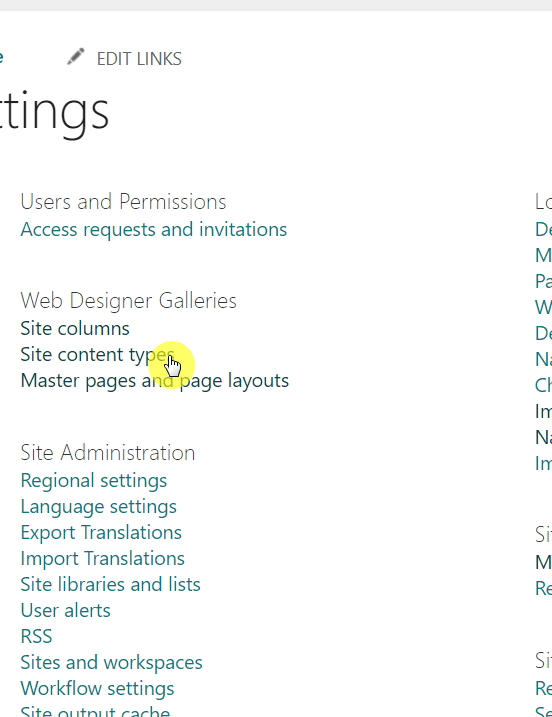
- Navigate back to the site settings page
- Click the “Site content types” option
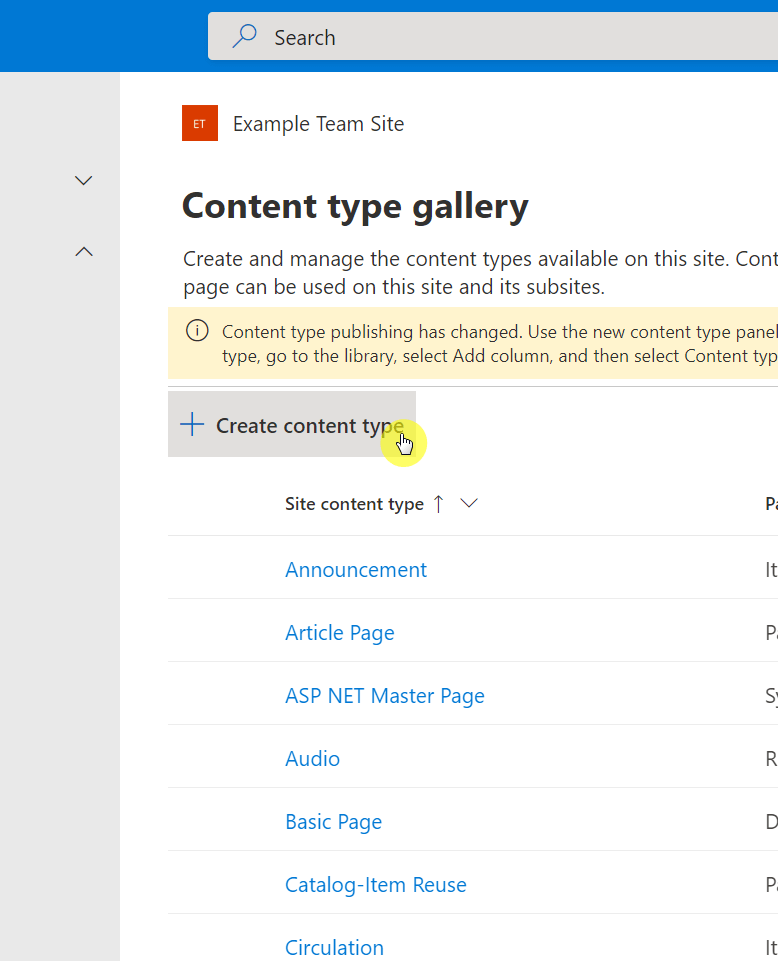
You will then arrive at the content type gallery where you can create and manage content types available on the site.
Click the “Create content type” button to proceed:
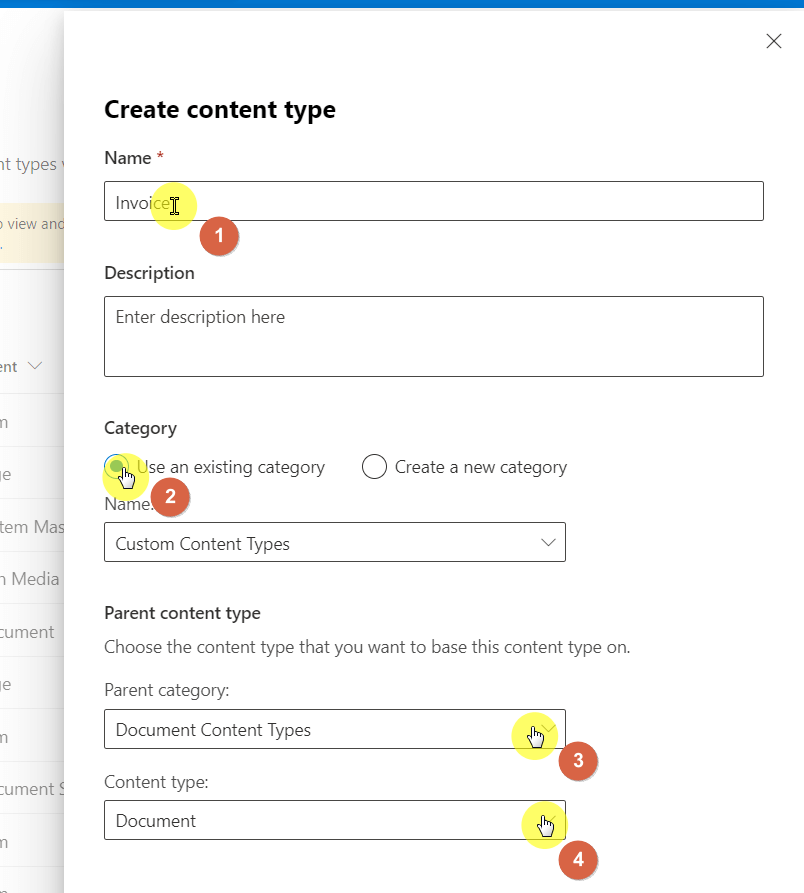
When you click the create button, a panel will slide in from the right side. This is where you can define the content type.
Let’s take this part a little slow here:
- Enter the name of the content type
- Leave the category as it is
- Choose “Document Content Types” in the parent category
- Select “Document” in the content type field
- Click the “Create” button once you’re done
The parent category and content type fields basically tell the system that the custom type is for managing digital files and documents in a library.
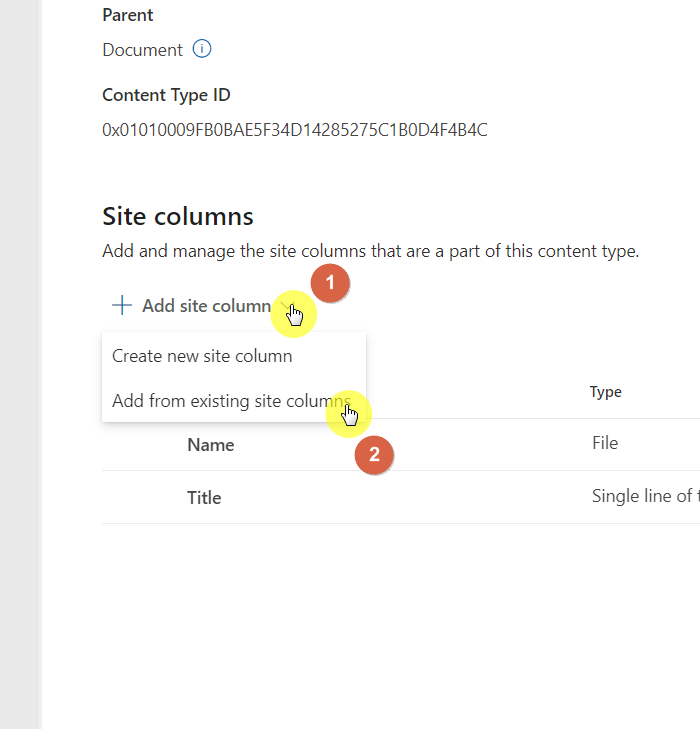
On the next page, you will see more details about the content type you just created. This is also where you can add site columns.
Follow these steps:
- Click the “Add site column” button
- Select the “Add from existing site columns” option
Remember the metadata columns you created earlier? It’s now time to add them to the content types you created.
Follow these steps:
- Filter the site columns to find your columns
- Select a column to add (check step #2)
- Click the right angle bracket
- Do it for all the columns to add
- Click the “Save” button at the bottom

Right after that, the site columns section will refresh and will now show all the recently added metadata columns.
Repeat the steps earlier for all the content types (for example, adding the estimate and receipt content types and their respective columns).
Related: How to Create a Global Content Type in SharePoint Online
Step 5: Create the document library with content type management
The next step now is to create a document library where you can manage all the documents with the metadata you prepared.
Note: You can actually skip this first part due to recent updates. However, I recommend that you go through it to know where to find the setting for this.
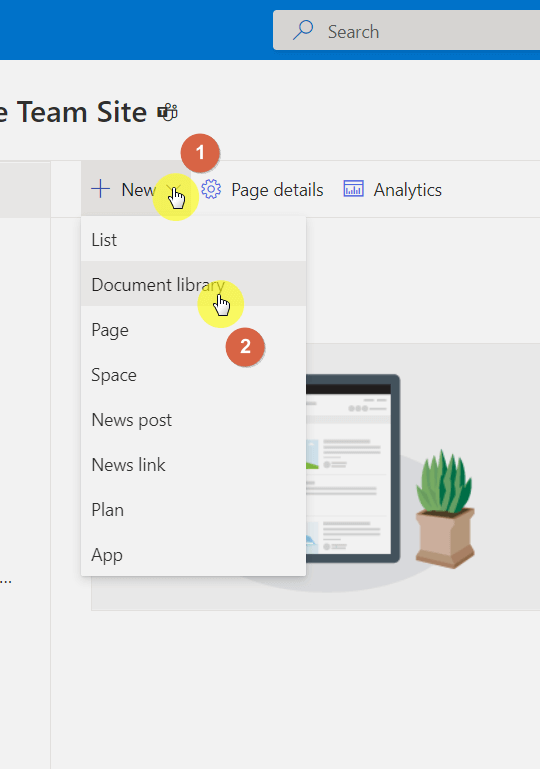
Follow these steps:
- Navigate to the site where you want to create the library
- Click the “New” button in the command bar
- Select the “Document library” option from the list
After creating the document library, there are things you need to set up first to enable the document management system or SharePoint DMS.
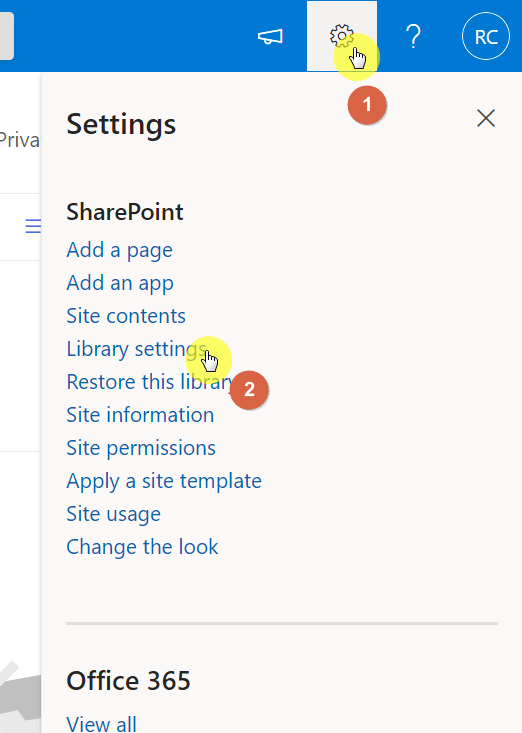
The first one is enabling the management of content types:
- Make sure you’re inside the new document library
- Click the gear icon on the upper-right corner of the page
- Select the “Library settings” option from the list
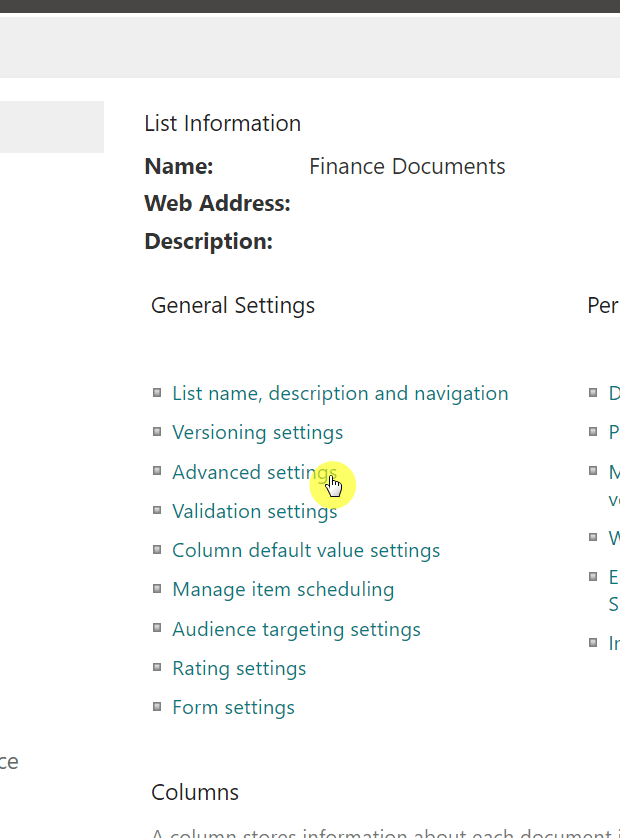
On the next page, you will see all the settings that you can manage for that document library.
Click the “Advanced settings” link under general settings:
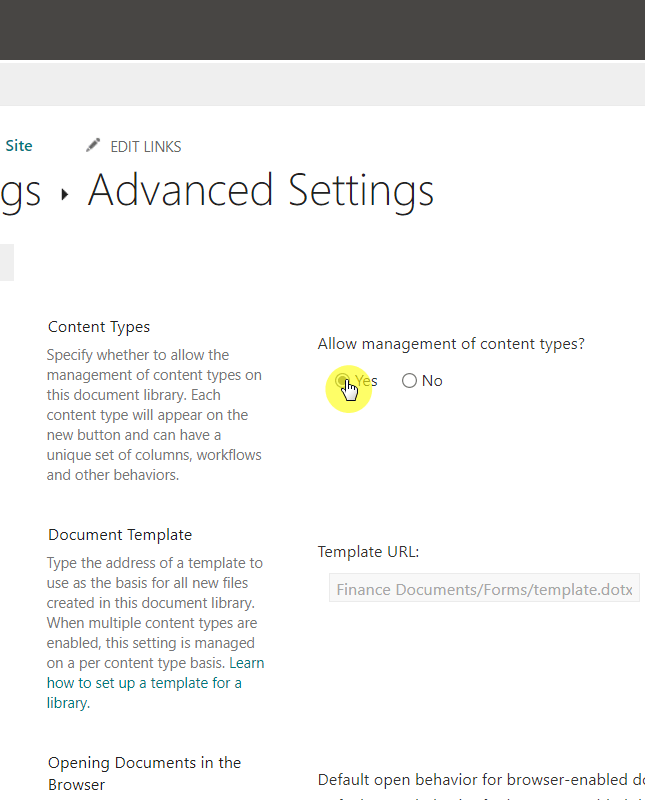
On the advanced settings page:
- Find the “Content Types” setting
- Click the “Yes” button for that setting
- Click the “OK” button at the bottom of the page
Note: Recent updates enable you to automatically add a content type to the document library without manually allowing content type management.
However, keep this as a practice so you will know at least where the legacy settings can be found in case another update comes in the future.
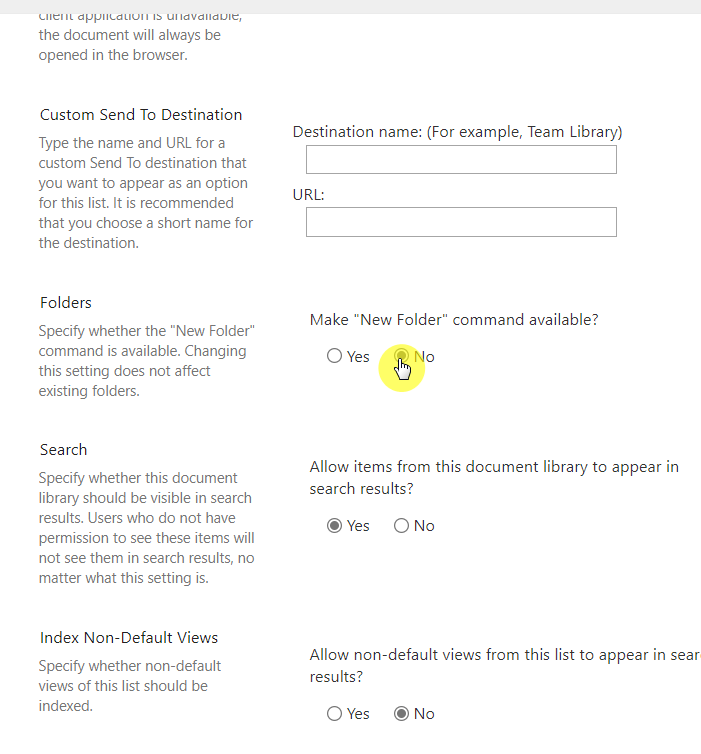
While you’re on the advanced settings page:
You may want to disable the “New Folder” feature to avoid having users incorrectly or accidentally create a new folder in the document library:
- Scroll near the middle
- Find the “Folders” setting
- Change the option to “No”
- Click the “OK” button once again
Step 6: Add the custom content types to the document library
Earlier in step #5, I indicated that recent updates in SharePoint made it “unnecessary” to manually enable content type management.
That’s because you can now readily add existing content types to the document library:
- Navigate back to the front of the library
- Click the “Add column” button in the document library
- Select the “Content type” option on the bottom

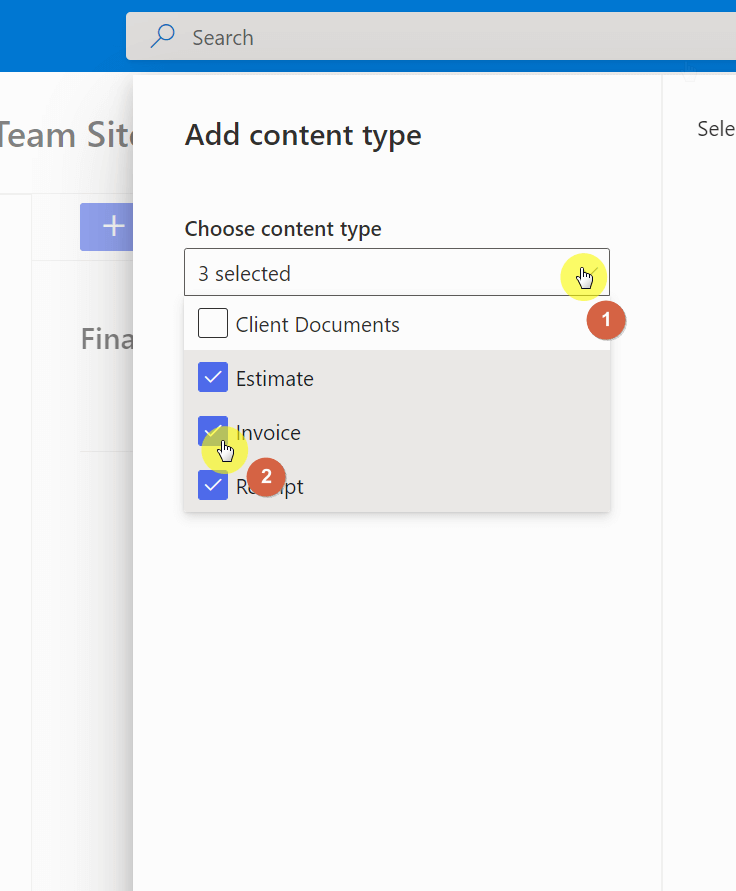
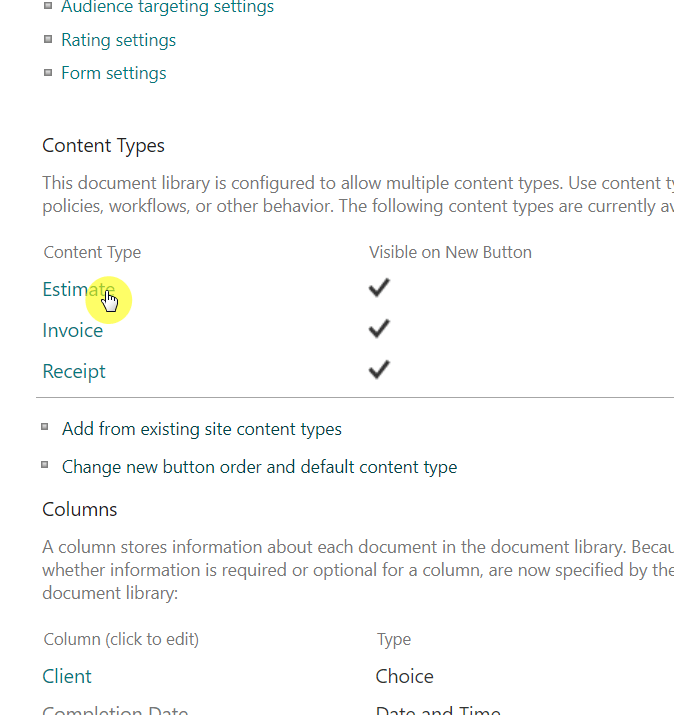
From the panel on the right:
- Open the content type dropdown
- Select all the content types to add to the library
- Click the “Apply” button at the bottom
The system will then notify you that the content types are now added to the document library.
At this point, you may not actually see any difference in the document library — not until you upload a document.
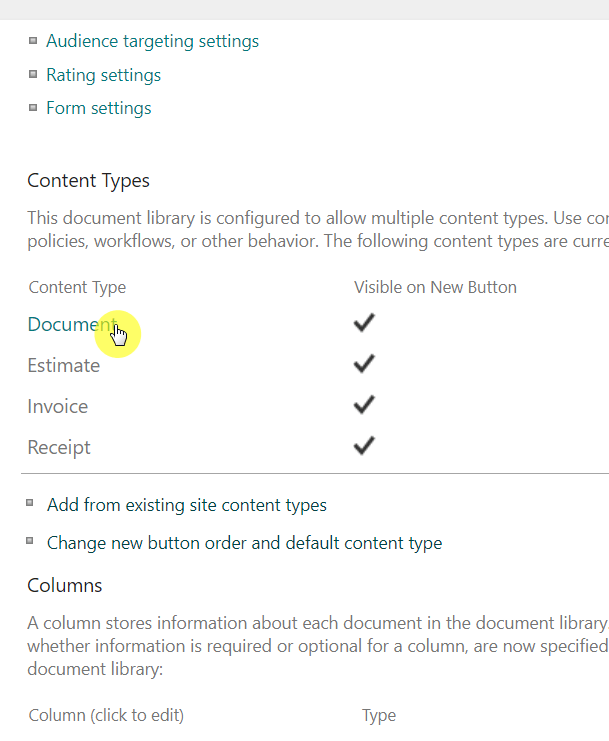
But before that, it will be worth it to delete the default content type in the library:
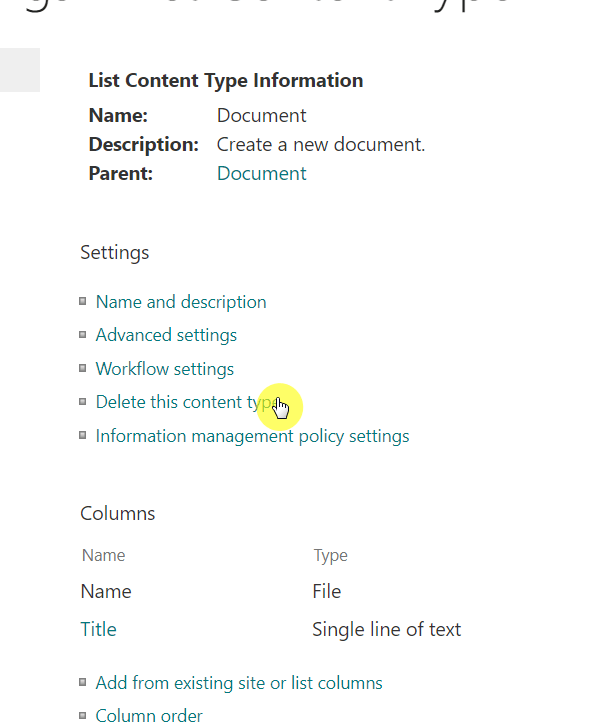
- Navigate back to the library settings page
- Click the “Document” content type
On the next page, click the “Delete this content type” link:
Another thing to do is to hide the title column in all content types since you don’t need it anymore (the name column will suffice).
Here are the steps:
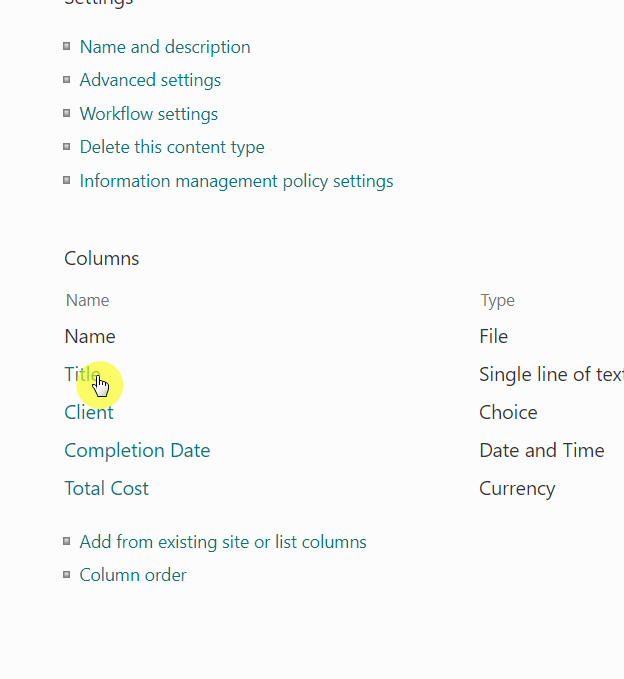
- Navigate back to the library settings
- Select a content type to start with
On the bottom, you will see all the columns in the content type, including the default title column that’s present in all content types.
Click its name first to configure it:
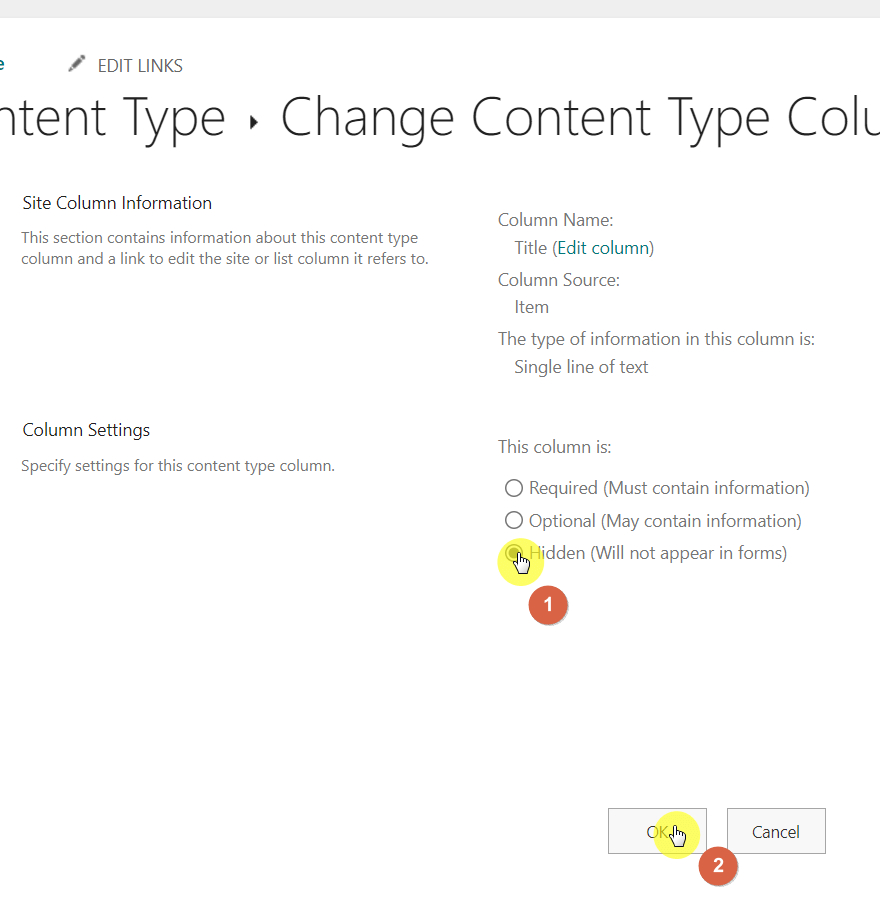
On the next page:
- Select the “Hidden” option in the settings
- Click the “OK” button
Do the same to all the content types you have in the document library.
Now, when you upload a document, you will be able to tag it with the appropriate metadata in the information panel:
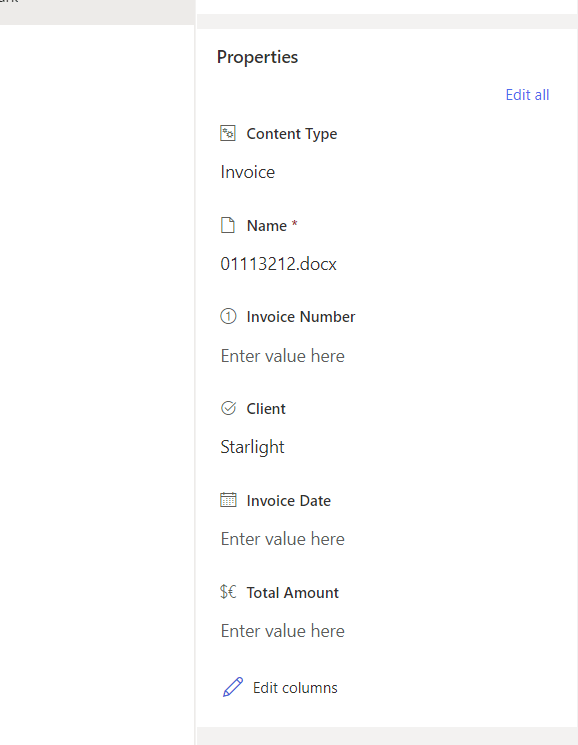
The modern experience comes with filtering and viewing options by default.
However, there is one feature that is strangely deactivated by default that will allow you to filter the library with metadata.
Note: This step is not really necessary. But this will put a nice touch on the library and make it easy to use for your users.
Follow these steps:
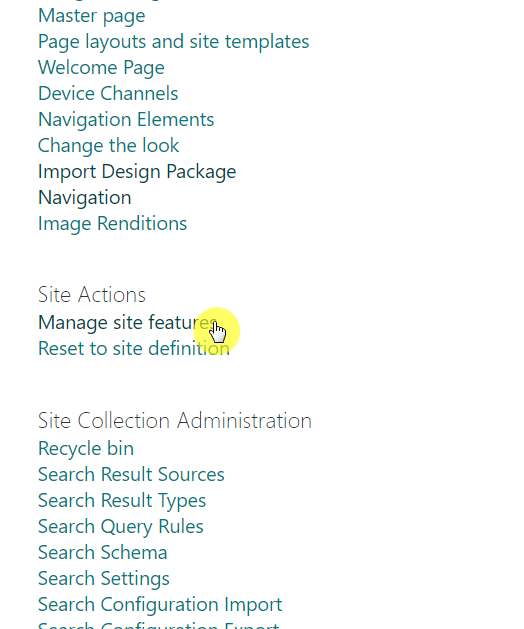
- Navigate to the site settings page (check step #1)
- Find and click “Manage site features” on site actions
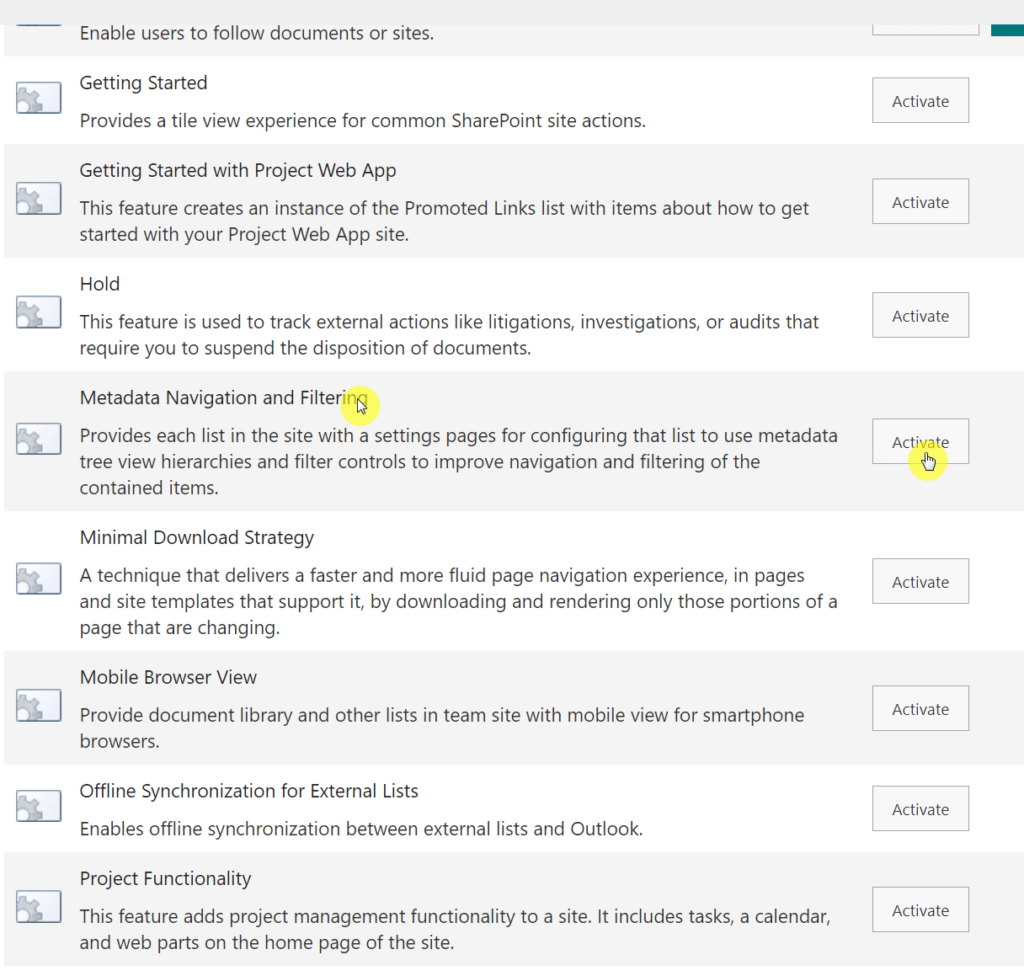
On the next page:
- Find the “Metadata Navigation and Filter” setting
- Click the “Activate” button to enable it
Now that the metadata navigation and filter feature is activated:
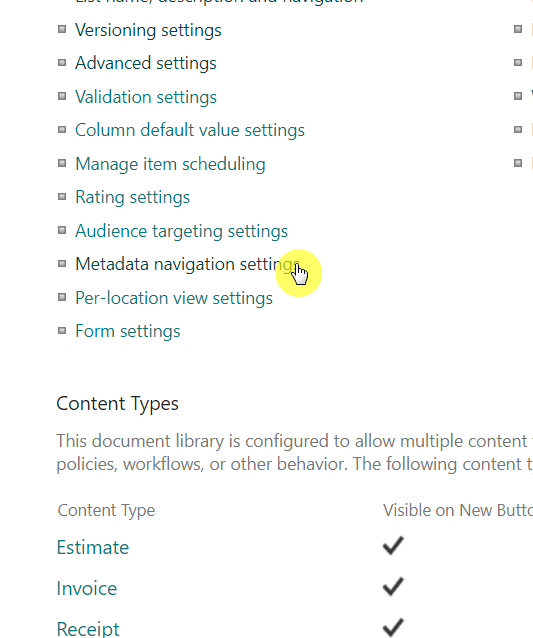
- Navigate back to the library settings page (check step #5)
- Click the newly added “Metadata navigation settings” option
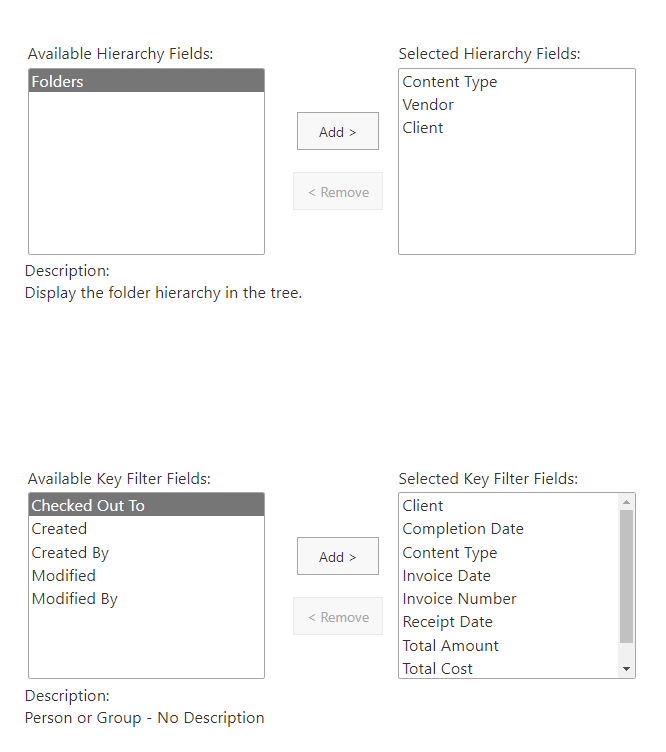
On the next page:
- Configure the hierarchy fields and key filter fields
- Click the “OK” button to finish up
When you go back to the document library and enable the filter panel, you will now see filtering options for specific metadata:

Nice! Even if you have thousands of documents here, you will be able to find specific ones according to metadata.
As you can see, you can create a document management system in Microsoft SharePoint using the system’s in-built features.
Through it, you will be able to track and manage the documents and even continue customizing them according to your organization’s needs.
By the way, were you confused anywhere in the article? Share your questions or thoughts in the comment section.
For inquiries and other concerns, please use the site’s contact form and I’ll get back to you as soon as possible.


Hi Ryan,
Thank you for this comprehensive Tutorial.
Even though it isn’t shown in Site Column > Name and Type, the Number format includes a comma by default.
My Invoice Number 11051 was displayed as “11,051”.
Is it possible to remove the comma?
Thank you
Hi Katherine,
If you are using a Modern List or Library, then you can edit the Number column and set the “Use thousands separator” flag to off. See attached image:
Hi Ryan, Thank you for your rapid response. Having used Excel, I looked for that, but the option to use/not use a thousands separator wasn’t available. In the bottom left corner of some screens is a note/button/link: Return to classic SharePoint, so I’d assumed it’s Modern. Having said that, we’re in a Shared Tenancy, which I’m led to believe makes a difference to how SharePoint behaves. I’m new to this, so I don’t know what to expect. I used a JSON script I found on the Web, and that removed the comma. Having fixed that problem, I found that some… Read more »
Wow…this article came at the perfect time. You have made creating a DocMan System in SharePoint less intimidating.
Thank you!
Thank you for the kind words! I’m glad this blog post could help.
how to setup sharepoint document library
If you plan to update this excellent guide I will suggest that the site columns and content types should be created in the Content Type gallery. This will future proof the solution and ensure that it can “live” on multiple site collections