
Last Updated on November 22, 2024
Want to make a site public?
In this guide, I will show you how to easily make a site public, and what to do if the option isn’t there.
Let’s get started.
Table of Contents:
Private vs Public Sites
Private and public SharePoint Online sites serve different purposes.
For the basics, private sites are accessible only to approved members, while public sites can viewed by anyone with the link.
Here’s a quick breakdown of some of their differences:
- Public sites are ideal for sharing information widely
- Private sites are better for collaboration among specific teams or departments
- Content in public sites can appear in search results for all users
- Public sites may require more oversight
That means if you want to increase visibility and collaboration, you want to change the site to public.
It’s especially useful for content meant to be widely accessible, such as company policies and event announcements.
👉 Related: Microsoft 365 Groups: Public vs Private (Differences)
Sign up for exclusive updates, tips, and strategies
Limitations Based on Site Type
Unfortunately, not all SharePoint sites have the same flexibility when it comes to changing privacy settings.
Here are some limitations you might encounter:
- Communication sites don’t have an “easy” privacy option
- Changing the privacy settings of a hub site doesn’t automatically apply to associated sites
- Older SharePoint sites may lack the user-friendly interface to adjust privacy
- Public settings might still be limited if external sharing is disabled
Since we’re mostly using modern sites today, I will show you later what to do in case the privacy option isn’t available.
👉 Related: SharePoint 101: Types of Sites in SharePoint Online
Now let’s get to the main point:
Fortunately, making a SharePoint Online site public is straightforward in modern team sites.
For starters, click the gear icon in the top-right corner and then select “Site information”:
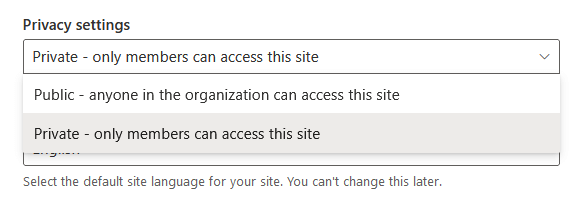
Under site information, you will see privacy settings near the bottom.
All you have to do here is change it to “Public”.
Like this:
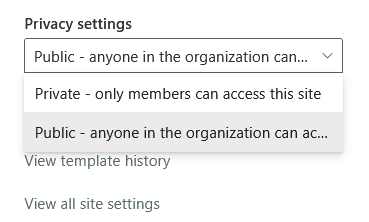
Click the save button to apply the new settings.
Keep in mind that converting to a public site doesn’t override permissions for sensitive files.
By the way, if your organization has restrictions in place, you may need to consult the SharePoint admin.
Also, public sites should still be monitored for appropriate content and user activity to maintain compliance with company policies.
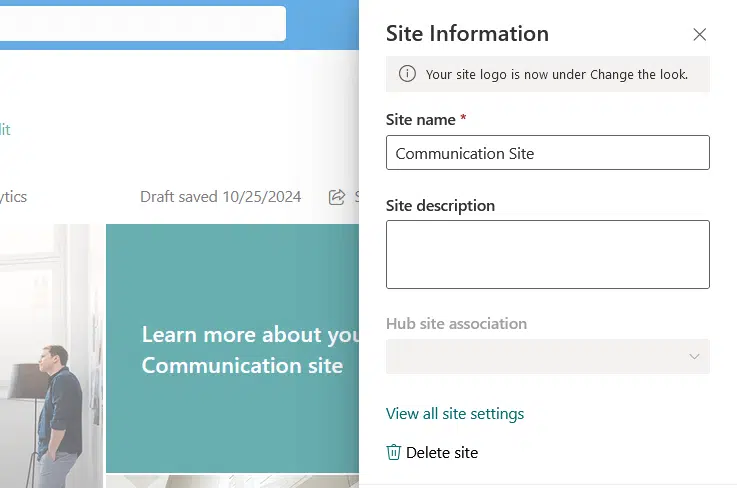
What to Do With Communication Sites
As you may know, communication sites are designed to share information broadly within your organization.
But the problem is that, if you visit the site information page, you will not see any privacy settings:
On the other hand, communication sites aren’t typically private by default (or how would people read the news).
But you need to manually share it with people.
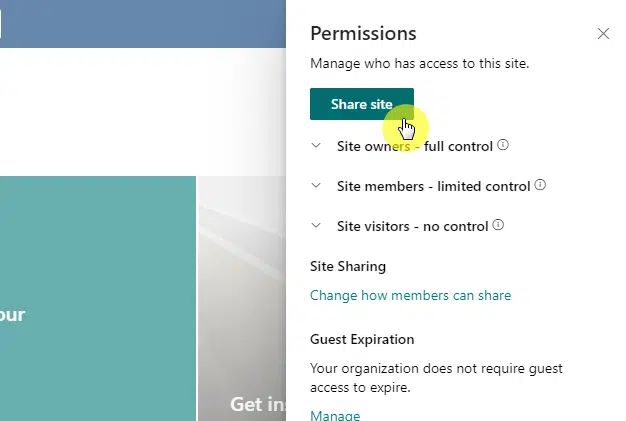
The easiest way to do that is through the gear icon > site permissions:
You will arrive at a page where you can see all the site owners, site members, and site visitors.
To share the site, click the “Share site” button:
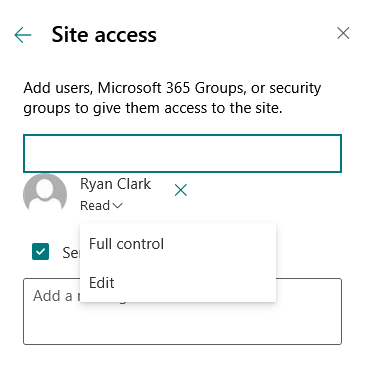
From there, you would be able to enter the names of the users or groups you want to add to the site.
You can also specify the permissions of these users or groups, and include a message as well for the changes.
Here’s what it looks like:
Nice!
That will then add those people to the site with the permission that you specified.
Do you have any questions about how to make a SharePoint site public? Let me know below.
For any business-related queries or concerns, contact me through the contact form. I always reply. 🙂


