

Last Updated on June 29, 2023
Do you need to copy files and folders to another SharePoint site in the tenant?
With the modern experience in SharePoint Online, it’s never been easier to do that. I will explain that step-by-step here.
I’ll get started.
Table of Contents:
Do you need special permissions or roles?
Not everyone in the SharePoint environment will be able to move files.
Take note of the following:
- There won’t be any problem at all if you’re a site owner or you have full control permissions on both source and destination sites.
- For the source site, you need to have at least the edit permission level to be able to move or copy files and folders.
- For the destination site, you need to have at least the contribute permission level to be able to add files.
- If you’re moving files shared with you, you need to have the necessary permissions to move those files.
These are the basics. But it can vary depending on your organization’s setup and policies.
Always check with your SharePoint administrator if you’re unsure about the permissions.
Related: SharePoint Permissions Explained: How Permission Levels Work
Sign up for exclusive updates, tips, and strategies
Step-by-step guide on moving files and folders
Moving and copying files and folders in SharePoint Online (within the tenant) is now easy with the modern experience.
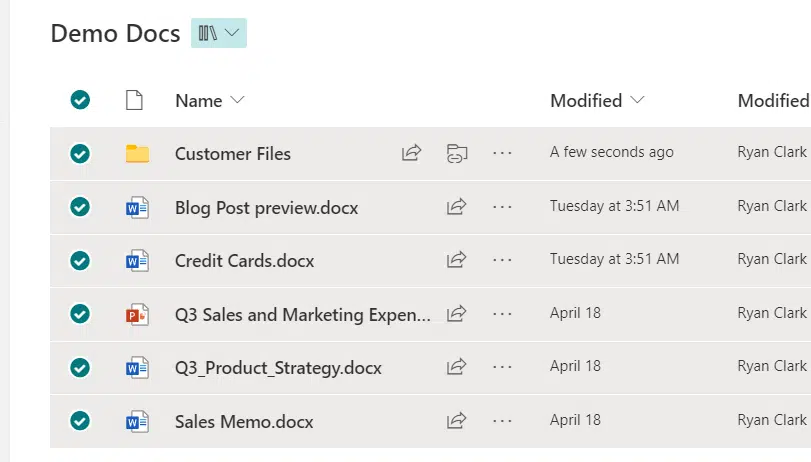
The first step is to visit the source site and navigate towards the source document library.
Once there, select the files and folders you want to move to another SharePoint site in the tenant:
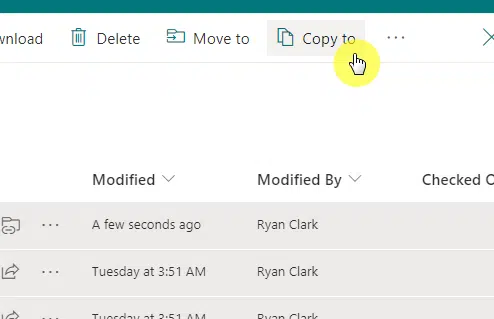
Step #2: Copy the files (instead of move)
If there are only a few files, this might not be too much of a risk.
But my reason for suggesting copying the files instead of moving them is so that you have a backup in case something goes wrong.
You can click the copy to button from the command bar (or do a right-click and then copy to):
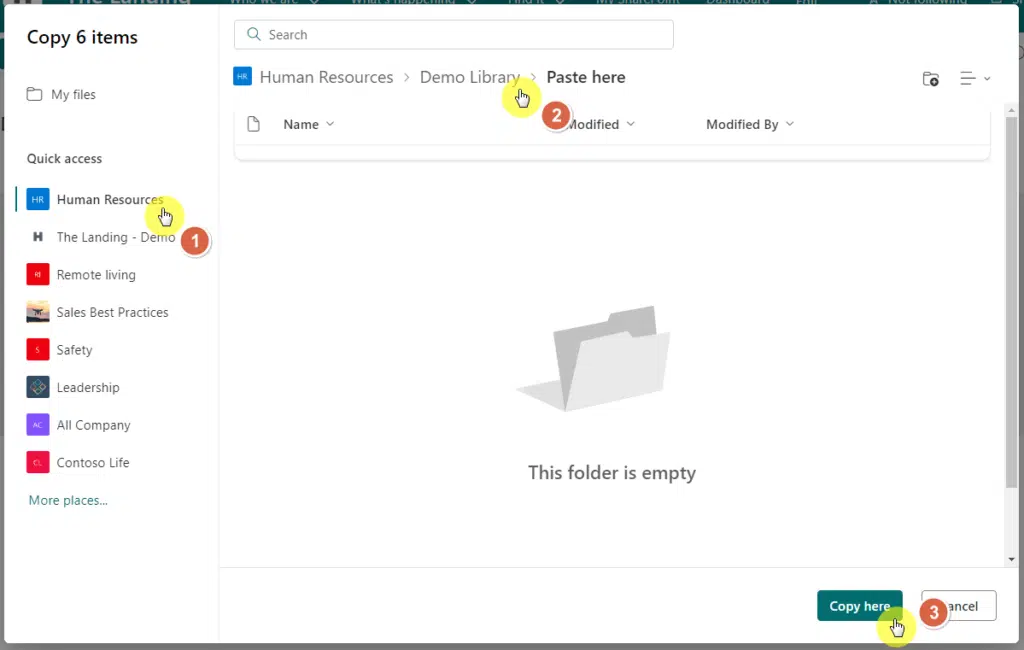
Step #3: Select the destination document library
After clicking the copy to button, a small window will appear where you can select the destination.
Then, follow these steps:
- Select the destination site (click more places if the site isn’t there)
- Then the destination document library
- If you want to put the copied folder and files into a folder, select the destination folder
- Click the copy here button
How to solve common issues that may arise
It’s possible that you will run into problems when doing the operation.
Here is a table that explains the common issues and their fixes:
| Issue | Fix |
|---|---|
| File with the same name already exists | Opt to overwrite the file if that’s what you intend to do, or rename the file you’re moving to avoid a name collision. |
| Destination document library does not have the same custom metadata as the source | Ensure that the source and destination libraries have the same metadata schema. Be careful with files that were stored in a library with metadata columns with the same name as the library you’re uploading the file to. |
| Unknown error code for blocking objects from copy/move | Use the SharePoint migration tool or a product like ShareGate for larger amounts of data. The SharePoint Online “move to/copy to” feature may not work reliably for moving more than about 25 files/folders at once. Move also won’t work if the records management is enabled at the source document library. |
| File is locked for editing or has been modified or deleted | Use the SharePoint migration tool or a product like ShareGate for larger amounts of data. The SharePoint Online “move to/copy to” feature may not work reliably for moving more than about 25 files/folders at once. |
Alternative: Use Power Automate
Microsoft Power Automate is an alternative solution to move files easily between document libraries from different site collections.
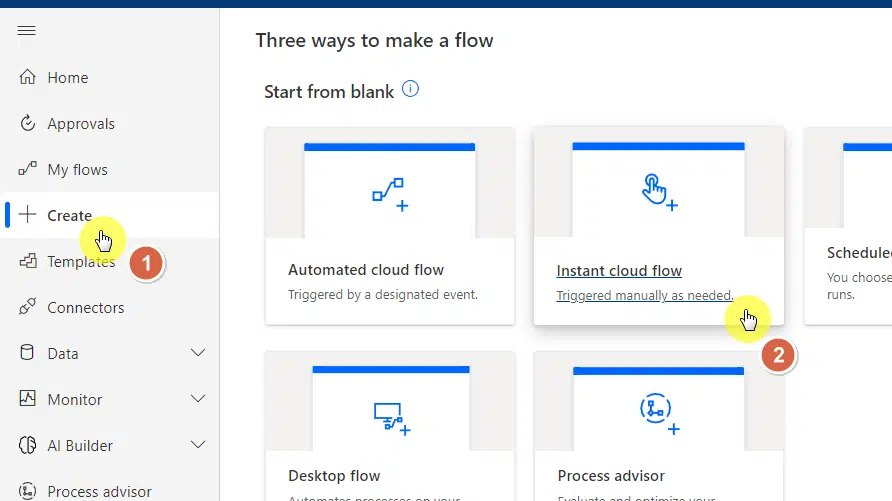
Navigate to Microsoft Power Automate and follow these steps:
- Click the create tab from the left panel
- Click the instant cloud flow button
You can choose to name the flow, though it’s only optional.
What’s important is that you click the manually trigger a flow option below the name field and click the create button:

Related: Key Benefits of Power Automate for Modern Businesses
Click the +new step button on the next page and then do the following:
- Enter copy folder in the search field
- Click the copy folder option
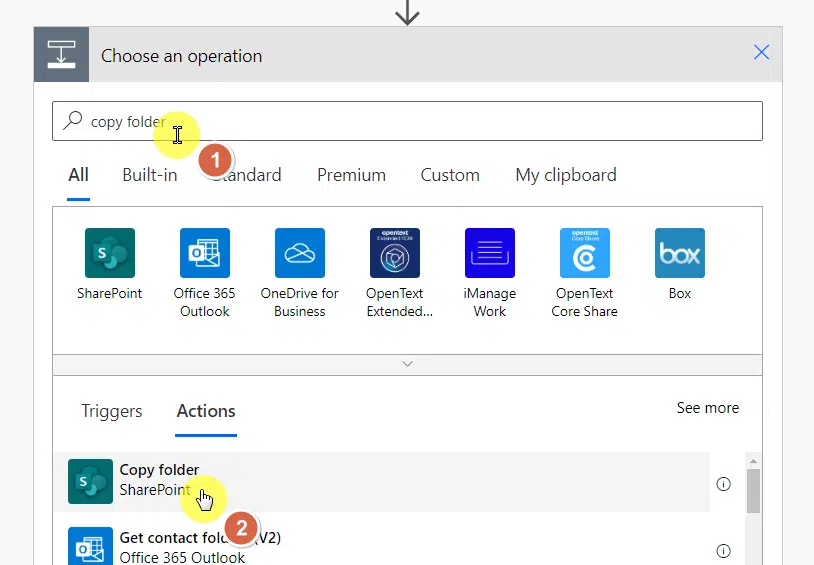
The box will change into the copy folder operation.
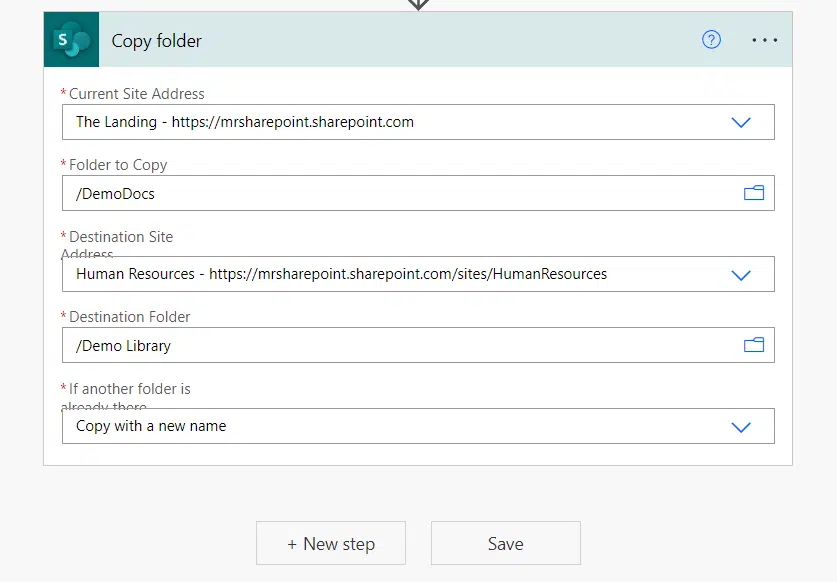
Fill out the following:
- Current site address: The source site (click the dropdown for the choices)
- Folder to copy: Location of the folder (click the folder for the choices)
- Destination site address: The target site
- Destination folder: The destination location
- If another folder is already there: Select from the dropdown choices
Click the save button once you’re done:
If you run the flow, you will be able to monitor the flow and see the current status and the details of the flow.
It’s a great option for transferring a large number of files from a SharePoint document library to another on a different site.
Were you able to successfully copy those files and folders? If you have questions, drop them in the comments.
For business inquiries and questions, kindly fill out the form here and I will get back to you asap.


Hello Ryan,
how can I select (move) all subfolders within Document Library?
Hi,
I am running into permission problems when running this flow. What seeting would be required on either site