

Last Updated on October 24, 2022
Do you need to set up some sort of approval workflow?
It’s worth considering if you have a lot of contributors for the content of your site as you may want to review each submission you get.
In this article, I’ll show you how to create an approval workflow for SharePoint using built-in features from Power Automate.
Let’s get started
Table of Contents:
What is Power Automate?
Microsoft Power Automate is an online workflow automation service that works across different apps and services.

Using this tool, you can create five basic flow types:
- Automated cloud flows
- Instant cloud flows
- Scheduled cloud flows
- Desktop flows
- Business process flows
There are also a lot of templates available — many of them being used with SharePoint.
Anyway, Power Automate will allow us to create a workflow without knowing how to code or doing any of that technical stuff.
Note: Power Automate used to be called Microsoft Flow. If you’re interested, you can read more about Power Automate in this article.
Sign up for exclusive updates, tips, and strategies
Creating an approval workflow for SharePoint pages is simple because there’s already a template and you only have to activate it.
Since approval workflow is usually associated with content — which means SharePoint pages — the template is only readily available in the site pages library.
This is helpful in cases like:
- You have a communication site to deliver news and announcements to the whole organization
- You have a human resources site or portal that employees regularly check for updates
In any case, follow these steps to create your own approval process in SharePoint:
- Click the gear icon on the upper-right side
- Click the option to go to the site contents
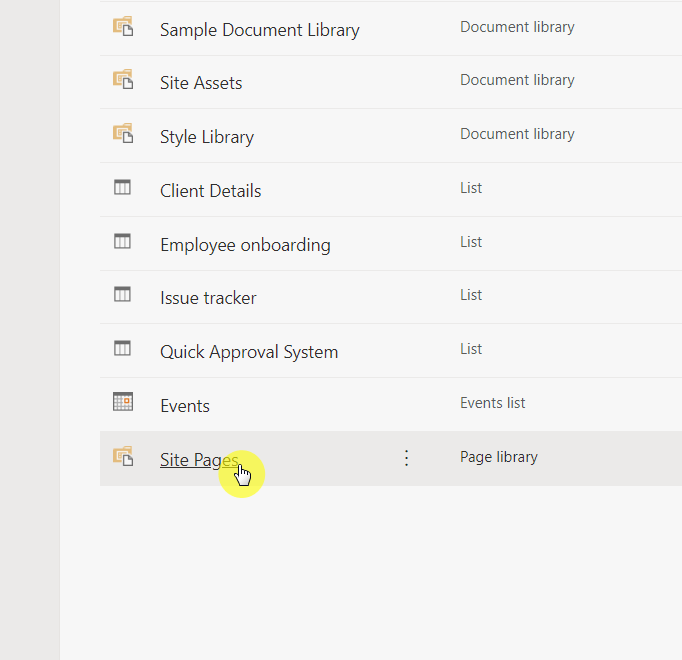
Find and go to the site pages library — where SharePoint pages are stored:
Once you’re in the site pages library, navigate through these buttons:
- Automate (command bar)
- Power Automate
- Configure page approval flow
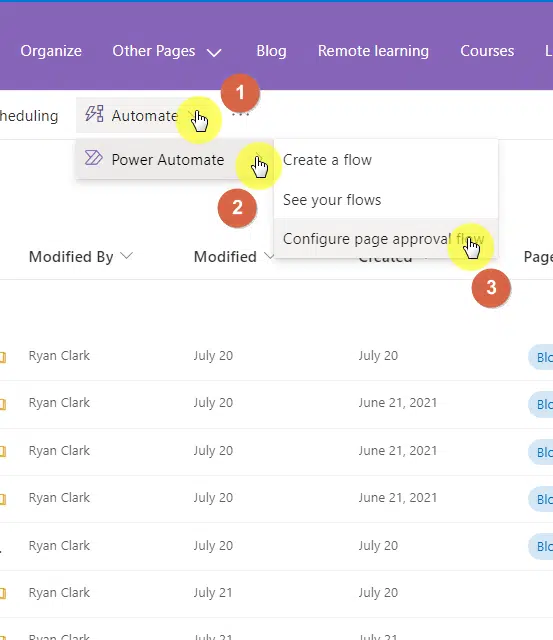
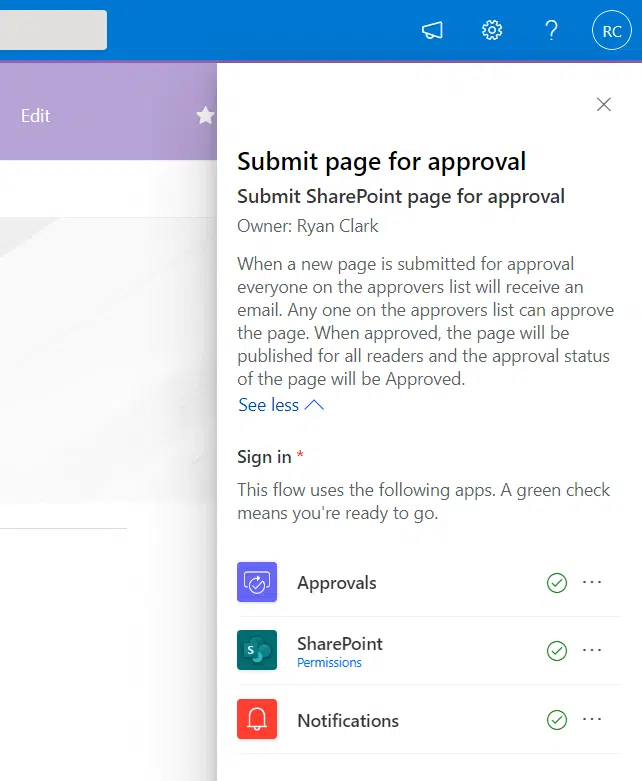
A right panel will slide in from the right side — click the create flow button:

In this next part, the system will use your credentials to sign in on the apps that will be used in the workflow.
If you don’t have the right license for these apps, then you will not be able to successfully create an approval process.
To proceed, click the continue button:

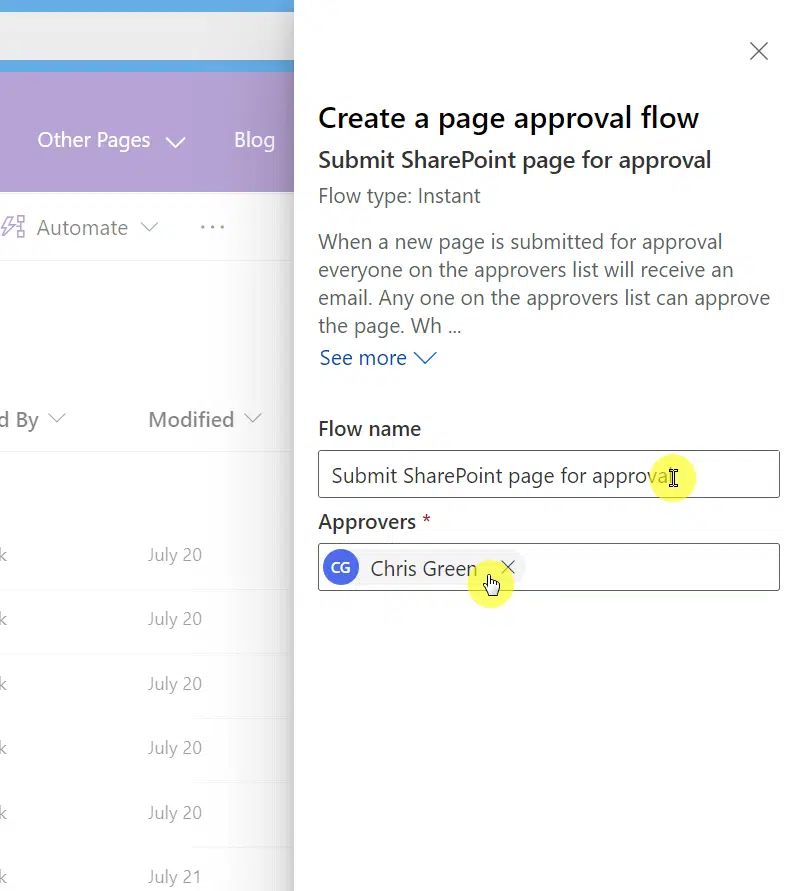
For the next steps:
- Enter a custom name for the flow (use the default one)
- Identify the approvers
- Click again the create button at the bottom
Congratulations! You now have a working approval request flow right inside your SharePoint site pages library.
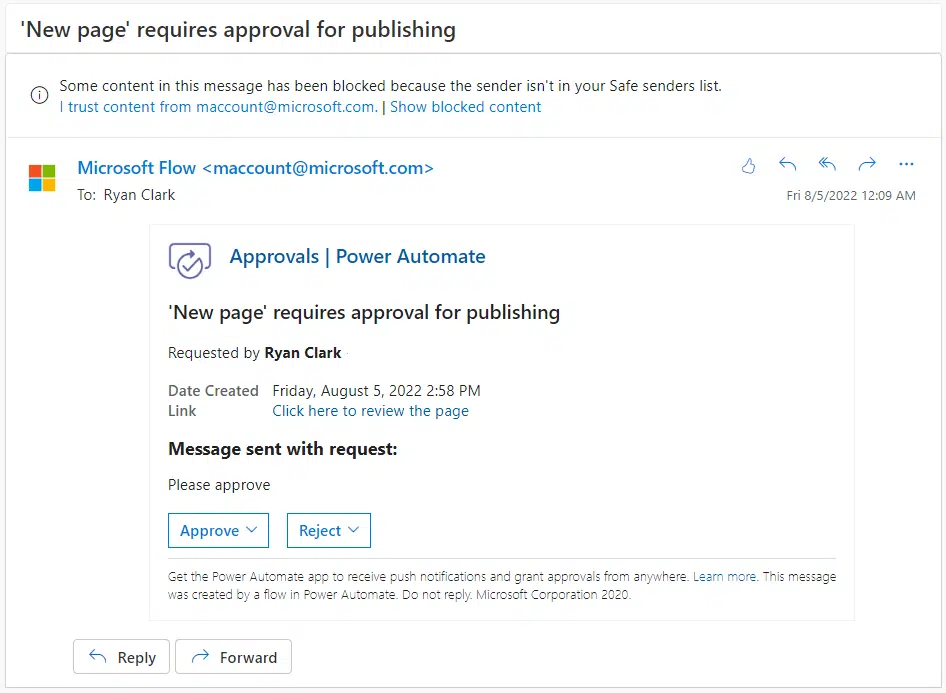
When someone submits a new page, everyone on the approver’s list will receive an email notification to either approve or reject the page.
Once approved, the system will publish the page automatically for all readers (while turning the status of the page to approved).
Note: For creating an approval flow with multiple approvers, check out this article: Microsoft Flow Approval: Multiple Approvers.
Here are the answers to common questions regarding this topic:
What does an approval process look like for a contributor?
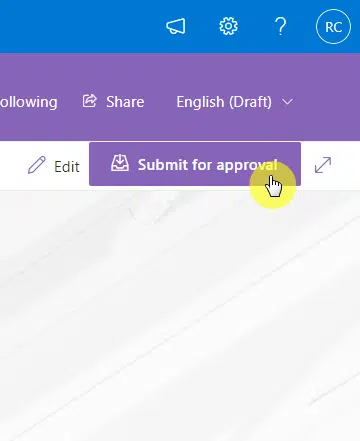
When someone creates a new page or edits the homepage, the publish button will be replaced by a submit for approval button instead:
A right panel will appear for submitting the page for approval — simply click the continue button at the bottom
On the next screen:
- Add a message to the approver
- Click the submit button at the bottom

After doing that, all that’s left is to wait for the approver to approve the page. The page’s status is also now pending until it’s approved.
But what if you’re on the receiving end of the flow?
Fortunately, it’s quite easy to approve or reject a request. There are at least three ways it can happen:
- Submitted page
- Power Automate Approvals
Right after a contributor submits a page, the system will send you an email where you can straight away approve or reject approval requests:
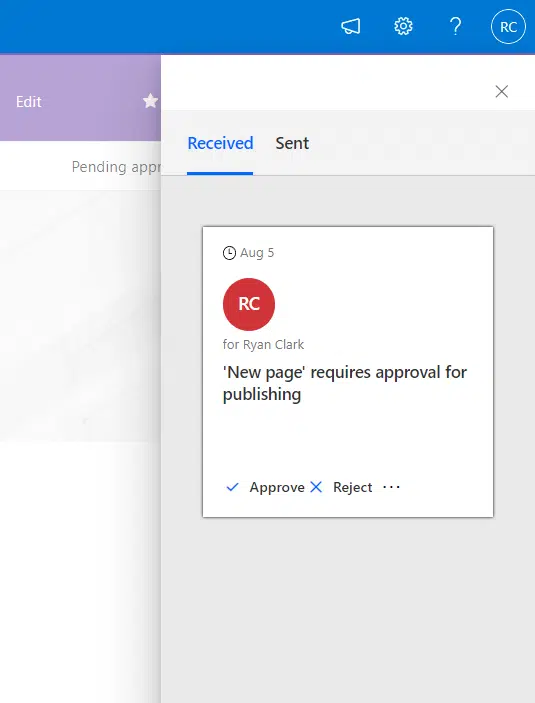
If you go to the submitted page, the publish button becomes review approvals — if you click on it, you will be able to approve/reject the request:
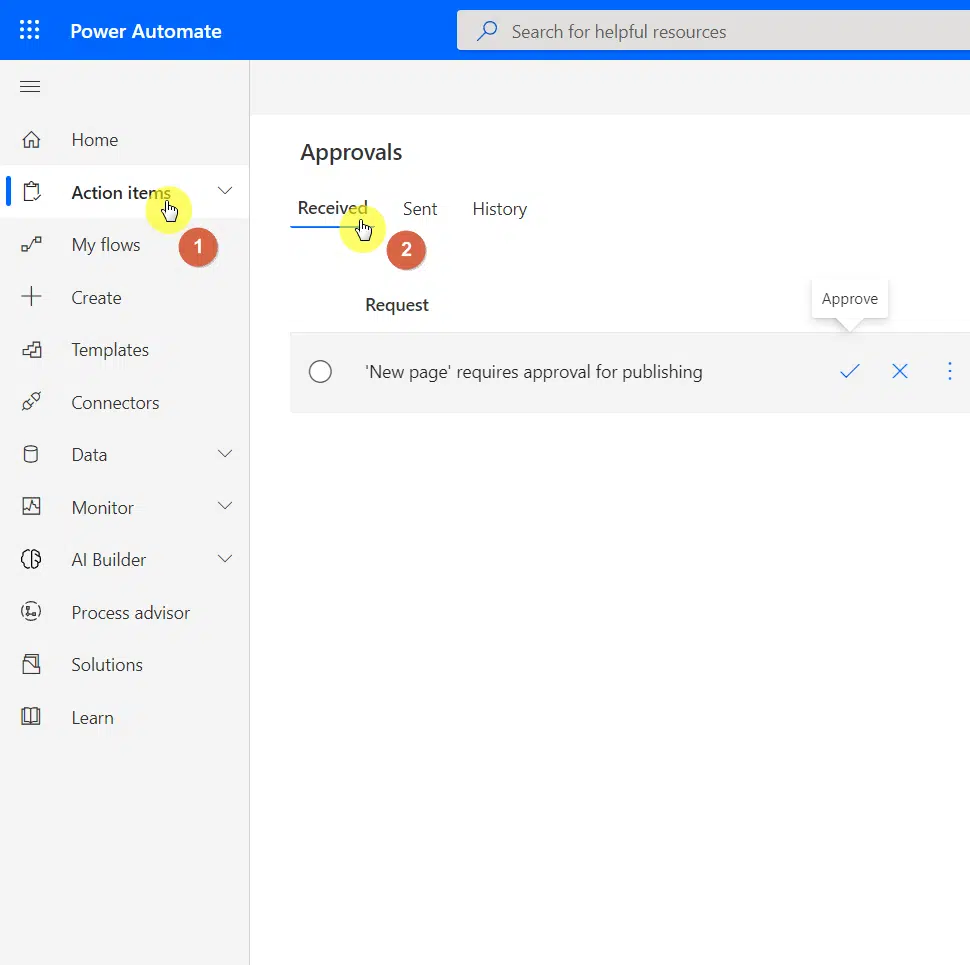
You can also approve requests from Power Automate itself:
- Go to the action items menu
- Navigate to the received tab
- Approve or reject requests through the check/x button
How to edit an existing approval workflow in Power Automate?
What if you need to add an approver?
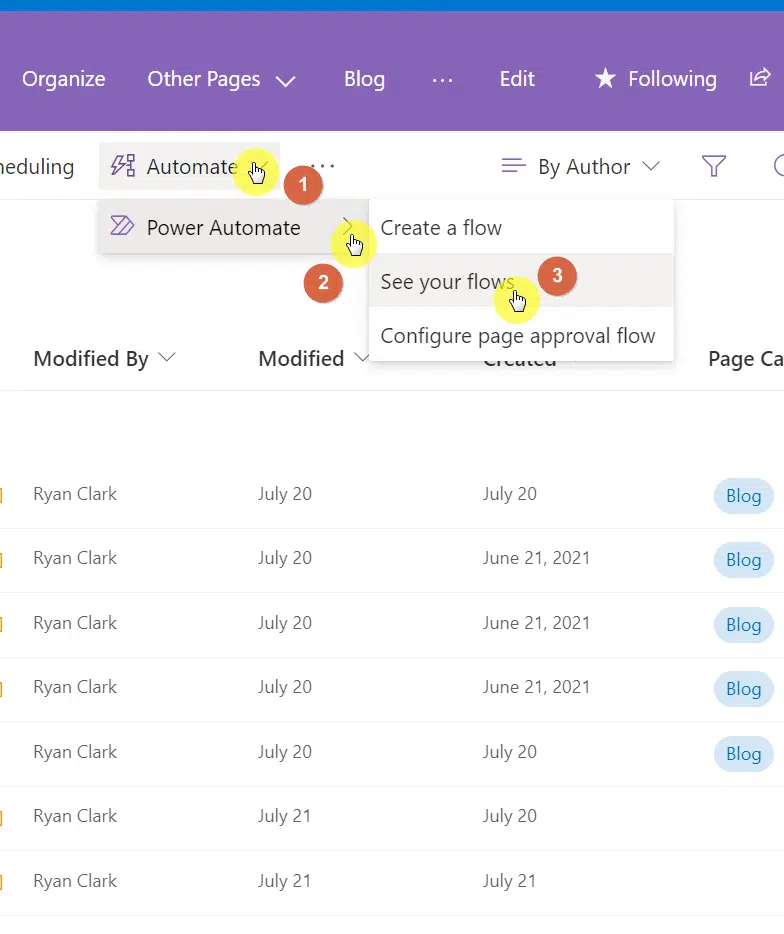
For that, you will need to get to the Power Automate app. There’s an easier way to do that from the site pages library:
- Automate (command bar)
- Power Automate
- See your flows
On the next screen:
- Hover your mouse over the target flow
- Click the pencil icon

Since the only sensible change that you will make here concerns the approvers, follow this flow to change/add a new person:
- Scope
- Start an approval
- Assigned to
All you have to do is enter the name of the new approver, click on his name, and save the changes you have made.
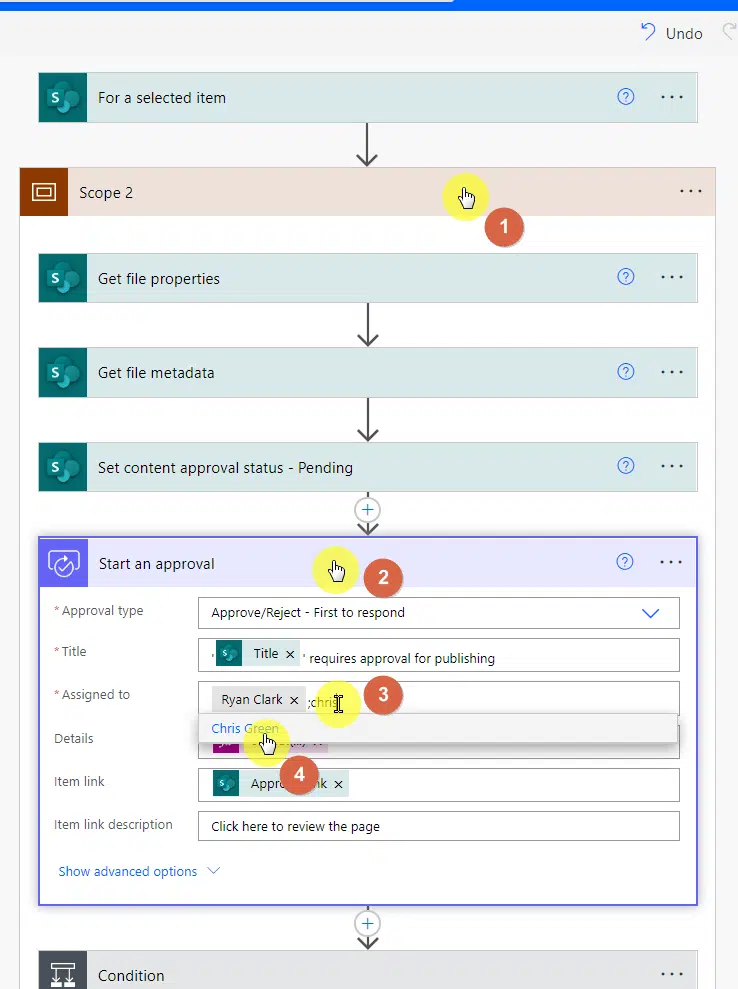
After saving the flow, the changes will take effect immediately.
Create an approval process easily using Power Automate
Using Power Automate, you can easily create an approval flow on the site pages library of your SharePoint site.
Any questions on how to create an approval flow in SharePoint Online? Simply share your thoughts in the comment section.
For inquiries and other concerns, kindly use the site’s contact form and I’ll get back to you as soon as possible.


