
Last Updated on January 5, 2024
Do you need to secure sensitive data in Microsoft 365?
In this guide, I will teach you about sensitivity labels in Microsoft 365, how to create labels, and how to use them.
Let’s get started.
Table of Contents:
What is sensitive data?
In general, sensitive data is confidential information that you protect from unauthorized access.
This includes the obvious ones like client or customer data (think bank accounts, social security numbers, and credit cards).
At the same time, this also covers classified data specific only to your business — like the source code of your app.
Sensitivity labels are all about protecting sensitive data. But you won’t be able to label those data unless you know what they are.
For that, you might have to create a data classification scheme. Use these guide questions when creating a scheme:
- What information do you deem important to keep?
- Where can you find that information?
- Who can access that information? (Or what kind of users can access that information)
- How do you use sensitive information or data?
- What level of protection do those data need?
Note: I talked more about identifying sensitive data in my Microsoft Teams security best practices guide.
Sign up for exclusive updates, tips, and strategies
What are Microsoft 365 sensitivity labels?
Basically, Microsoft 365 sensitivity labels are a way to classify and label your organization’s sensitive data.
With sensitivity labels, you can apply specific security measures to documents, emails, and other files that contain sensitive information.
Through sensitivity labels, you ensure that only the right people have access to the data they need, while also protecting it from unauthorized access.
Sensitivity labels can also be used to set up automated processes for applying security measures, such as encryption or watermarking.
By using MS sensitivity labels, organizations can easily manage their data security and compliance needs while still allowing users to work productively.
In summary, here are the things a sensitivity label can do:
- Encrypt files, emails, documents, and even meeting invites
- Add watermarks, headers, or footers to content in Office apps
- Protect content even those in containers like SharePoint sites and groups
- Apply a sensitivity label automatically to emails and files
- Enforce the default sharing link type for sites and documents
Related: Microsoft Compliance Center: Microsoft Purview Basic Guide
How to create sensitivity labels in Microsoft 365
With the basics of sensitivity labels out of the way, let’s get into the actual process of creating a sensitivity label.
Along the way, I will explain various important aspects of sensitivity labels:
1. Create the label
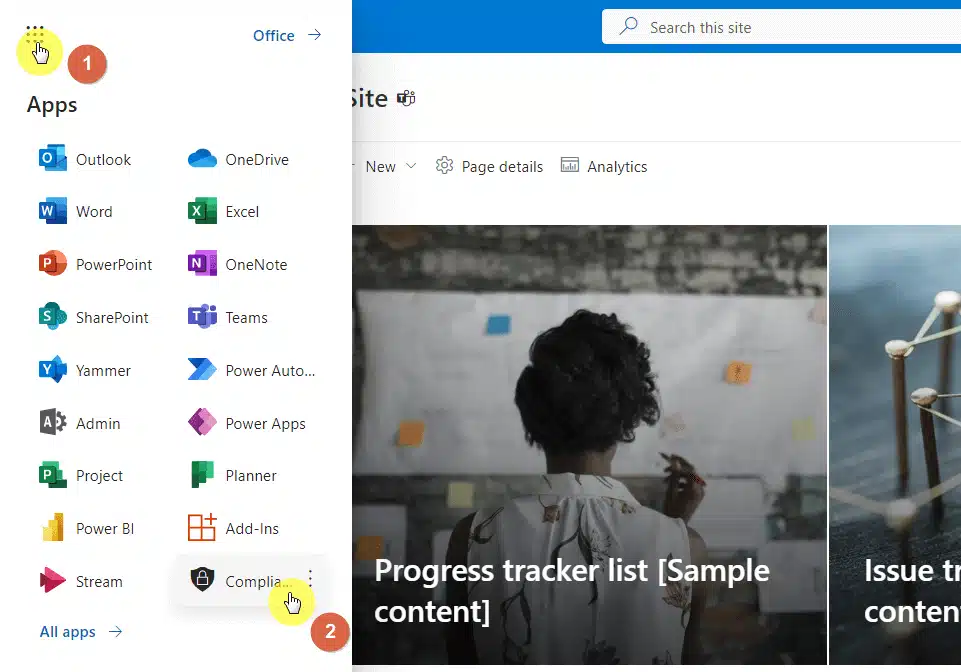
The first thing you have to do is go to the Microsoft Purview compliance portal and log in with your global admin account.
Conversely, if you’re already inside Microsoft 365:
- Click the app launcher icon on the upper-left side
- Find the compliance center from there
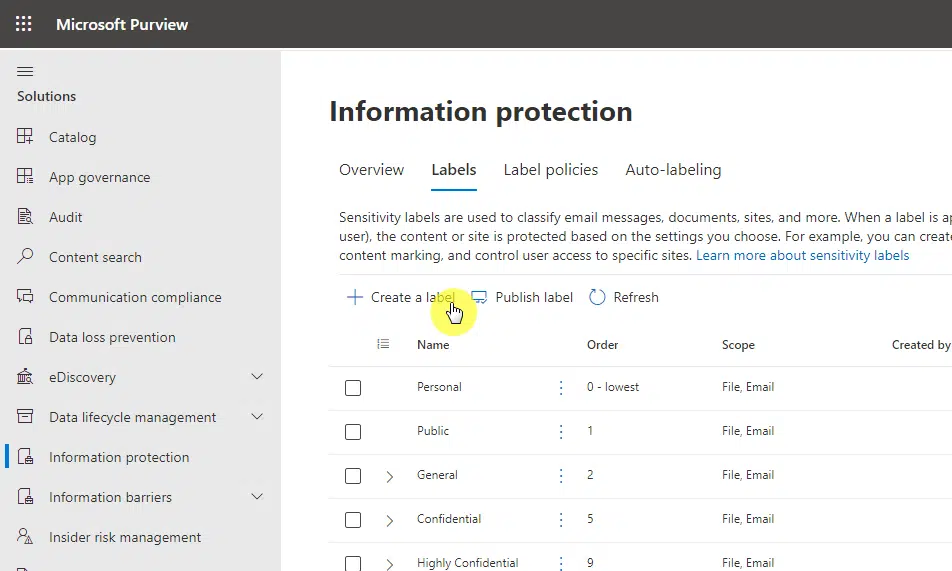
When you’re in Microsoft Purview, go to the information protection page > labels under the solutions section in the left pane:

Did you see the yellow warning container about turning on a feature?
It says:
Your organization has not turned on the ability to process content in Office online files that have encrypted sensitivity labels applied and are stored in OneDrive and SharePoint.

When you click the turn on now button, users in your organization will see the sensitivity button on the ribbon when they apply labels.
I highly recommend turning this on since this means SharePoint and OneDrive will be able to process encrypted (with sensitivity labels) Office files.
To start creating a sensitivity label, click the create a label button:
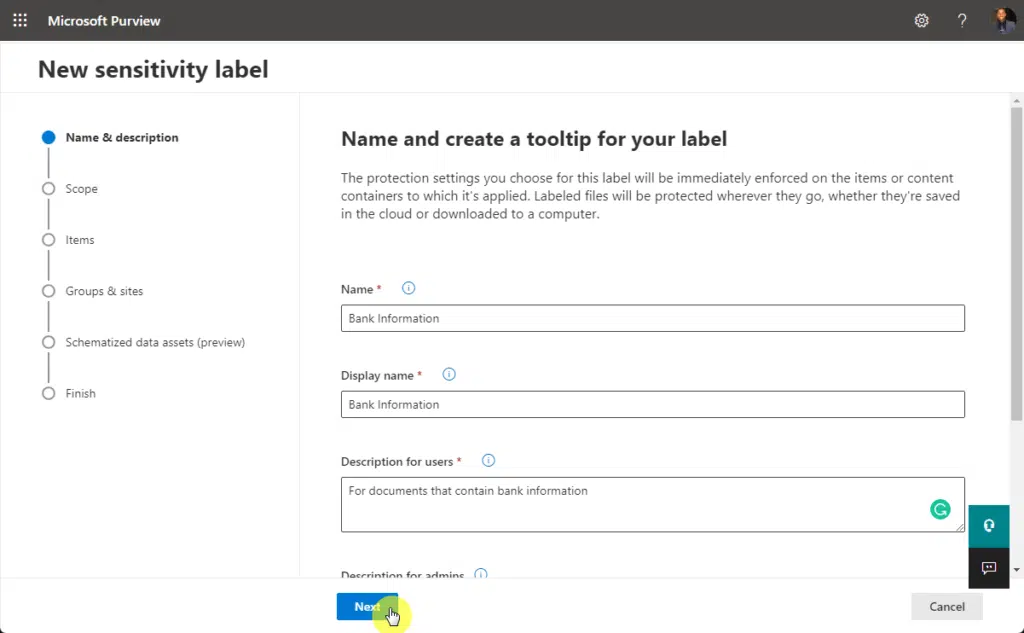
Right after that, the new sensitivity label wizard will start.
For starters, enter the required information about the new label:
- Name
- Display name
- Description for users
Click the next button once you’re ready to proceed.
2. Define the label scope
The next screen will show you the different scopes where your new label will apply:
- Items
- Groups and sites
- Schematized data assets
Choosing a label will determine:
- What type of label settings you can apply to the label
- Where can users see the label
You can actually select one scope over the others — like only having the label affect emails and files and not groups and sites.

But by default, the system will always select the item scope option. The others only get selected when the features are enabled.
Note: For groups and sites, you need to enable sensitivity label support and sync them to Azure AD through PowerShell.
3. Define protection settings
If you have selected all the scopes in the previous screen, you will be able to choose all the protection settings that apply.
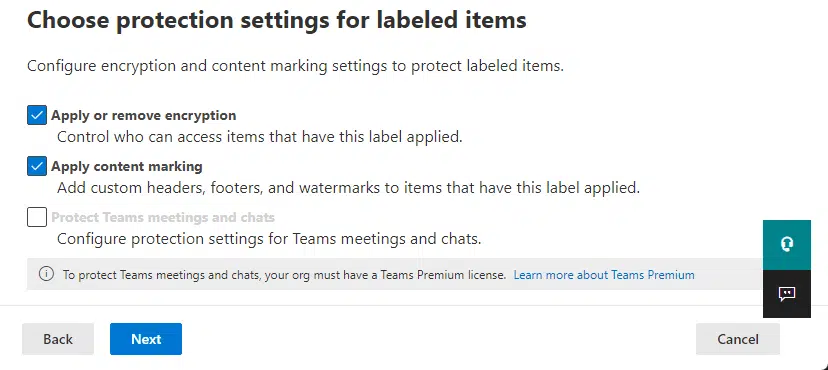
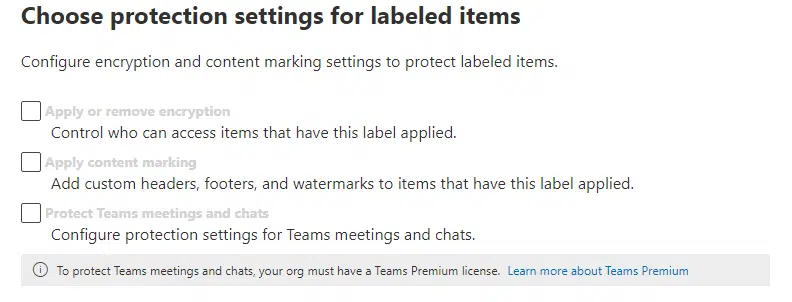
However, if selected your own scopes, then you will still see the screen above. However, you will not be able to change the settings.
For example, unless you have a premium Microsoft Teams license, all the protection settings on the page are related to items.
If you deselected items earlier, the first two settings will be greyed out:
Assuming you included items in the scope, click on the next button to proceed to the next part.
4. Encryption settings
The next page will allow you to configure the encryption settings.
You will be able to do the following here:
- Remove the encryption if there’s already encryption on the file or email
- Let users decide the encryption settings
- Limit how long users can access content with the label
- Allow/disallow content access even when offline
- Assign permissions to users and groups
- Use double-key encryption
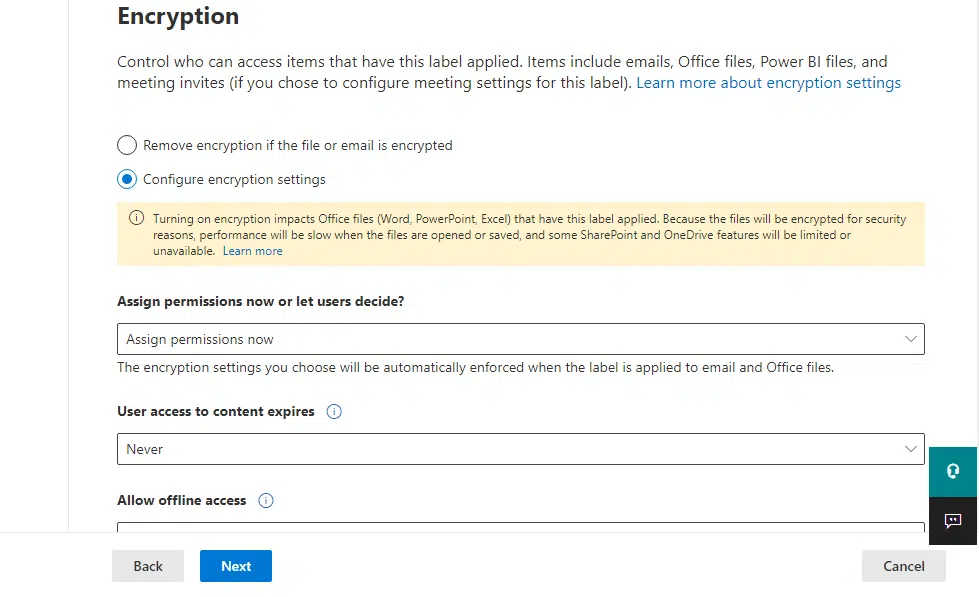
The rest of the options are available if you assign the permissions now.
However, if you choose to let the users decide, you will see different options:
- Enforce protection settings in Outlook
- Prompt users to specify permissions in Office apps
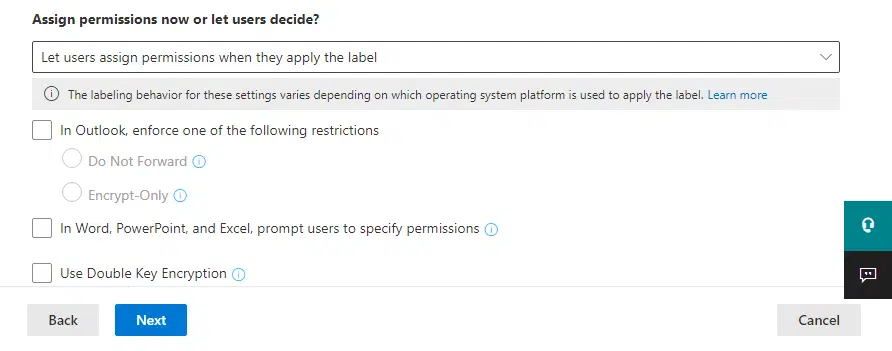
You can also specify how long users can access content with the label in two ways:
- On a specific date
- A number of days after the label is applied
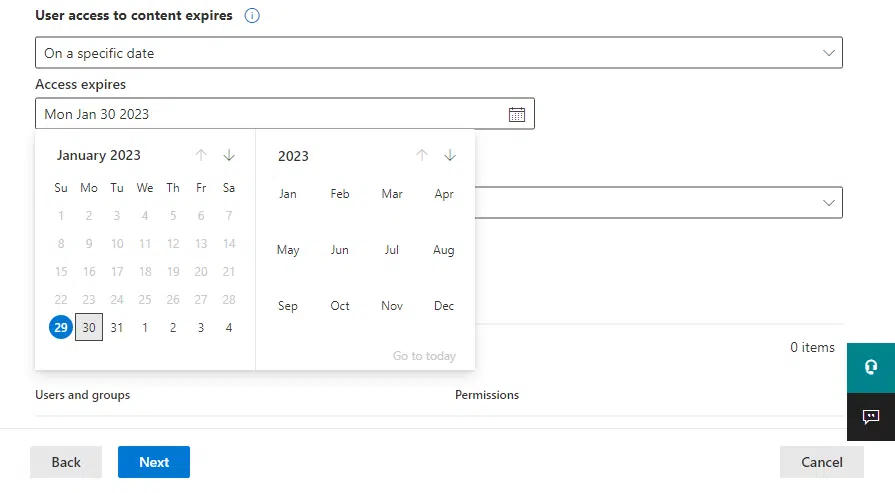
Some notes here regarding the options:
- If you choose to specify a date, the label is effective at midnight in your current time zone.
- If a number of days, the timer starts when the label is applied to the content.
After the time expires, the users won’t be able to open the files anymore where the label was applied.
For emails, the expiration might not always be enforced because of caching mechanisms by email clients.
Another option is about allowing offline access, with three choices:
- Always
- Never
- Only for a number of days
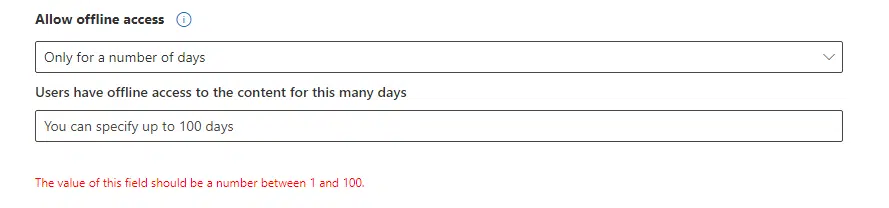
If you specified the number of days, when that time has expired, users have to authenticate, with the system logging their access.
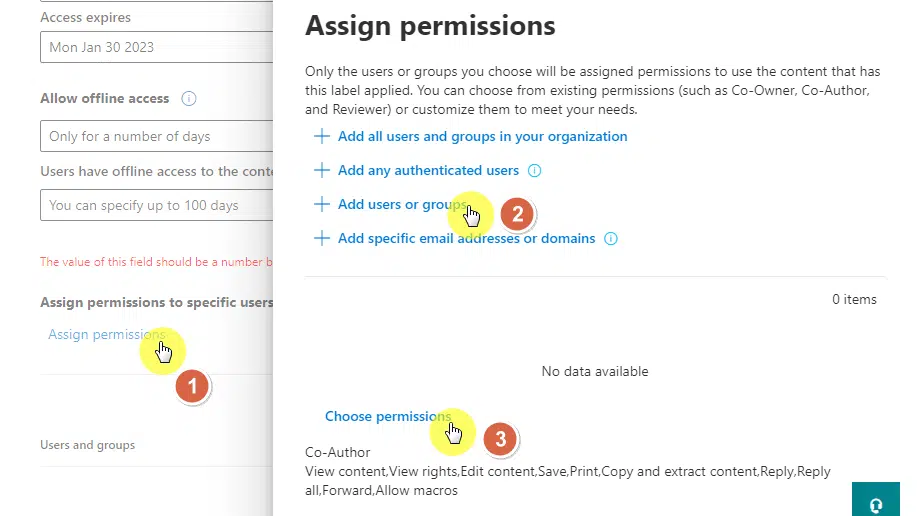
As for assigning specific permissions, it’s quite easy.
Once you click on the assign permissions option, a right panel will appear where you can add users and groups.
Once you have the users and groups, you will then be able to configure their permissions through the choose permissions link.
Once you’re satisfied with the encryption settings, click on the next button once again to proceed.
Note: Assigning permissions to specific users and groups is required. You won’t be able to proceed without assigning permissions first.
5. Content marking settings
Even if the content marking page shows up, you still have to toggle it on within the page to see the configuration options.
Once you do, you will see three options:
- Add a watermark
- Add a header
- Add a footer
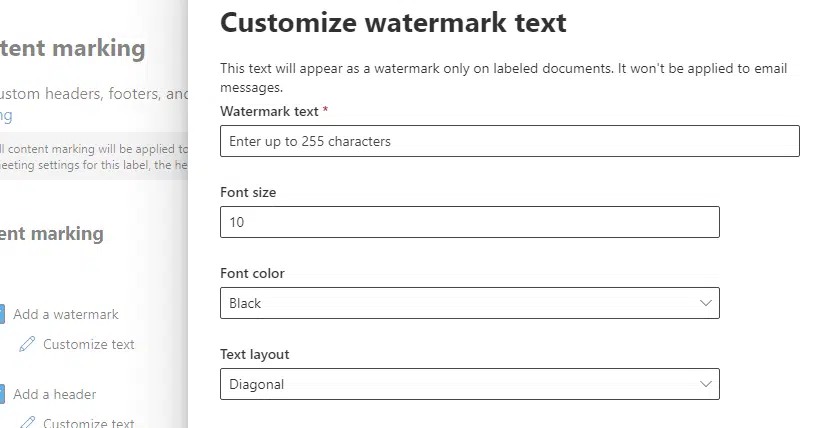
To customize the watermark/header/footer, simply click on the customize text button.
You will then see similar options on the right panel as follows:
For the character limitations:
- 255-character limit on watermarks
- 1,024-character limit on headers and footers
- 255-character limit for headers and footers on Excel
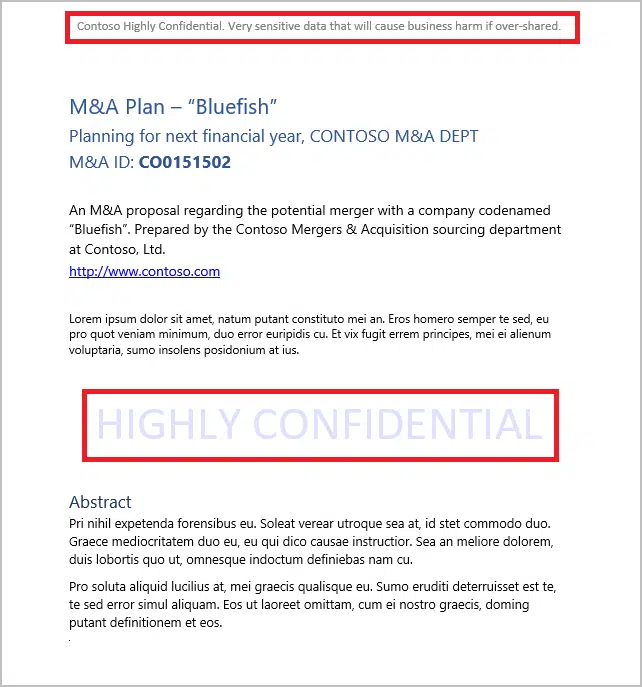
As for their effect, watermarks, headers, and footers will appear on documents. On email and meeting invites, there is no watermark.
The result will look like this:
Sensitivity labels also support dynamic markings in Office apps by using case-sensitive variables in the text string.
If you plan on applying dynamic markings, I suggest you test it out first before you publish the label.
6. Auto-labeling for files and emails
The next page will allow you to set up automatic sensitivity labels for files and emails easily.
Because of this, you don’t need to always rely on your users to classify the content correctly — or for them to even know about the sensitivity label policies at all.
Once you get to the next page, toggle the auto-labeling option to on and you will be able to configure the conditions:
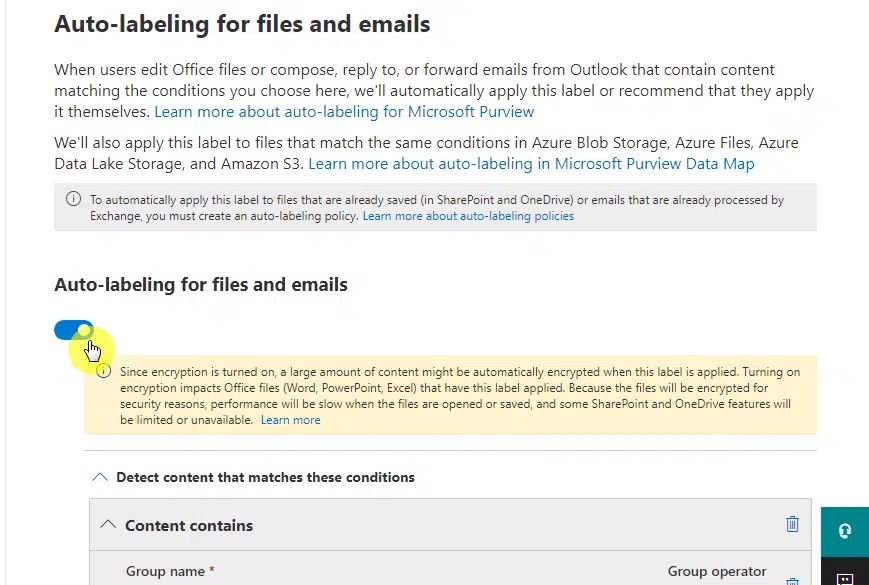
Note: When you enable this feature together with encryption, it might impact many of your Office files making them a little slow when you open or save them.
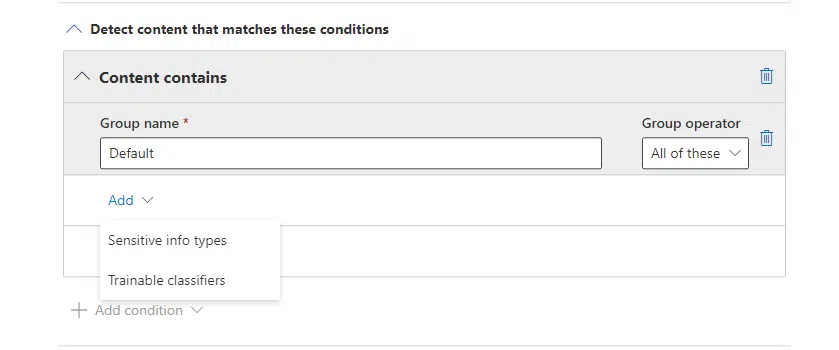
Right after that, you will be able to add conditions to your sensitivity label under the content contains box.
Conditions can be grouped, which is why you can give a group a specific name — though you can always retain the default label.
Click the add button and you will see two choices:
- Sensitive info types
- Trainable classifiers
Sensitive information types detect person names, addresses, and other information. They can’t be edited or copied.
Trainable classifiers are well suited for content that can’t be easily identified, though the list contains pre-trained classifiers.
If you’re not sure, remember that you can input as many conditions as you can in the sensitivity label that you’re creating.
After you click on a choice, you will be able to search for specific information/classifier and add them to the list.
Select the ones that apply and click the add button:

The next option on the page will allow you to automatically apply the label or recommend that users apply the label.
After that, you can customize the message to the users when the label is applied — or leave it blank to display the default message.
Click on the next button to continue.
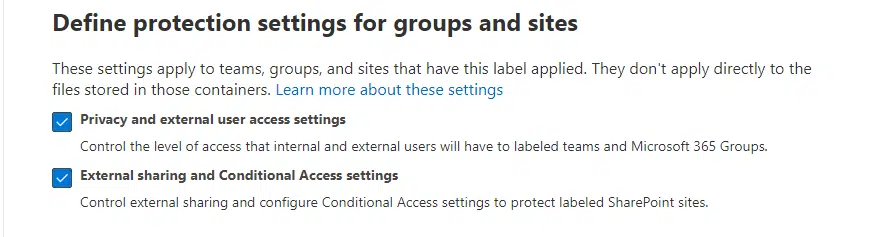
7. Protection settings for groups and sites
This is the part where you can define the settings that will apply to groups, Microsoft Teams, and sites that apply to the label.
Select the ones that you want to configure the settings:
- Privacy and external user access settings
- External sharing and conditional access settings
Click next to see the options:
The first setting will allow you to control the access level that internal and external users have to sites and teams that the label applies.
Related: Types of Groups in Microsoft 365: Comparing Groups
You have three options here:
- Public (anyone in the organization)
- Private (only team owners and members)
- None (team and group members can change their privacy)
You can also enable/disable the option for group owners to add external users to the team/site/group as guests (for guest access).
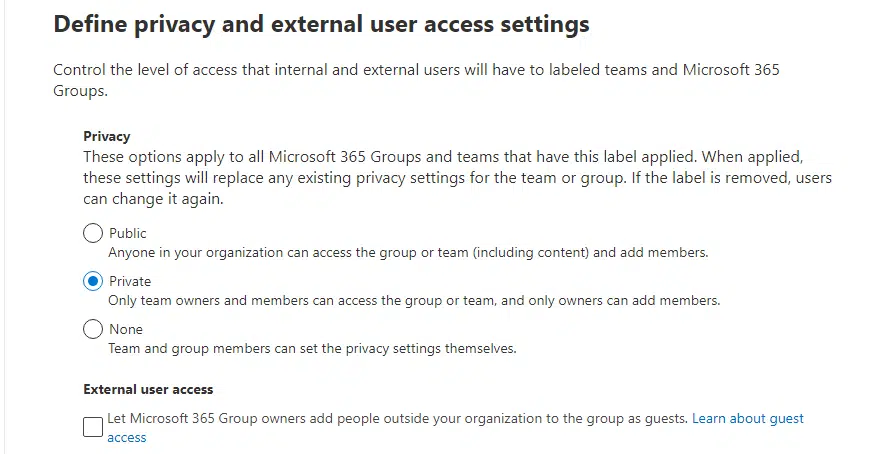
Remember that the privacy settings you apply here will replace any existing privacy settings for the team or group.
The next page will have two options (both can be selected):
- Control external sharing from labeled SharePoint sites
- Use Azure AD Conditional Access to protect labeled SharePoint sites
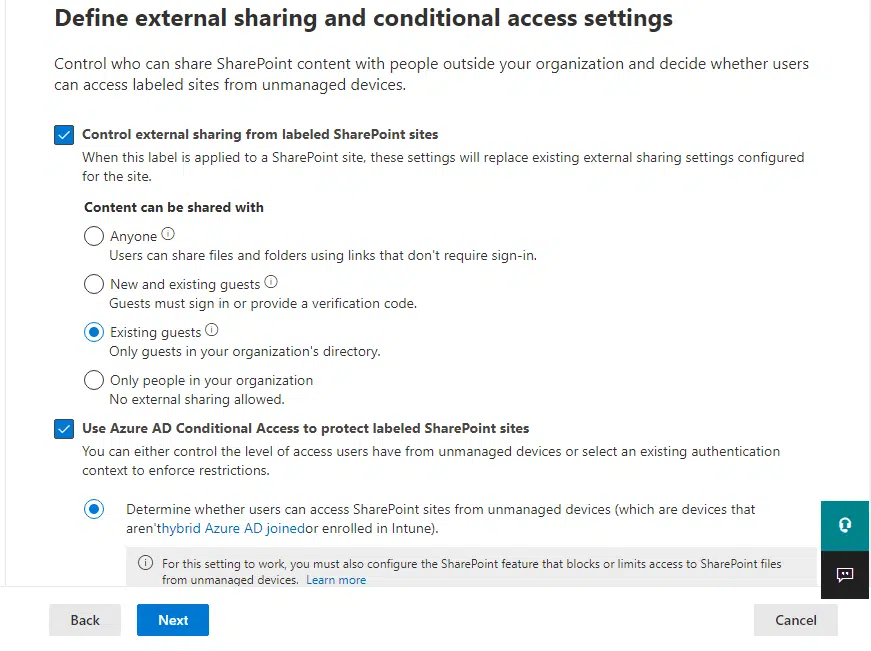
The first setting will allow you to configure the external sharing settings for the site and will replace the existing ones.
The second one will allow you to control the access of users from unmanaged devices or set up an existing authentication context.
Click the next button to proceed to the next page.
8. Auto-labeling for schematized data assets
You can also apply auto-labeling to schematized data assets in Microsoft Purview data map.
Once you toggle the setting to on, you will be able to choose sensitive info types (only) as criteria for auto-labeling.
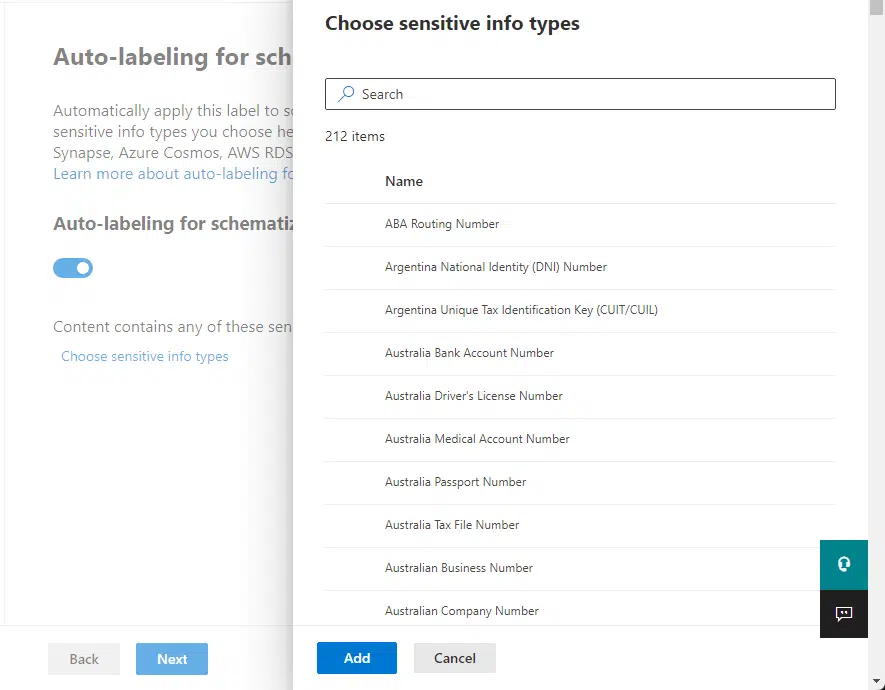
This will allow you to automatically label schematized data assets in the following sources:
- SQL Server
- Azure SQL database
- Azure SQL Managed Instance
- Azure Synapse Analytics workspaces
- Azure Cosmos DB for NoSQL
- Azure Database for MySQL
- Azure Database for PostgreSQL
- Azure Data Explorer
Click the next button to proceed.
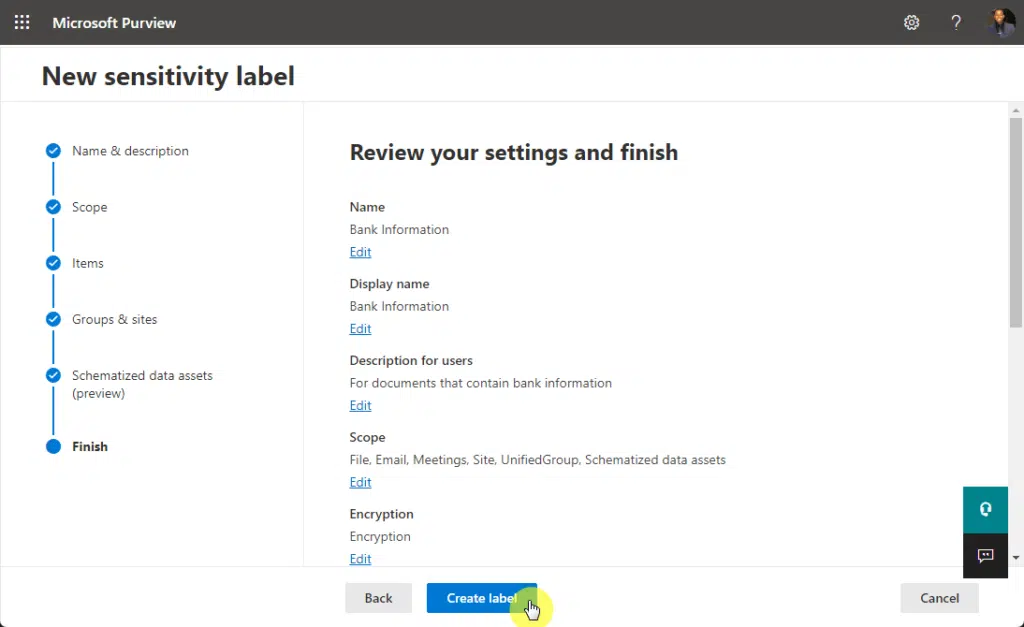
On the next page, you will be able to review your settings and finish creating the sensitivity label.
Click the create label button to finalize the sensitive label.
On the next page, you will be able to proceed to automatically apply the label, publish the label to apps, or don’t do anything yet.
If you publish the label now, you will see the same things as in the publishing guide I created below this section.
How to publish sensitivity labels
Creating sensitivity labels is only half the work. In order to make them available to your organization, you need to publish these labels.
If you’re confused with the terminology, remember that publishing a sensitivity label is the same as creating a sensitivity label policy.
Go back to the labels tab in the information protection settings from the Microsoft Purview Compliance portal.
Click on a sensitivity label that you want to publish.
Then, click the publish label button on the right panel:
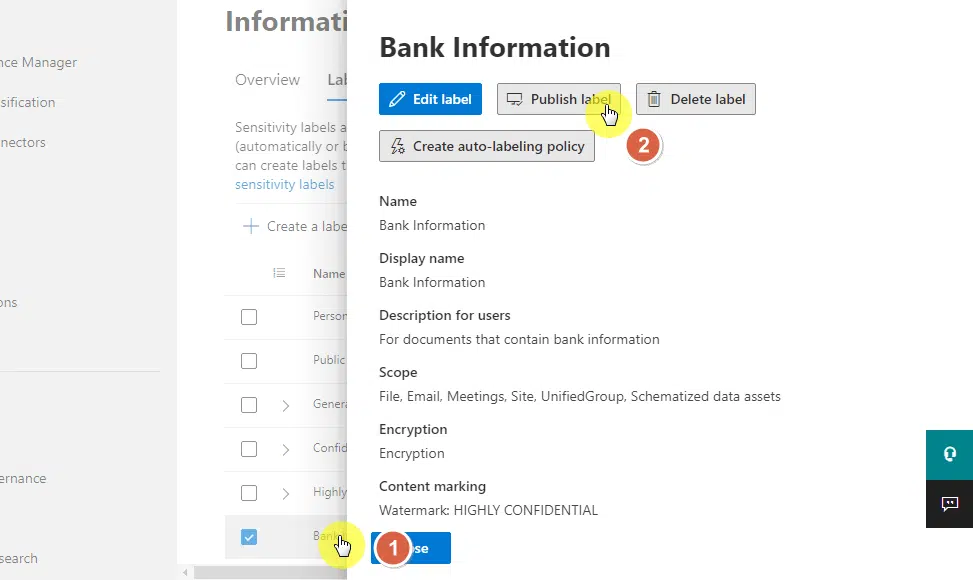
Note: The edit label button will allow you to change the sensitivity label settings and will start the sensitivity label creation wizard again.
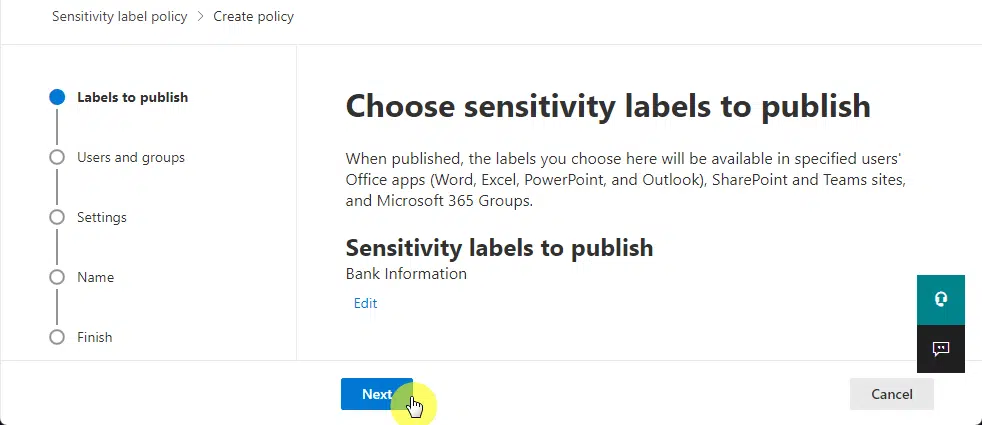
After you click the button, the create a sensitivity policy wizard will start up.
This is the same wizard that starts up when you create a policy from the label policy tab — only that there is a pre-selected sensitivity label.
Click the next button to continue:
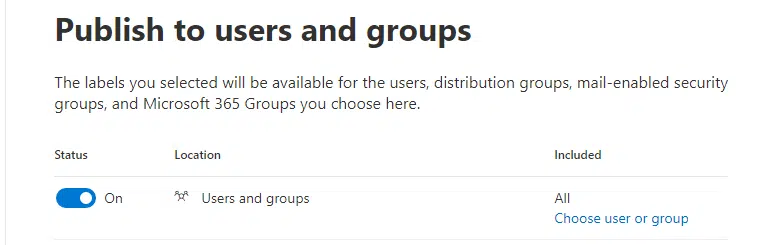
The next page will allow you to specify the users and groups to which the policy will apply.
By default, it will include all users and groups. But you can always click the choose user or group link to choose specific users and groups.
Click the next button to continue.
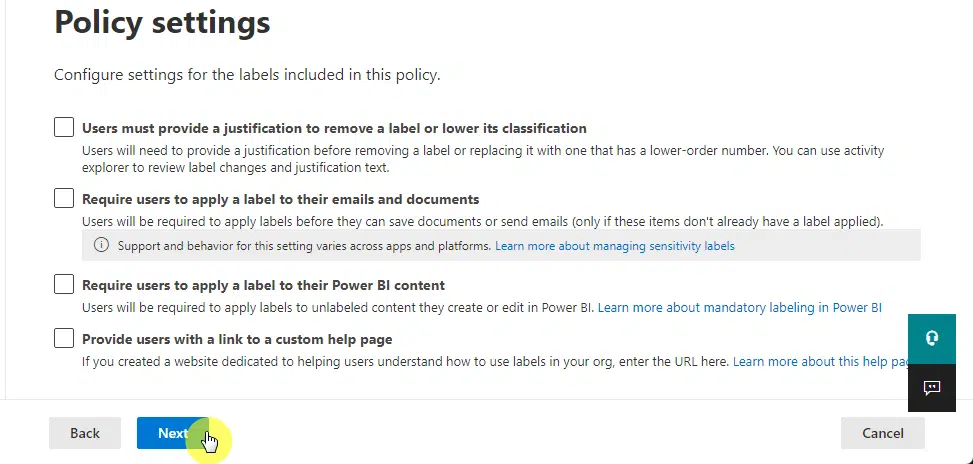
The next part is for the policy settings where you can opt to:
- Enable users to provide a justification if they want to remove a label or lower its classification
- Require users to apply sensitivity labels before they can send unlabeled emails or save sensitive documents
- Require users to apply sensitivity labels to unlabeled Power BI content
- Show users a link to a custom help page if you created one
You’re not required to select one, so feel free to click the next button.
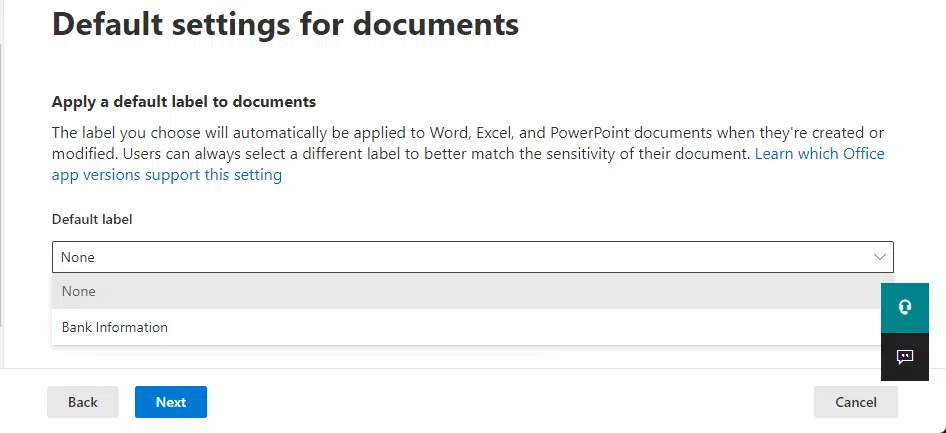
The next few pages will allow you to apply a default label to documents, emails, meetings, sites and groups, and Power BI.
Naturally, the choices will contain the sensitivity labels you included in the first part — or apply none at all.
Here’s what it looks like:
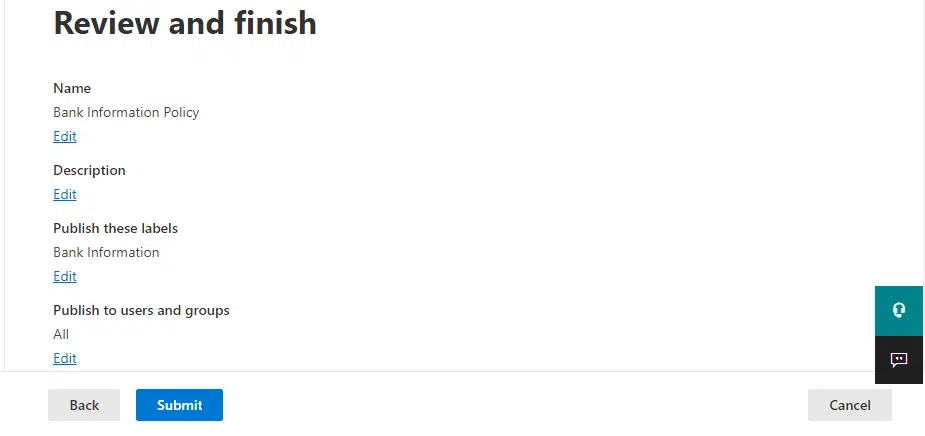
What comes next is the name of your new label policy.
You can also put in a description if you like — but it’s completely optional, so you can always leave it blank.
Click the next button to continue.
The same when you created your first sensitivity label, you can review all the settings of the new policy.
Once you’re sure of all the settings and details, click the submit button to finalize.
How to manage sensitivity labels
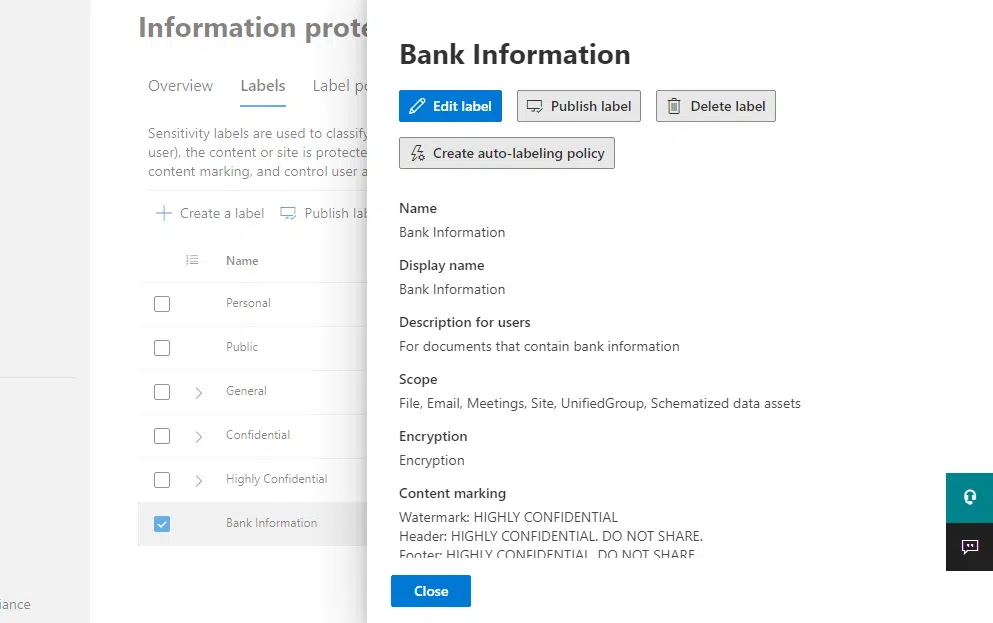
For sensitivity labels management, all you have to do is go back to the labels tab and click on a label.
You will then see the following options:
- The edit label button will allow you to change the sensitivity label settings through the wizard.
- The publish label button will allow you to publish the label into a policy.
- The delete label button will allow you to delete that label.
- The create auto-labeling policy button will allow you to easily create an auto-labeling policy.
Another thing you might notice is when you click the three dots on a specific label.
This will allow you to:
- Create a sublabel
- Move the label up or down in the label priority
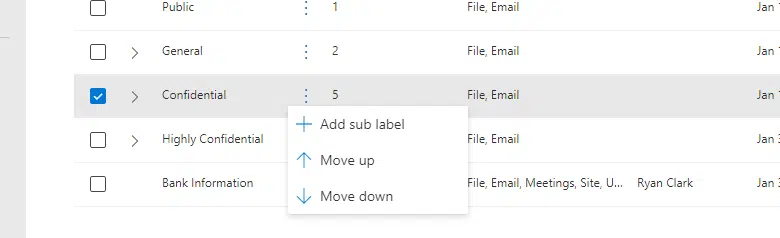
As for label priority, the order in which the sensitivity labels are written will reflect their priority.
The least restrictive sensitivity label must be at the top while the most restrictive sensitivity label must be at the bottom.
Sublabels are simply groups of one or more sensitivity labels. The parent label won’t have any protection settings since the user must choose a sublabel.
Note: If you create sublabels, make sure to not choose a parent label as the default label (or configure the parent label to be applied automatically).
Using sensitivity labels in your tenant
Creating sensitivity labels and publishing sensitivity label policies is a good way to protect your organization’s data from those with ill intent.
They let your users classify and protect your organization’s data without disrupting your user’s productivity and collaboration
How do you feel about sensitivity labels? Kindly share your thoughts and questions in the comments below.
For business inquiries, drop me a message using the form found here and I’ll get back to you as soon as possible.


