
Last Updated on June 29, 2023
Are you familiar with the content types in SharePoint?
In this article, I will explain the uses of modern content types, how they’re different from the classic ones, and how to create them.
Let’s get started.
Table of Contents:
Content types have been around for a long time.
For new users of SharePoint, the concept of content types might get a little confusing as it’s sometimes confused with metadata.
That makes sense since technically, a content type is a group or collection of metadata columns and other things that you can reuse.
If you’re new here, metadata, on the other hand, refers to a specific trait/characteristic/detail of an item.
Some default metadata in SharePoint include:
- Type
- Name
- Modified by
- Created by
Note: For more on using metadata, read this one: How to Use Metadata in SharePoint: The Beginner’s Guide.
Sign up for exclusive updates, tips, and strategies
Think of content type as a group of metadata properties or columns you can deploy to a list or library.
For example, let’s say you want to create an invoice content type — for every time you upload an invoice document.
That content type can include metadata like:
- Client
- Invoice date
- Due date
- Comments
Every time you upload an invoice document, you will be able to easily fill out different columns for that document.
Without using a content type, you can still create a library and simply create new columns to house the metadata you want.
But using content types can make the work more efficient, especially when you’re dealing with different types of documents.
Other benefits of using content types include:
- Retention management
- Reusability
- Multiple content types in a list/library
Modern content types vs classic
Although content types have evolved since the creation of the concept, most of the evolution is on the back end.
Note: For a guide on the modern experience, check this out: Introductory Guide: SharePoint Online Modern Experience.
There are two primary differences:
1. Content type gallery
Content type gallery is the modern version of the content type hub.
It’s not exactly a replacement for the content type hub. It’s more of a reskin of the entire page and creation process.
The difference in visuals is obvious though.
For reference, here is the classic interface of the content type hub:
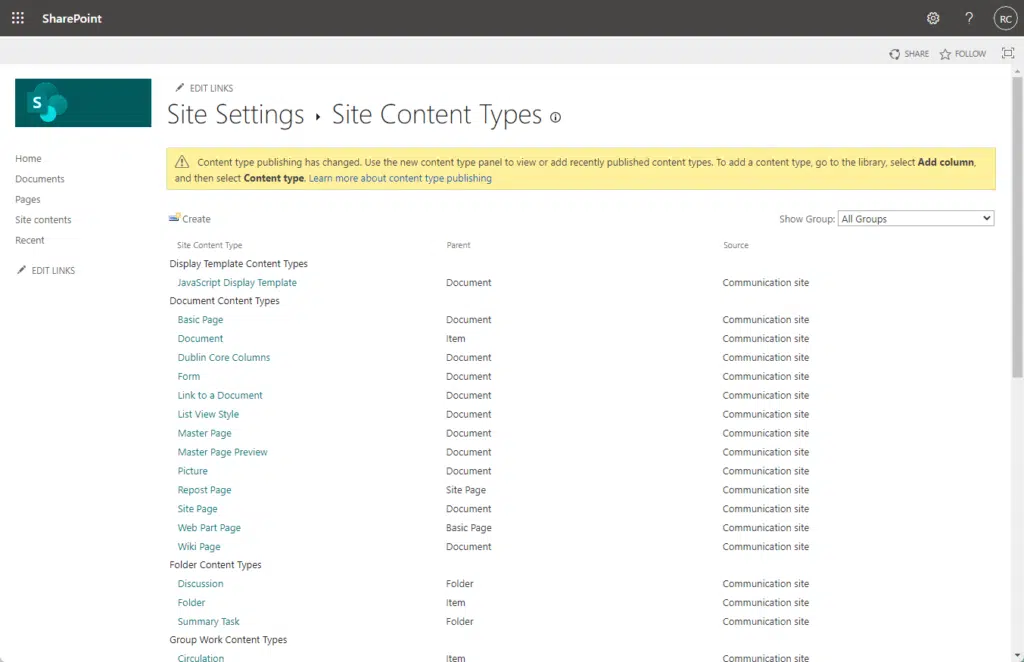
The look is similar to how sites and site pages look in the classic experience of SharePoint.
The modern version of it looks like this:
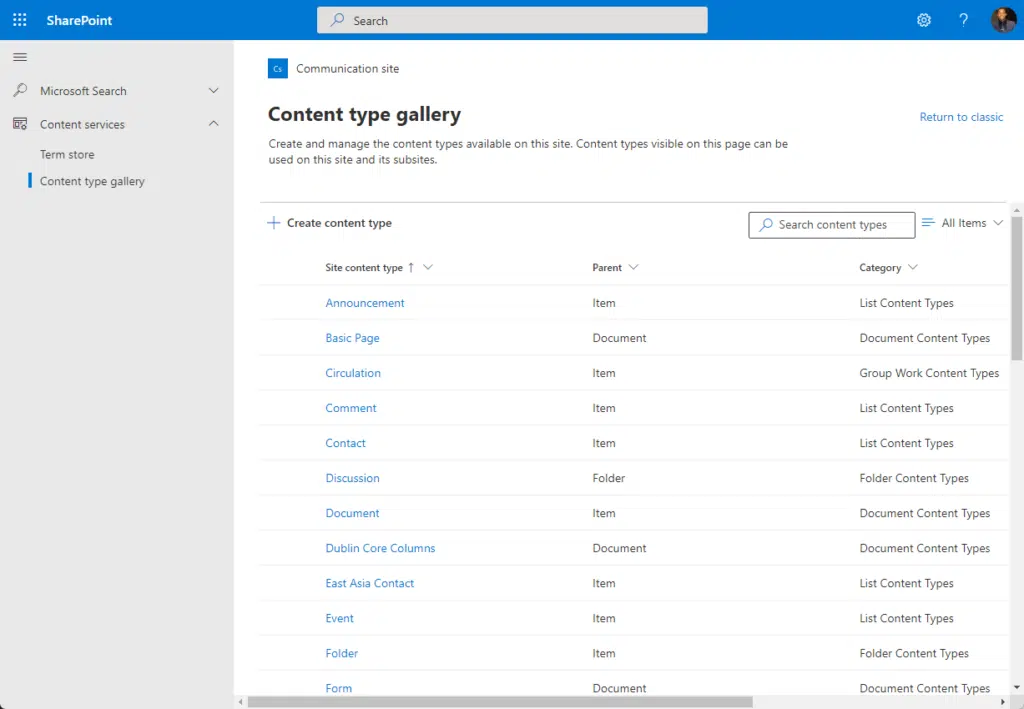
In addition, there is also a content type gallery in the SharePoint admin center, which can be pulled by all site collections.
Those created in the site content type gallery can be used only within the site collection and its subsites.
2. Pulled into the site
In the past, the publishing of content types is done in what can only be described as a push method.
That means when a user created a content type in the gallery, it is then pushed to all the site collections in the tenant.
There is a timer job that will periodically sync the content types across the site collections so changes propagate.
This method presented two problems:
- It led to a degradation of site performance as more content types and sites were created and caused long delays in the updates.
- Deleting a content type resorted to the user deleting all copies of the content type from every site.
The new method now is being described as pulling as the content types are only pulled to site collections when needed.
The pulling happens when a user adds a content type to a list or library, and only updates where it was added to.
Besides these two differences, there are a few ones like having the content type ID available in the content type gallery.
However, the two I mentioned earlier are the most significant of these differences. More cosmetic differences will come with the modern experience.
How to create a content type in the modern experience
Adding content types now through the content type gallery is even easier than ever.
I will show you how to set it up first from the content type gallery and then how to add it to a list or library.
Step #1: Access the content type gallery
There are two content type galleries that you can access:
- Admin center content type gallery
- Site content type gallery
Content types created from the admin center can be pulled by all site collections in the tenant.
On the other hand, content types created in the site gallery can only be pulled by lists and libraries in that site collection.
Site content type gallery
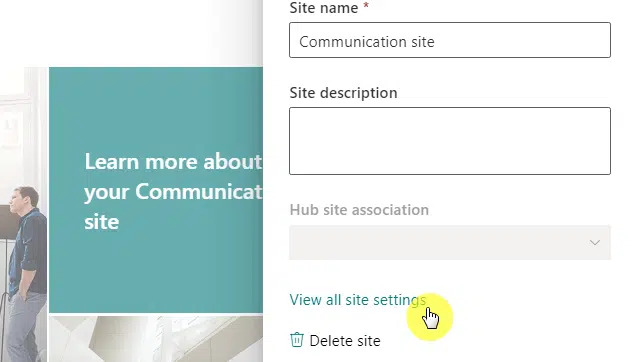
For the site content type gallery, click the gear icon > site information option:
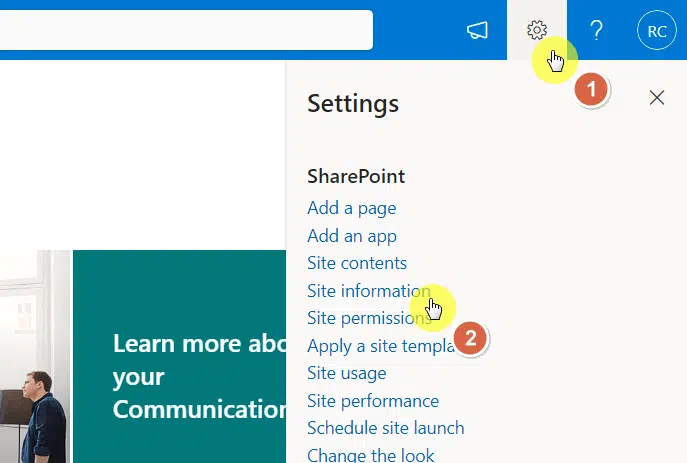
This will open more options for site information.
Click the view all site settings button near the bottom:
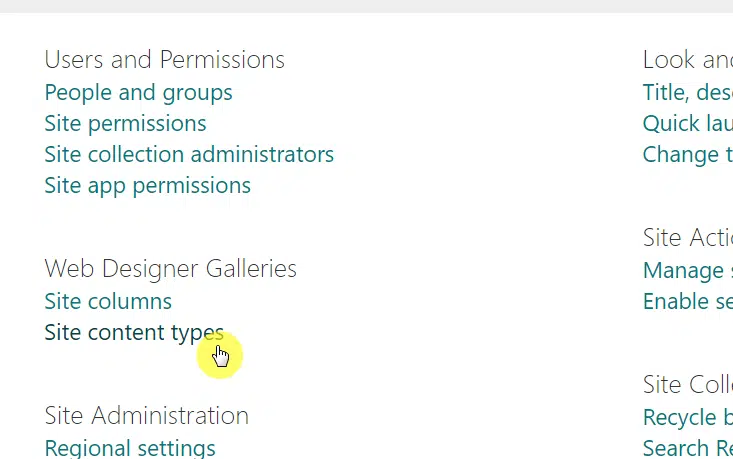
The next page will contain all the site settings.
Click site content types under web designer galleries:
Admin center content type gallery
For this, you need to navigate to the SharePoint admin center first.
Click the app launcher > admin button:
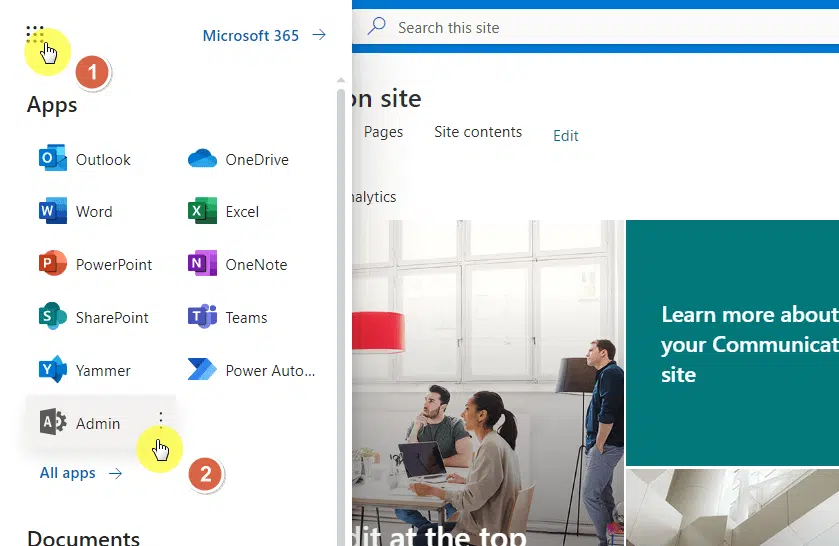
You’re still not on the SharePoint admin center yet.
This time, click show all > SharePoint:
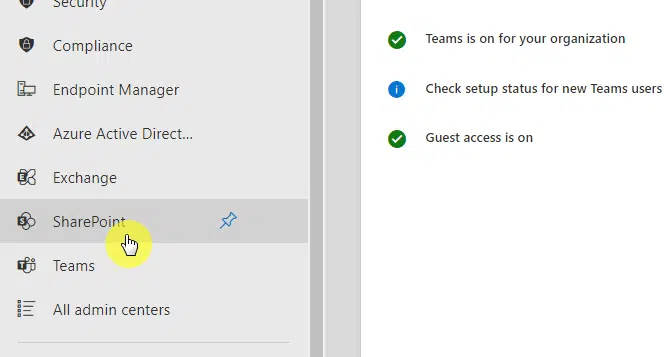
You’re finally at the admin center of SharePoint Online.
Expand content services > content type gallery and you’re finally there.
Step #2: Create a content type
The process of creating a new content type didn’t differ much from the classic experience.
Ultimately, what changed is the user interface, which made the process a little easier to understand.
From the gallery, click the create content type button:
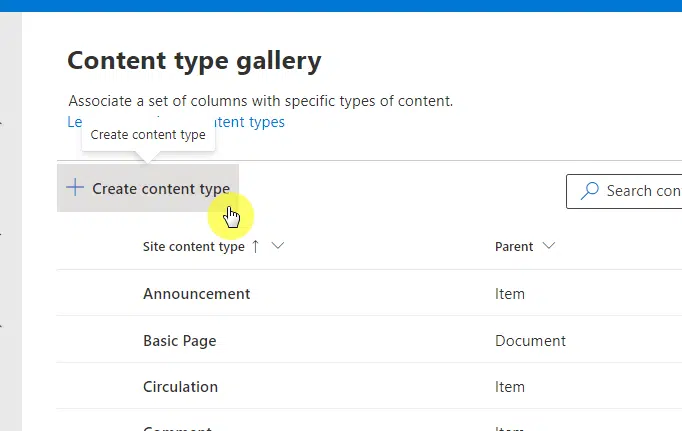
Instead of going to a new page, a side panel will open from the right side.
Let’s break the process into digestible bits.
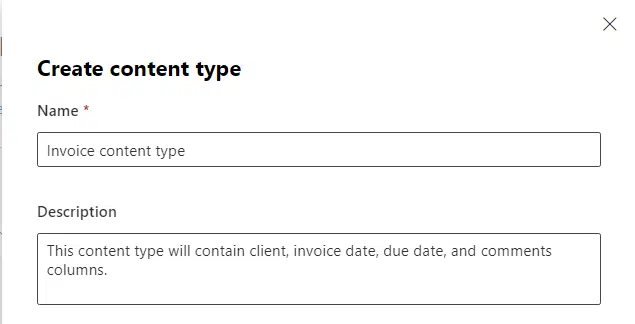
Start with the name and description.
Make them recognizable, although you can always skip out the description part.
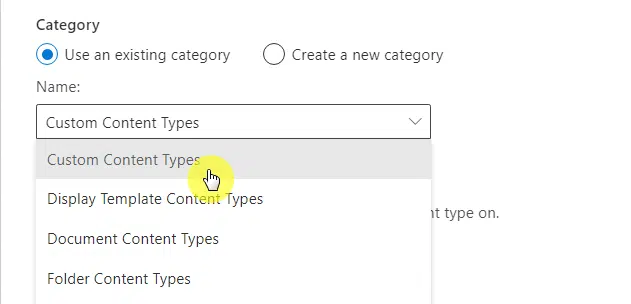
The category simply refers to where you want to file the new content type.
For example, if your content type relates to folders, you can file it under the folder content types.
Personally, I prefer to file new content types to custom content types. You can also create a new category.
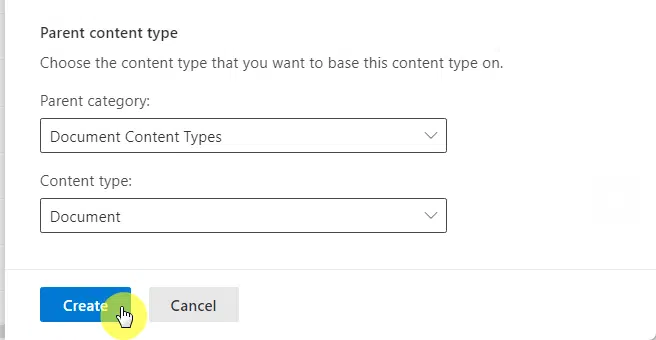
For the parent content type, you will have to select the proper category for your content type.
Since I’m creating an invoice content type in this example, then it’s under the document category.
The content type, it’s clearly a document since it’s for invoice documents that I will upload to the site.
Click the create button after that:
By the way, the content type will change depending on the parent category.
Make sure to select the right parent category for your content type so you can see the right option afterward.
Step #3: Add site columns
The next part is where you can add site columns.
Depending on the content type you create, there may already be some site columns added to it by default.
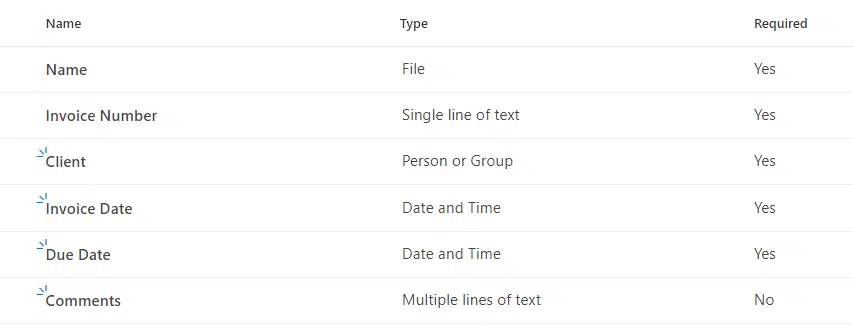
The site columns I want to include in this content type are the following:
- Invoice number
- Client
- Invoice date
- Due date
- Comments
The content type includes two site columns — name and invoice number.
All that’s left is to add the other site columns.
But I’ll show you a few things you might want to know.
First is what if you want to rename a site column.
To do that, click the column > edit site column settings:
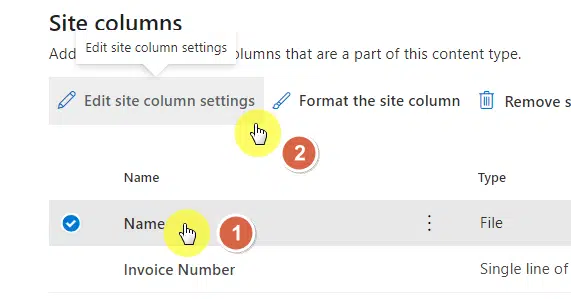
Unfortunately, editing the column name isn’t available yet in the modern experience.
But there is a link at the bottom of the panel that will allow you to go to the classic experience to edit the column.
Click on it:
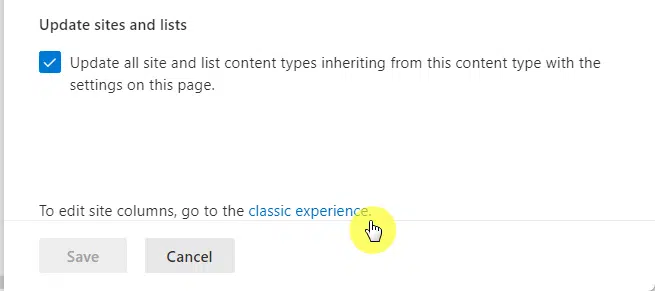
The first setting on the next page is for the column name where you can change it right away.
There is an ok button to click at the bottom once done.
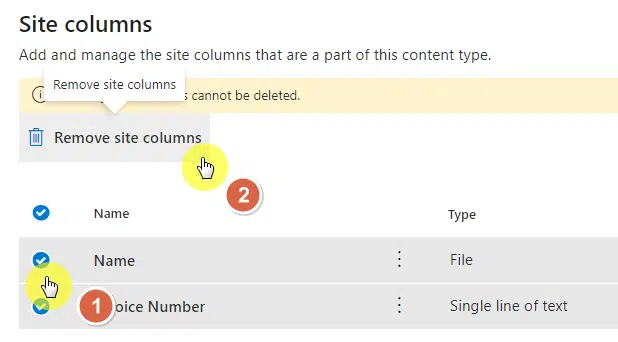
Another one is what if you want to remove site columns.
For that, select those columns and click the remove site columns button:
With that, let’s talk about adding new site columns.
Click add site column > create new site column:
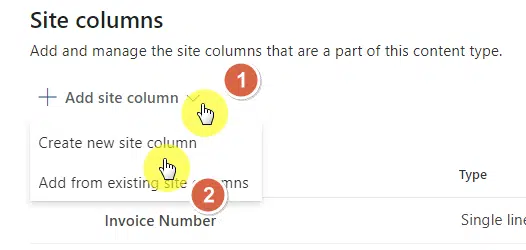
The option to add from an existing site columns work if the columns you want to add already exist in the database.
Since the due date and comments columns already exist, I can just add them right away through the second option.
Better to check first the existing site columns before you decide to create a new one.
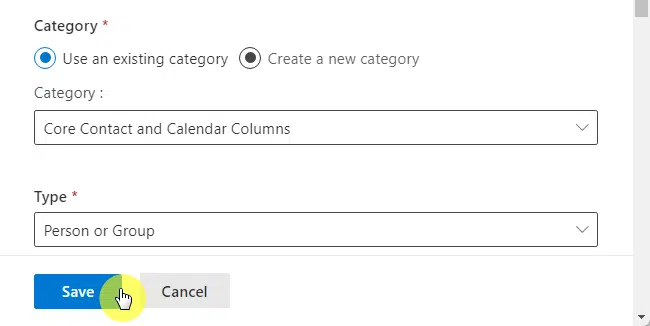
Anyway, once I opted to create a new site column, the right panel opened up so I can configure the new column.
The first example is the client column, and I used the following settings:
- Core contact and calendar columns category
- Person or group type
- Show profile photos
- Require the column for information (more options)
Click the save button to add the new column:
Note: For more info on metadata and site columns, check this out: How to Use Metadata in SharePoint: The Beginner’s Guide.
I’ll proceed with creating all the site columns for the content type.
This is the result:
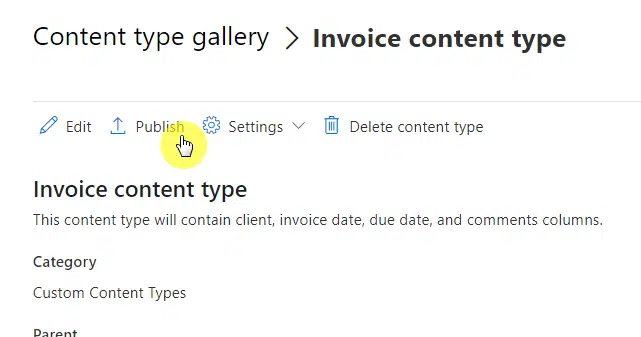
Step #4: Publish the content type
Once you’re done adding and configuring the site columns, what’s left is to publish the content type.
Scroll up to the top of the page and click the publish button:
A side panel will then appear from the right side.
The default selection is publish for new content types so all you need to do is to click the save button below.
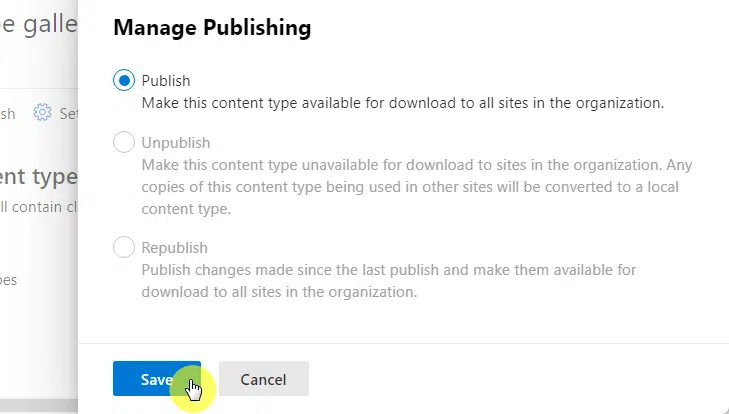
That’s it.
The content type is now live and can be added to a document library (or list, depending on the type) on all sites.
Step #5: Add the new content type
The next part is quite easy to do.
Unlike in the classic experience, you can add a new content type from the document library or list right away.
In my example, I created a financial document library where I will add the invoice content type.
On your list or library, click the add column button > add a content type > next:
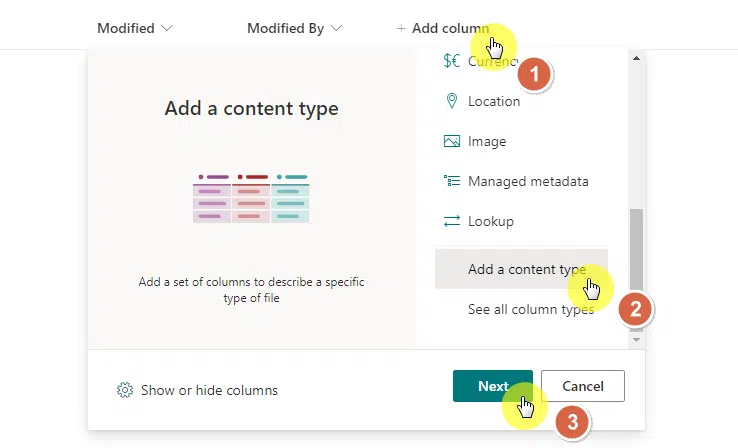
This will open a new panel from the right side.
Select the content type from the dropdown and click the apply button.
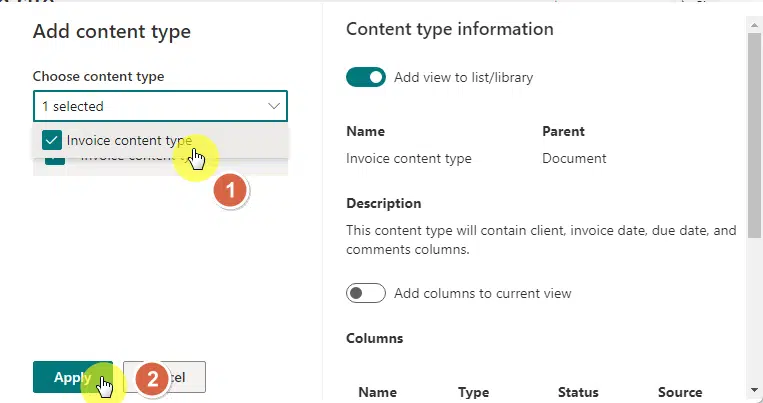
You will see a notification that the content type was added to the library or list.
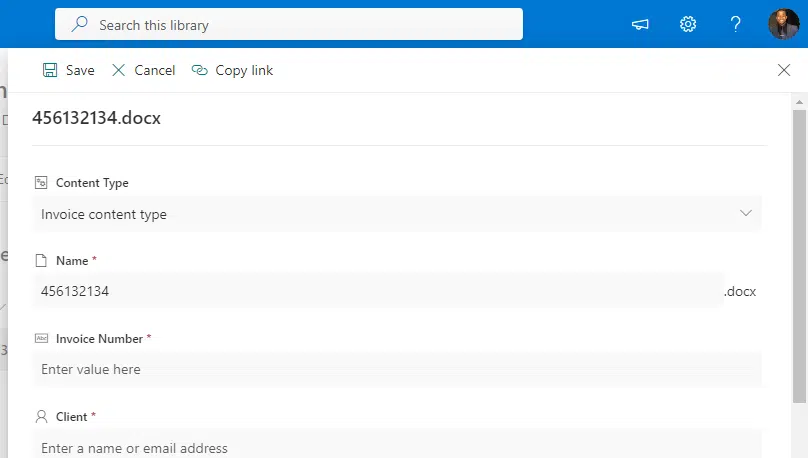
In my example, once I upload a document and tag it as an invoice content type, I can then fill out the site columns.
Pretty neat, right?
Save time by creating content types
As you can see, these content types are great especially if you’re dealing with a lot of similar content on your site.
Imagine if you have to deal with creating site columns on a bunch of libraries and lists when you know you have this option.
Not to mention, content types help in the searchability and discoverability of your files and documents.
How do you feel about modern content types in SharePoint Online? Share your thoughts in the comments below.
For business inquiries, kindly use the contact form found here to get in touch. I’ll get back to you asap.


