

Last Updated on June 29, 2023
Because of the benefits of using Exchange Online (Office 365), numerous organizations have moved from an on-premises messaging environment.
Reduced costs, enhanced management overhead, and easy management are enough to convince executives to switch.
The problem is, the migration process is quite tedious and may be challenging for most people.
In this article, let’s dive deeper into the exchange migration process and learn how to use the hybrid-configuration migration wizard.
Table of Contents:
What is Office 365 Hybrid Migration?
There are many options available that will allow you to move your Exchange environment to Office 365, including hybrid migration or tool-based migration.
Office 365 Hybrid Migration is a process that will enable you to create a relationship between your on-premises Exchange servers and Exchange Online.
Its ultimate goal is to make sure that the transfer between existing mailboxes is smooth and seamless.
If you are using Azure Active Directory Connect, then you must use Hybrid to synchronize your identity in the cloud.
Azure AD Connect knows when you have an existing Exchange organization, which is why there will be no mailboxes in Office 365 for existing mailboxes on-premises.
In this case, you will have to use Exchange Hybrid to migrate the mailboxes.
Note: If you want to learn more about Azure and its certification path, go here: Microsoft Azure Certification Path: What You Need to Know.
Sign up for exclusive updates, tips, and strategies
Requirements and Reminders for Hybrid Migration
To make sure that the migration process is smooth, you must do some work beforehand. Some of these include the following:
- Establish proper permissions first
- Configure the hybrid deployment between on-premises and Exchange Online organizations
- Make sure that you have a healthy environment to migrate including the local Exchange Server
- Enable the Mailbox Replication Proxy Service in on-premises Exchange 2013 client access servers
- Ensure to have the correct identity model (all custom domains must be added to the Office 365 tenant)
- Update Exchange server with cumulative update (CU)
- Build Exchange Hybrid server (that can manage Exchange 2010 server from Exchange 2016 console)
- Install a third-party certificate to the hybrid server and add external DNS records
Once you’re done with all of that, it’s time to proceed with the next step:
Implement Exchange Hybrid
To start, open your Exchange Admin Center on-premises.
Once there, go to the hybrid tab. Here, you will be able to configure an Exchange hybrid deployment to connect and manage on-premises and Exchange Online organizations.
You can also download the Exchange Online PowerShell Module to be able to manage Exchange Online more securely.
Click on the first configure box (for the Exchange hybrid deployment).

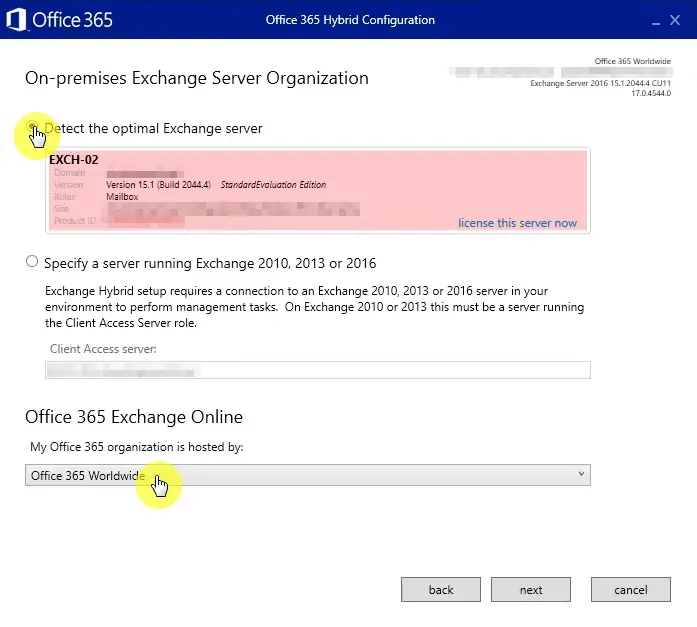
This will download the Office 365 Hybrid Wizard. The easy step here is to let the wizard detect the optimal Exchange server by Office 365 Worldwide.
Naturally, you can always specify a server by clicking on the appropriate box.
But to simplify, click on the first option (Detect the optimal Exchange server) and select “Office 365 Worldwide) in the dropdown below.
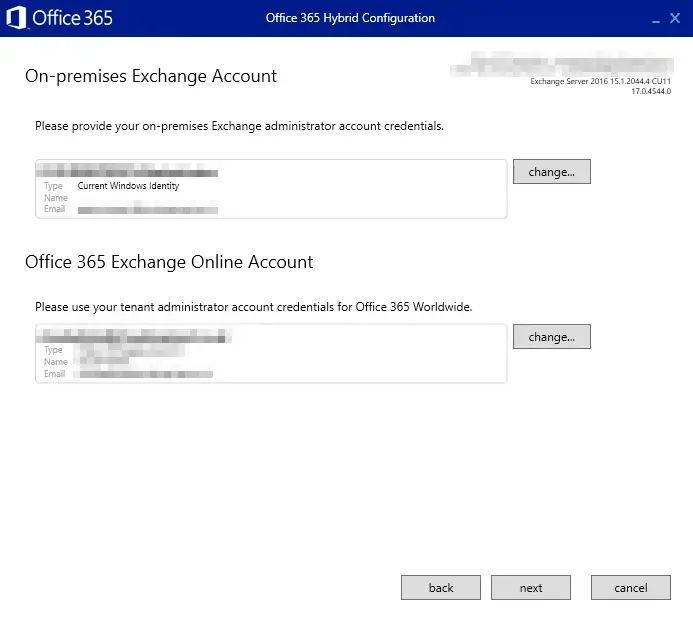
The next screen is where you provide the appropriate admin credentials.
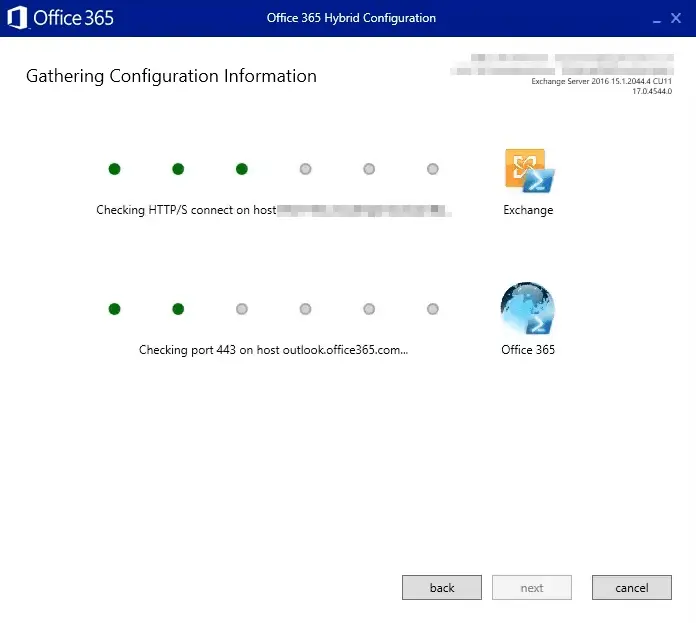
Right after that, the wizard will gather information about the connection and will let you know if there are any problems.
Once you get all green, you will now be able to click on the “next” button and proceed to the next step.
Types of Hybrid Configuration
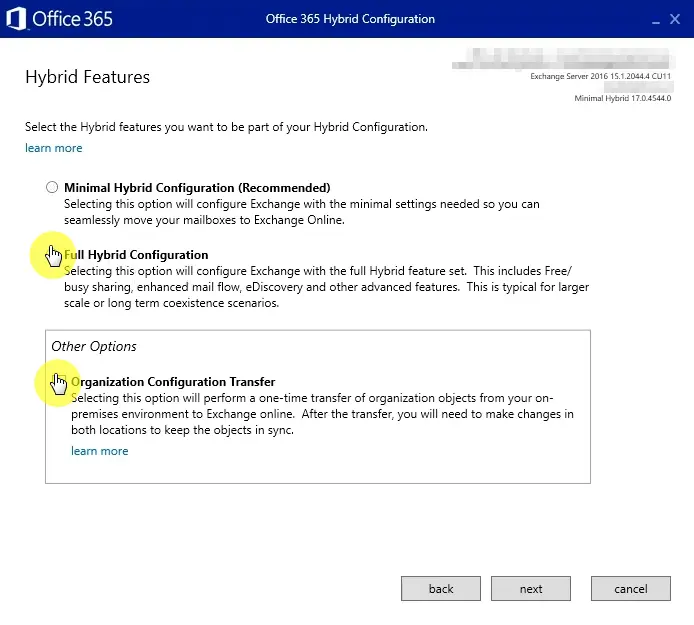
There are two types of Hybrid configurations:
- Minimal Hybrid Configuration
- Full Hybrid Configuration
The first one is the most seamless of the two. Unfortunately, this will configure Exchange using minimal settings.
The second one, which is what we will be using in this article, will allow you to plan for longer-term co-existence with full mail routing.
There is also one other option here: Organization Configuration Transfer. This will allow you to transfer objects from your on-premises environment to Exchange Online.
In this example, we will be using a full hybrid configuration and organization configuration transfer.
Note: For a guide on the SharePoint migration tool, read this article: How to Use the Microsoft SharePoint Migration Tool.
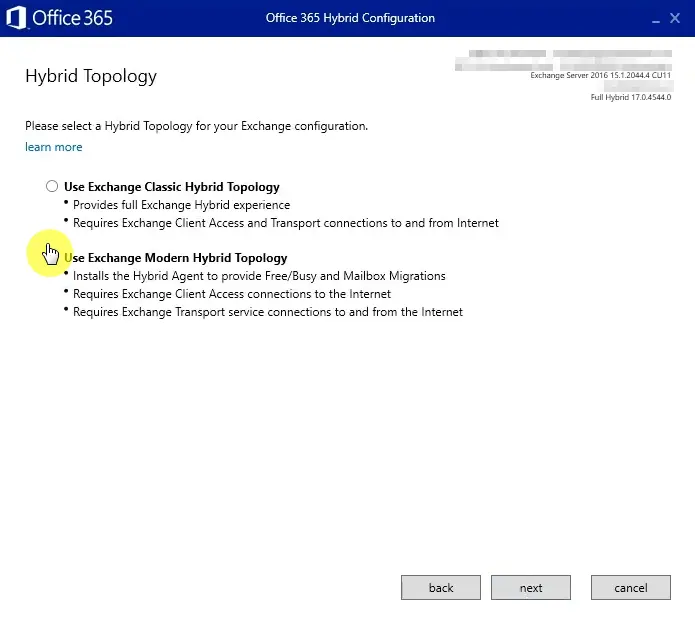
Hybrid Topology
The next step is choosing a Hybrid Topology for your Exchange configuration. There are two types of them here:
- Exchange Classic Hybrid
- Exchange Modern Hybrid
The Exchange Class Hybrid is the traditional hybrid approach where Exchange Online and Exchange Servers connect directly over the internet.
For this, your Exchange Servers must be accessible online. You must also own an officially trusted third-party certificate.
This is ideal if you already published your Exchange endpoints online.
The Exchange Modern Hybrid, on the other hand, is based on Azure Active Directory Application Proxy technology and will handle the communication between Exchange Online and Exchange environment.
Choosing this will install the Hybrid Agent, which will take over the connection between Exchange Online and on-premises Exchange Servers.
Do not use it if you did not publish Exchange online or you do not have official third-party certificates.
If you want to simplify the publishing between your Exchange Server to Office 365, it is advisable to use the modern one.
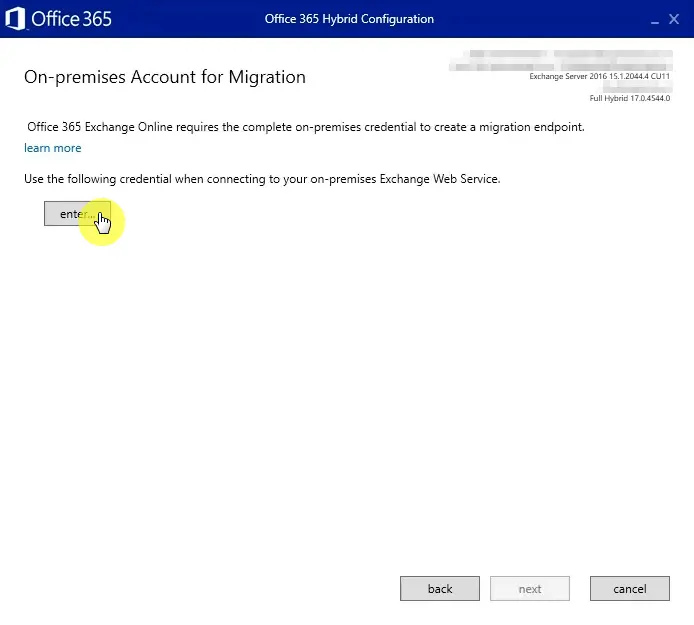
To create a migration endpoint, the wizard will ask for your on-premises credentials to migrate mailboxes.
If you have entered your on-premises Exchange Web Service earlier, you can use that. Otherwise, you could click “enter” to connect to your on-premises Exchange Web Service.
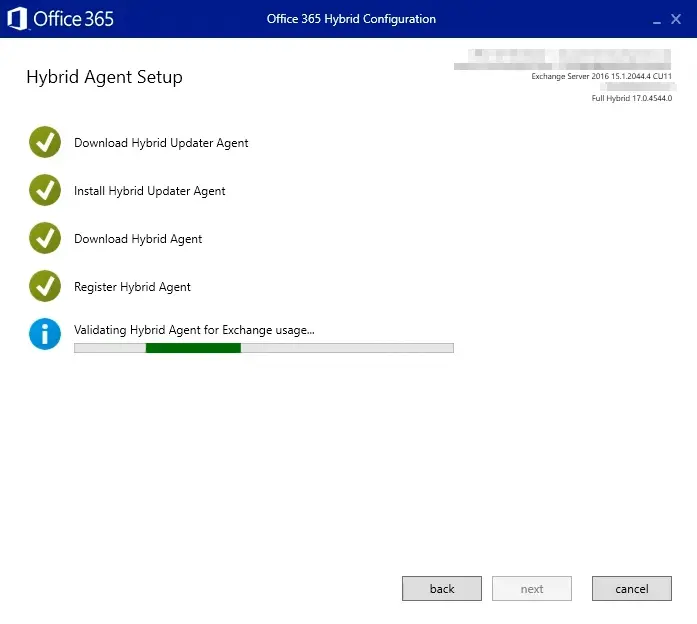
Since it’s the Hybrid Agent that will handle the connection, it must be installed first and configured. For this, you may have to provide your Office 365 credentials and agree to the licensing terms.
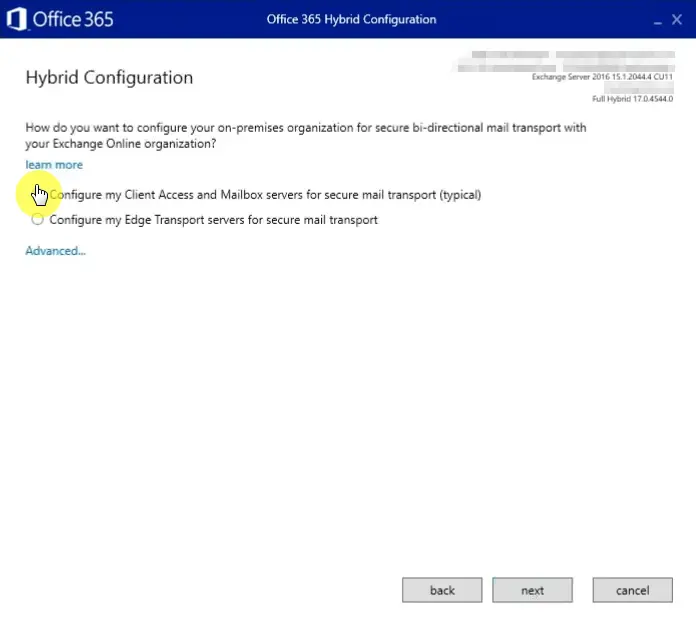
Next is the configuration of the Hybrid Agent. Unless you want to use Edge Servers, you must select to configure the Client Access and Mailbox servers for secure mail transport.
The other option — centralized mail transport — will appear when you click on “Advanced” and will configure all your outbound mail from Office 365 to flow through the Exchange Server on-premises.
For this example, we will only be using the first option.
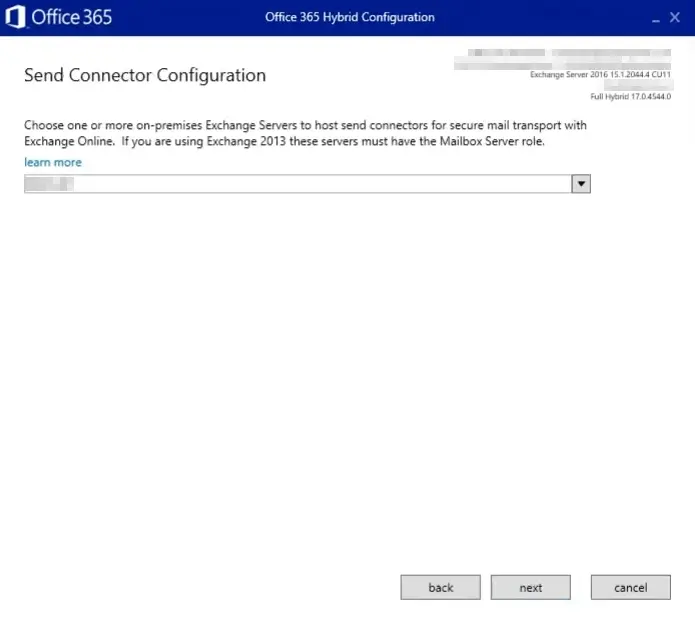
Receive/Send Connector Configuration
The next two steps are for defining the inbound and outbound mail flow servers between Office 365 and the on-premises Exchange Server.
The first part is for configuring the receive connector, which is the server to receive mail from Office 365 including messages from Office 365 mailbox to mailboxes hosted on-premises.
To qualify, the server must be valid with SSL certificates installed and published.

The next one is for configuring the send connector, which will be the server that will serve as the last stop before sending the message to Office 365.
Unless you bring over your MX records to Office 365, all mail to Office 365 recipients will go through these connectors.
The servers will then need to connect to Exchange Online Protection through SMTP and use valid SSL certificates.
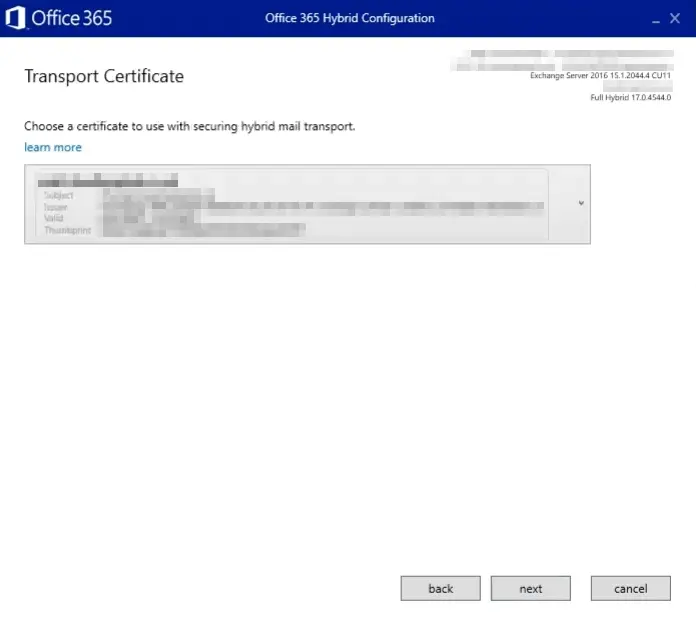
To proceed, you will then have to select the SSL certificate for communications.
The connectors will use this certificate when negotiating a secure SMTP connection with Office 365 and during the validation process of the on-premises identity.
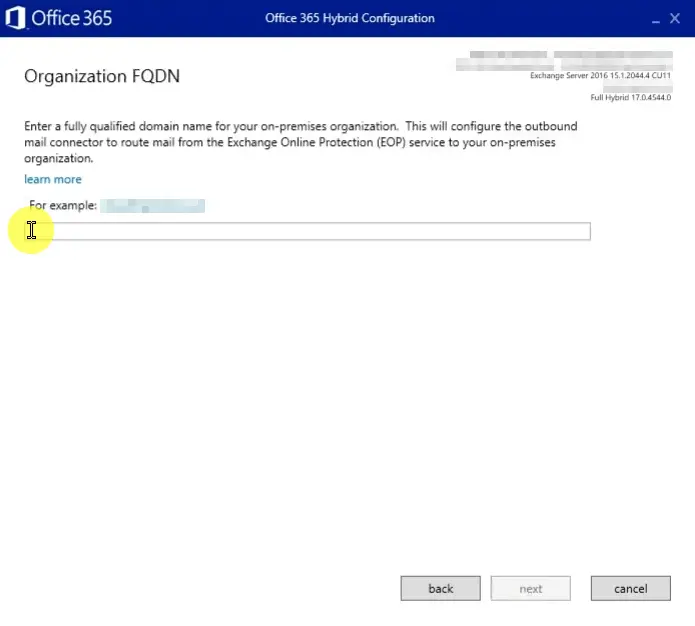
The next step is providing a fully qualified domain name for your on-premises organization.
The DNS name for this domain will initiate a connection over SMT after Office 365 creates a connector in order to send mail on-premises.
This is the same name you will have to configure when publishing SMTP externally.
Lastly, all you need now is to complete the configuration. On the next window, click “update” and wait until the process is complete.
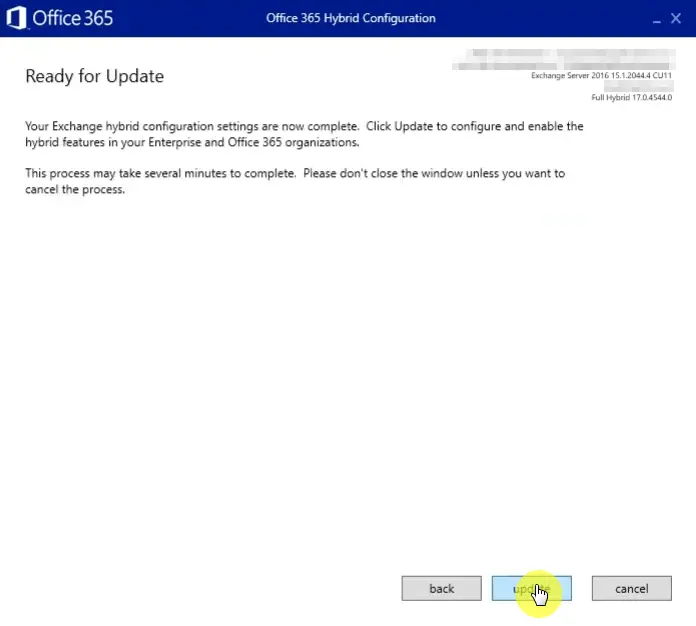
This process may take a bit of time as the Hybrid Configuration Wizard will make changes to both Exchange Online and Exchange On-Premises. Larger organizations may have to wait even more.
Migrating to Office 365 from Exchange
As you can see, the hybrid configuration alone may seem somewhat tedious.
Add to this all the necessary steps before and after the configuration, which is why the person who should do the migration must know what he is doing.
Once the exchange hybrid configuration is done, there are other additional configurations you could do.
For example, you could check if any of your mailboxes have the email address policy checkbox disabled. If so, you will not have the additional Office 365 routing addresses added automatically.
You could also test migration to Office 365 before actually migrating real users.
Because of firewall rules, something may still go wrong despite having good connectivity. Avoid surprises by creating test mailboxes and testing everything.
At the very least, you must perform two tests:
- Mail Flow
- Address List Lookup and checking availability
Once everything is ready, you must also plan your migration process, preferably in batches.
Users will have a better experience if you move their mailboxes together with their colleagues since you don’t need to do any workarounds in other areas.
That’s it! If you have any other questions, feel free to leave a comment below or send me a direct message via the contact page.


