
![How to Access SharePoint Online Data [With the Postman Tool]](https://www.mrsharepoint.com/wp-content/uploads/2020/12/sharepoint-to-postman-access-1-1024x683.jpg.webp)
Last Updated on February 17, 2024
It’s certainly possible to access SharePoint data using the postman tool and SharePoint REST API. This tutorial will teach you how to do that — though it may get a little technical. Rest assured, however, that you can straightaway follow the steps outlined in this guide.
Although it’s not required, having a working knowledge about SharePoint REST API and how it works will definitely help you understand this guide better.
But nevertheless, you will still be able to successfully access your SharePoint Online data through the Postman Tool if you follow closely the steps and commands shared in this guide.
With that, let’s get started.
Table of Contents:
- What is the Postman tool?
- Step #1: Enable Grant App Permission
- Step #2: Register Postman to SharePoint Add-In
- Step #3: Grant Permissions to the Add-In
- Step #4: Tenant ID retrieval
- Step #5: Generate access token
- Step #6: Access SharePoint Online with Postman
- How to generate a code snippet in Postman?
- What you can do with SharePoint API
What is the Postman tool?
Postman is a known collaboration platform for API (Application Programming Interface) development.
Consider it as one of the best REST (Representation State Transfer) API testing tools out there with over 500,000 companies and four million people using it including the tech guys over at Shopify, Cisco, and Intuit.
Strictly speaking, the Postman tool is a Google Chrome app designed to interact with HTTP APIs. In contrast with other API tools, this one has an easy-to-use interface you can use for constructing requests and reading responses.
That is, you can use postman to work with SharePoint’s inbuilt REST API to retrieve, add, delete, and even update data. On the other hand, you can use it to send authorization details, parameters, and any data that you need.
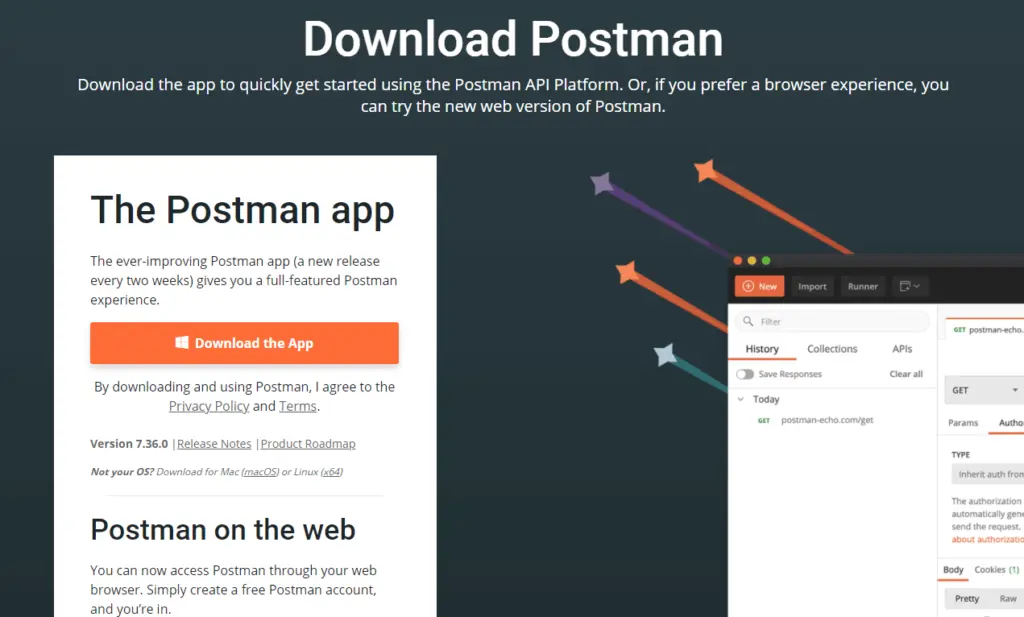
(If you missed the link earlier, click here to download Postman.)
Note that there are two types of Postman you can use. Download and install the Windows app version.
Sign up for exclusive updates, tips, and strategies
Step #1: Enable Grant App Permission
One of the changes in SharePoint is how Grant App Permission is disabled by default. Meaning, you can’t open the appinv.aspx link of your SharePoint.
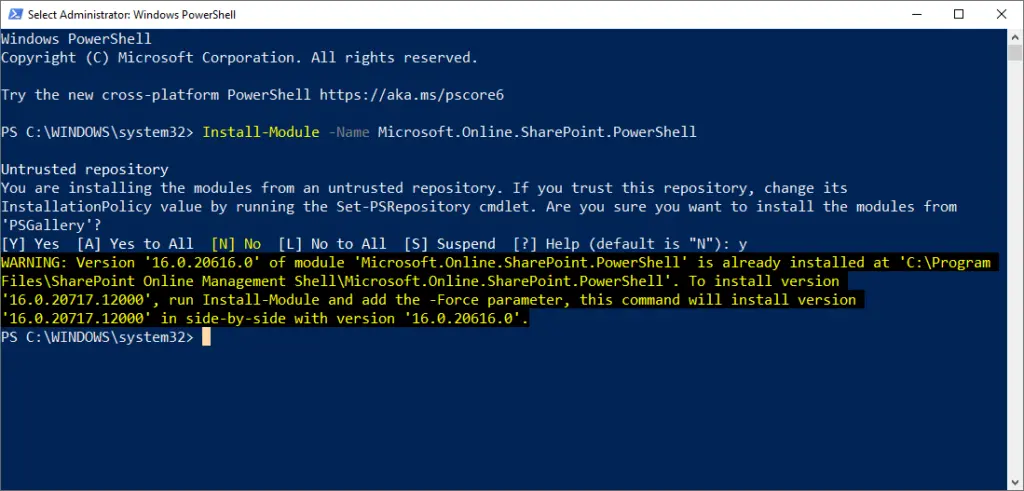
Before everything else, you must first enable Grant App Permission using Windows PowerShell.
To start, open your Windows PowerShell and run it as an administrator.

Then, enter the following command:
Install-Module -Name Microsoft.Online.SharePoint.PowerShell
Proceed with the installation.
If you already have this module installed, you will receive the following notification:
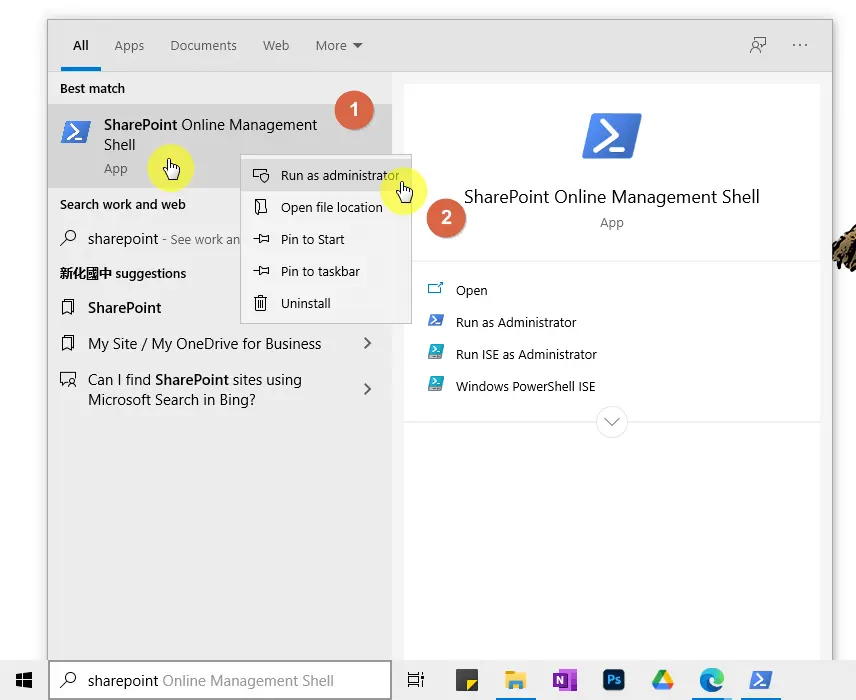
Once you get the module installed, open the SharePoint Online Management Shell command prompt as administrator.
Enter this next command but change the value inside the quotation marks with the full email address of your SharePoint administrator account:
$adminUPN=""
Follow it up with another command. But this time, enter the name of your Office 365 organization:
$orgName="mrsharepointguru"
Enter another command for the credentials request:
$userCredential = Get-Credential -UserName $adminUPN -Message "Type the password."
A dialog box will then pop up. Enter the password for the admin account you provided.
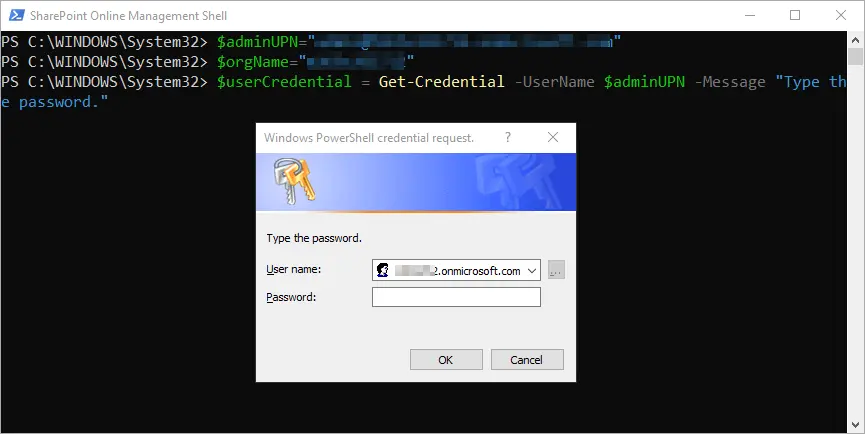
Once you’re in, enter the last two commands:
Connect-SPOService -Url https://$orgName-admin.sharepoint.com -Credential $userCredential

set-spotenant -DisableCustomAppAuthentication $false
Before you proceed, check first whether the commands were successful. Open the appinv.aspx link on SharePoint.
If you’re not sure where to go, open this link and replace the “name” variable with your organization name:
https://name.sharepoint.com/_layouts/15/appinv.aspx
You should be able to see this form:
Once you see can access this page, it’s time to proceed to the next step.
The next step is to register the Postman to SharePoint Add-In.
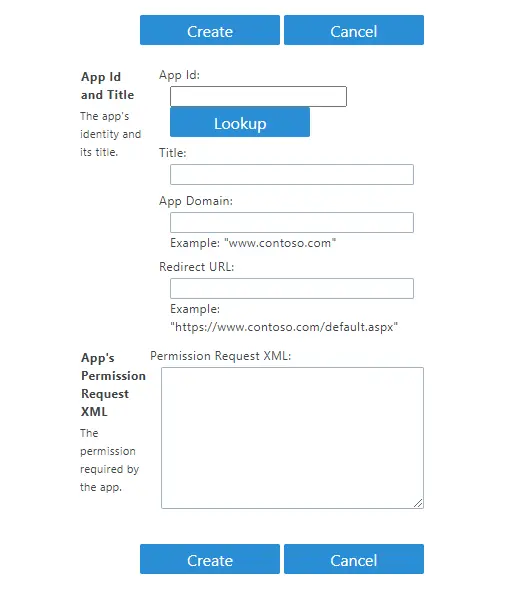
To do this, visit the appregnew.aspx page of the SharePoint Online site you want to connect with.
Here’s the link (change the organization “name” and “sitename”):
https://name.sharepoint.com/sites/sitename/_layouts/15/appregnew.aspx
You should be able to see this page:

In here, you will find five forms:
- Client Id
- Client Secret
- Title
- App Domain
- Redirect URI
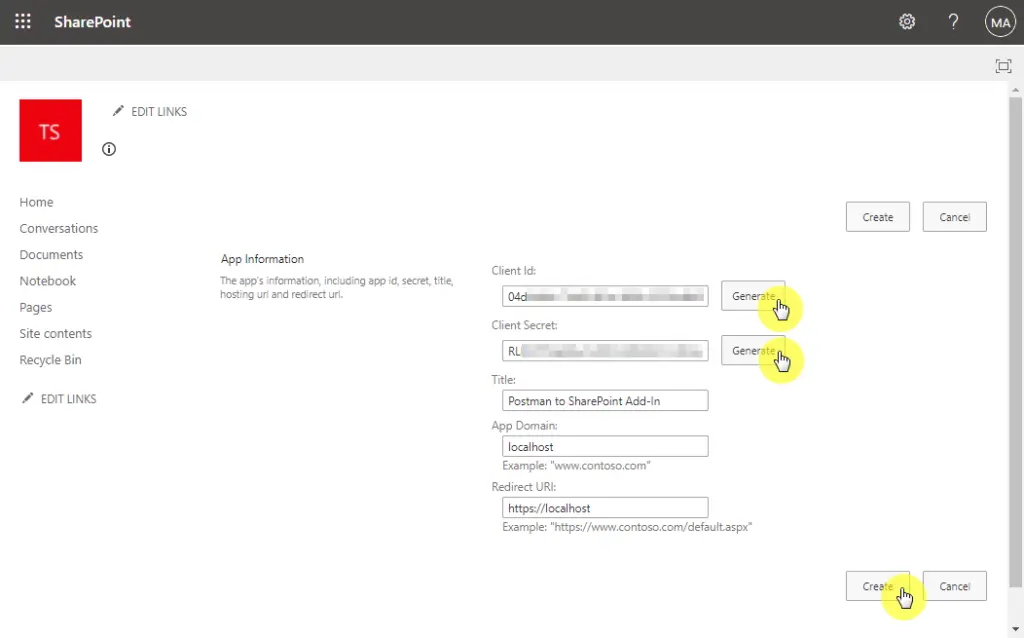
As for the first two, all you need to do is click on the “Generate” buttons.
Then, enter the following details for the succeeding forms:
- Title: Postman to SharePoint Add-In
- App Domain: localhost
- Redirect URI: https://localhost
After that, hit the “Create” button.
Afterward, SharePoint will confirm that you have successfully created an app identifier.
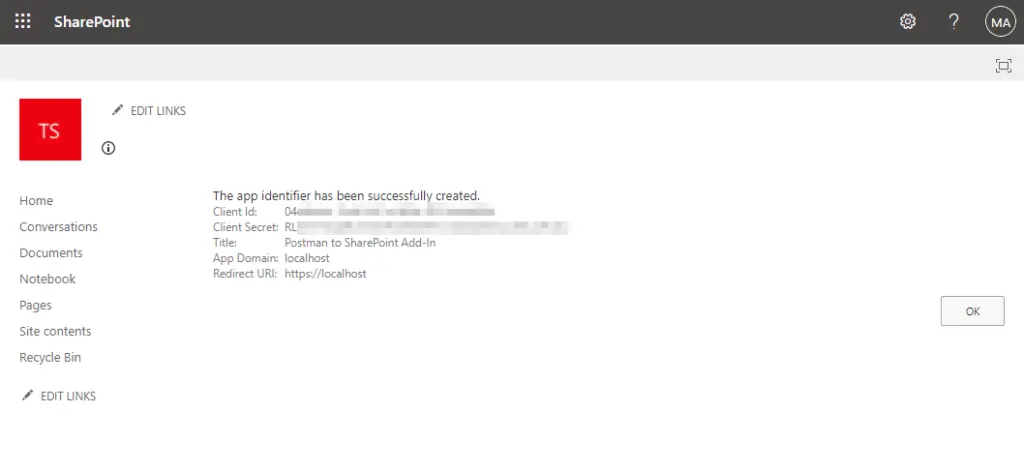
Don’t close the window right away. Save the details first in a notepad or somewhere. You will need it at a later step.
Step #3: Grant Permissions to the Add-In
Remember the appinv.aspx page you went to earlier? This is the part where you use it. However, you will need to visit it with the particular SharePoint site you used in the above section.
So if you visited https://name.sharepoint.com/sites/sitename/_layouts/15/appregnew.aspx earlier, the link you should be going to is:
https://name.sharepoint.com/sites/sitename/_layouts/15/appinv.aspx
To start, enter the “Client Id” in the “App Id” form you generated earlier. Then, click on the “Lookup” button.
After you click the button, all the details will be generated here.
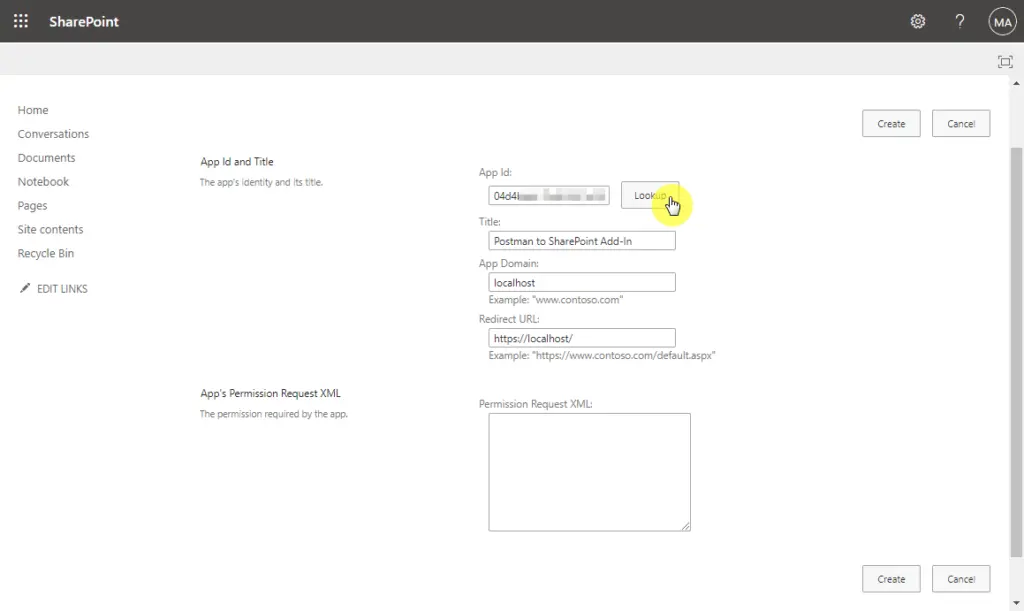
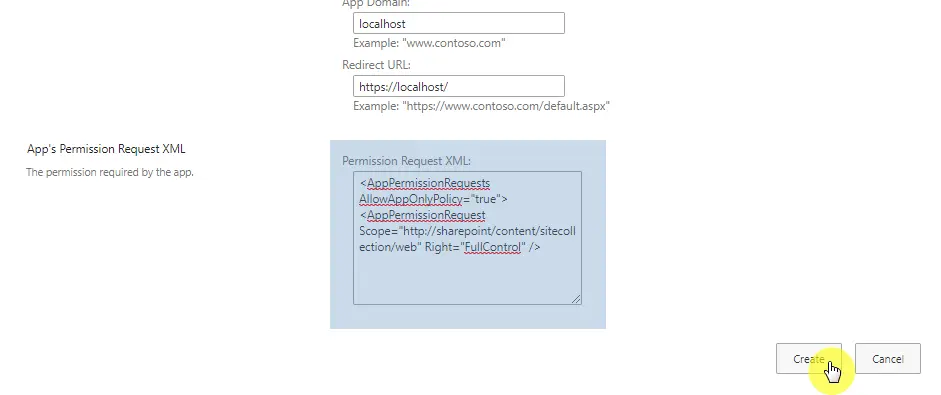
At the bottom part, you will see a large box labeled “Permission Request XML”. Enter the XML code below and click on the “Create” button.
<AppPermissionRequests AllowAppOnlyPolicy="true">
<AppPermissionRequest Scope="http://sharepoint/content/sitecollection/web" Right="FullControl" />
</AppPermissionRequests>
Here’s how it looks:
You will then be asked if you trust the Add-In. Proceed by clicking the “Trust It” button.
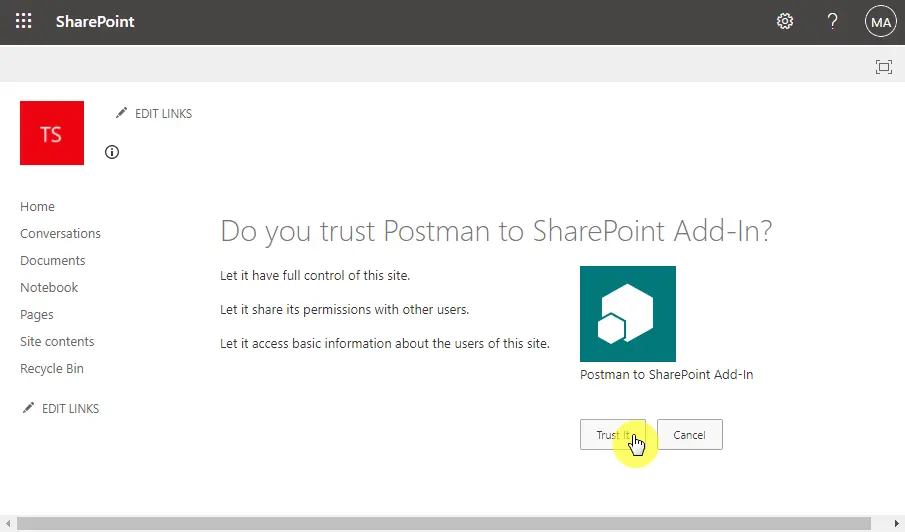
Before we proceed, you can now pat your back for a job well done. You have successfully created an app identifier and grand permission to it.
Step #4: Tenant ID retrieval
This step is the easiest and shortest. All you need to do is retrieve the Tenant ID from SharePoint Online using the Postman tool.
To start, fire up the Postman tool and open a new tab.
By default, the new tab is set to GET method. On the form, enter the request URL, which is simply the SharePoint site + client.svc.
For example:
https://name.sharepoint.com/sites/sitename/_vti_bin/client.svc/
Then, go to the “Headers” tab below the URL box and enter the following details:
- Key: Authorization
- Value: Bearer
Once you’re ready to go, click on the “Send” button.

Don’t be surprised if you ended up with an access denied message on the response body below.
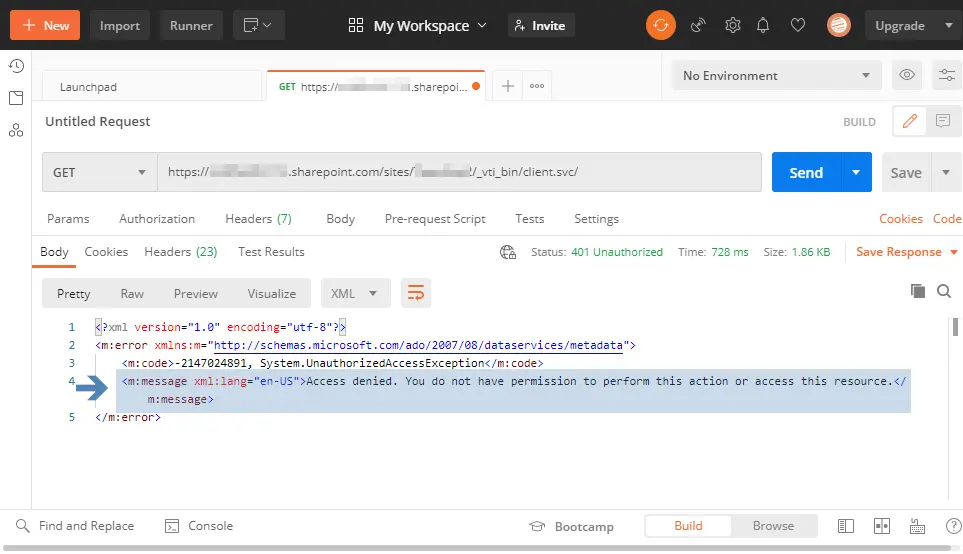
To solve this, you need to generate the access token.
Step #5: Generate access token
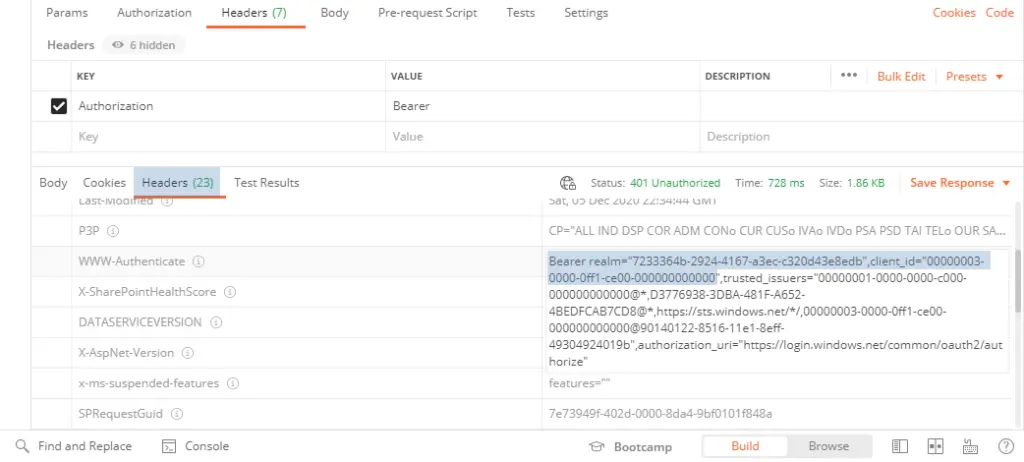
First off, you need to locate two important elements within the Postman tool — the realm value and client_id. Both are needed for later steps so note them down on a notepad or something.
The realm value represents the tenant id for your SharePoint Online site. The client_id is the resource information. You can find both of them under the “Headers” tab on the “Temporary Headers” section.
- Bearer realm = tenant id
- client_id = resource information
Both are part of the value of the “WWW-Authenticate” key.
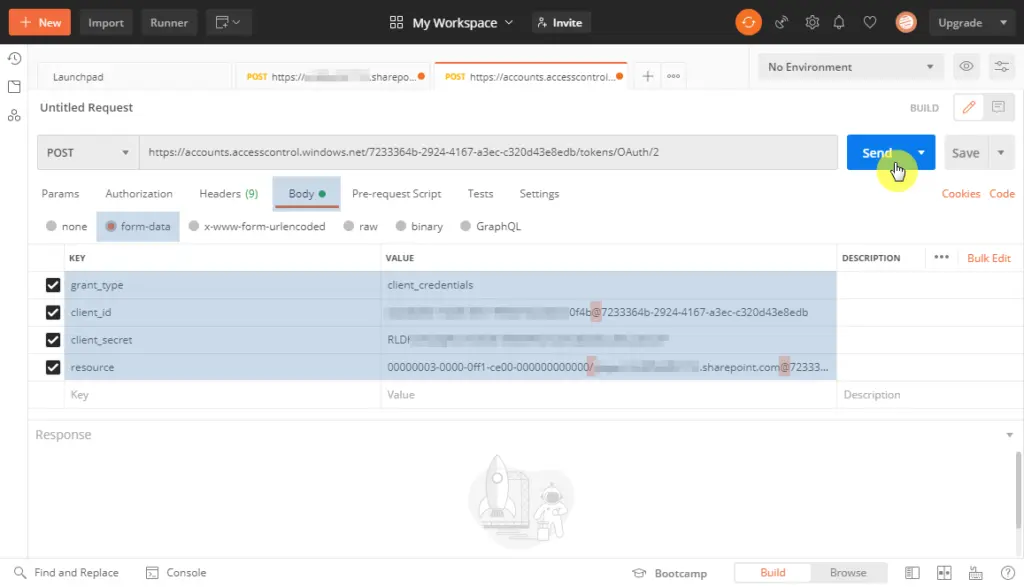
Now that you have the tenant ID (which is the real value), you can now get the access token.
First off, form a URL with the tenant ID. You will be using this as another request URL.
It goes like this:
https://accounts.accesscontrol.windows.net/tenantID/tokens/OAuth/2
Replace the “tenantID” with your own realm value. So for example, using the realm value generated earlier, you get this:
https://accounts.accesscontrol.windows.net/7233364b-2924-4167-a3ec-c320d43e8edb/tokens/OAuth/2
Now, open another tab in the Postman tool, and this time, change the request type to POST.
On the headers part right below the URL, enter the following details:

- Key: Content-Type
- Value: application/x-www-form-urlencoded
Then, switch to the “Body” tab and make sure you click on “form-data”.
Enter the following information:
- Key: grant_type
- Value: client_credentials
- Key: client_id
- Value: “Client Id” + “@” “tenant id or realm value”
Remember that the “Client Id” is one of the things you generated in Step #1. The tenant id or realm value can be found on the response body in the Postman tool, which was illustrated at the start of this step.
- Key: client_secret
- Value: Client Secret (generated in Step #1)
- Key: resource
- Value: “resource information” + “/” “site domain (no https://)” + “@” + “tenant id”
The resource information is simply the client_id found on the response body in the Postman tool (together with the tenant id). The site domain is the domain of your SharePoint Online or simply name.sharepoint.com.
Once you enter all these details, click on the “Send” button.
You will now once the execution was successful since you will see a 200 OK status.
On the response body, you will also see an “access_token” parameter. Copy the value and save it on a notepad.
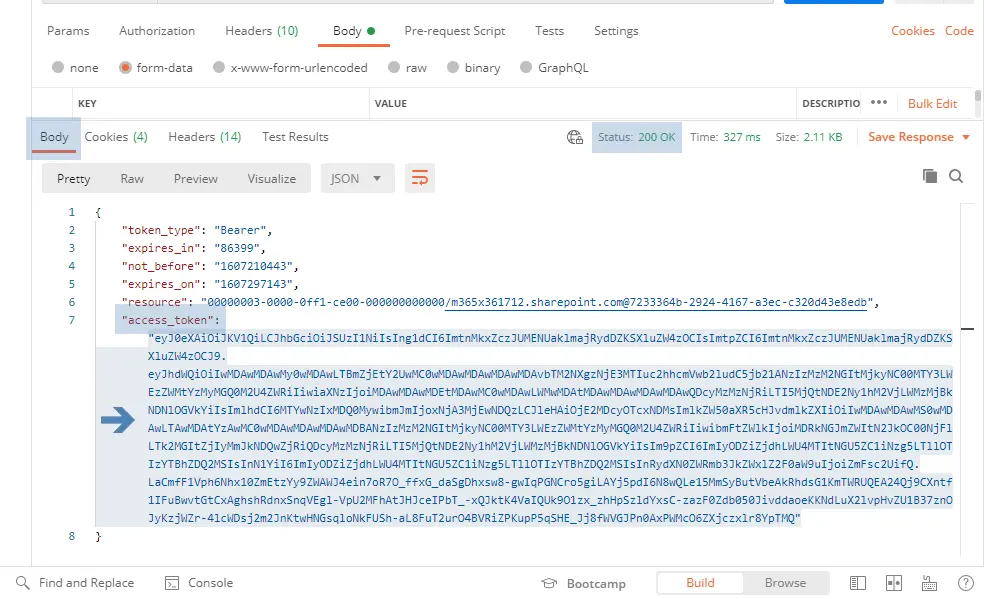
Note that the access token will expire after five to six hours. After which, you will need to generate a new access token value.
Now that you have the access token, you can now connect to SharePoint Online and access it using the Postman tool. You will have to build a REST API query to get list items from your SharePoint site.
To start, you need to build a URL for it. The basis will be something like this:
https://name.sharepoint.com/sites/sitename/_api/web?$select=Title
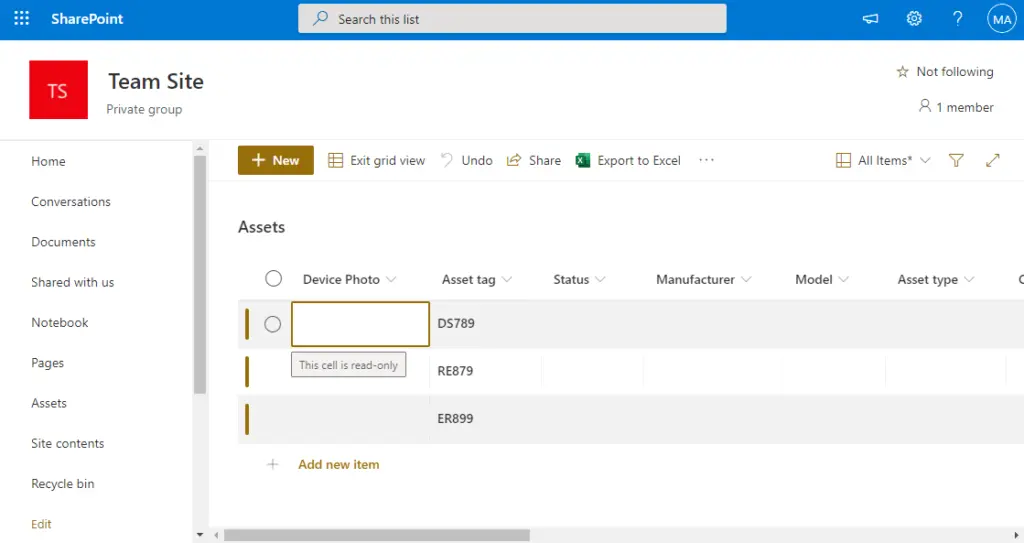
For example, here’s a team site with an assets list that has three items:
To get list item objects, you will need to use this URL:
https://name.sharepoint.com/sites/sitename/_api/web/lists/getbytitle('assets')/items
On the Postman tool, open another tab and select the GET method. Then, enter the following headers:
- Key: Authorization
- Value: “Bearer” + “ “ + “access_token value”
This means you need to enter the word “Bearer”, add space, then the access token value.
- Key: Accept
- Value: application/json;odata=verbose
Click on the “Send” button. If everything goes well, there will be a 200 OK status.

As you can see, it’s a valid request, which means the connection is successful.
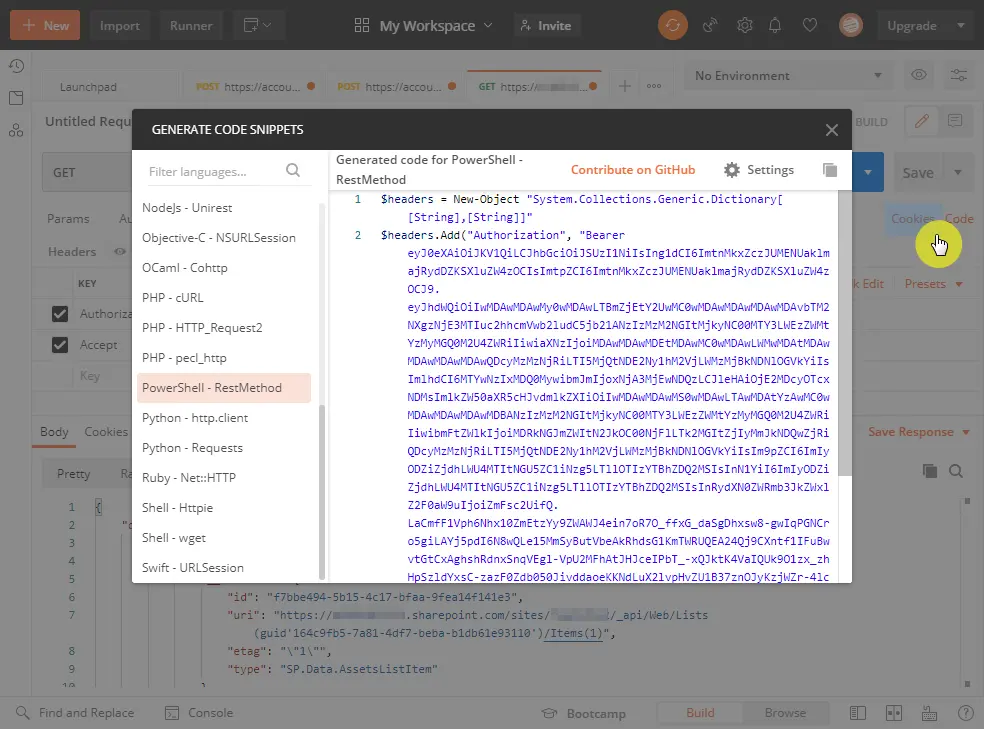
How to generate a code snippet in Postman?
Now that you can access your SharePoint Online data with Postman, you can now generate code snippets that you can use in any projects that you have.
The code language library in Postman is huge including Java, PowerShell, C#, C, and many more…
To generate a code snippet, all you have to do is click on the “Code” link found at the right corner of the tab. Make sure that you’re using the tab that has successfully connected with your SharePoint Online data.
That’s it!
Now that you know how to generate code snippets, you can basically use it any way you want. In addition, you can use the Postman tool for various actions in SharePoint Online like creating a new item in a list.
To further make use of this functionality, you must know the different capabilities of the REST API. Once you get a hang of it, you can use the Postman tool to go through your SharePoint Online site and add, remove, or update its data.


Thanks for the post!
I’ve made it all the way through the steps but in the last step I’m receiving an error:
-2147024891, System.UnauthorizedAccessException
Access denied. You do not have permission to perform this action or access this resource.
This would seem to indicate that I don’t have permissions to the site, although since I’ve been successful in all the steps leading up to this, I’m not sure why this would be.
Any suggestions/thoughts?
Bah.
I found my issue. I had entered the headers into the wrong section in Postman. All is good!
Again, thanks for this post, it really helped me get off the ground integrating Postman w/SPO.
Glad you got it working, Jeff!
I am having the same error and I don’t know what’s wrong. Kindly assist
Hi Ryan,
Thanks for this amazing blog .I have tried to implement the same and when I am trying to pass parameters in postman .I am encountering the below error:
AADSTS90102: ‘redirect_uri’ value must be a valid absolute URI
I am giving https%3A%2F%2Flocalhost%2F as the redirect_uri parameter ,could you please suggest what might be the issue ?
Thanks
Hi Shraddha,
The Redirect URI should be set exactly as, “https://localhost” without the quotes.
Hey Jeff – I have followed all the steps up until the final step. In Postman, I have a GET request pointing to https://mysite.sharepoint.com/sites/Records/_api/web/lists. Under Headers, I have the Authorization and Accept keys. Authorization has a Value of “Bearer [access token]” where Access Token is the string I get from the earlier step without any brackets/quotes. The response I get says: {“error”:{“code”:”-2147024891, System.UnauthorizedAccessException”,”message”:{“lang”:”en-US”,”value”:”Access is denied. (Exception from HRESULT: 0x80070005 (E_ACCESSDENIED))”}}} In a different spot in Postman, I see the following: 917656; Access+denied.+Before+opening+files+in+this+location%2c+you+must+first+browse+to+the+web+site+and+select+the+option+to+login+automatically. The account I am logged into the machine with is a Site Collection admin on the site collection.… Read more »
Hi Ryan,
Thanks for this amazing blog .I have tried to implement the same and when I am trying to pass parameters in postman.
I try to recheck every step to ensure that I follow your guide however, I got Error {“error”:”invalid_request”,”error_description”:”Token type is not allowed.”}
Have you seen this before? or I am not sure that currently it needs more parameter on header.
Any suggestions/thoughts?
See below: For new SharePoint subscription Grant App Permission is disabled by default or the browser link https://xxxx-admin.sharepoint.com/_layouts/15/appinv.aspx is disabled. To enable this feature, we need to connect to SharePoint using Windows PowerShell and then run set-spotenant -DisableCustomAppAuthentication $false. Run the following commands on PowerShell. Install-Module -Name Microsoft.Online.SharePoint.PowerShell $adminUPN="<the full email address of a SharePoint administrator account, example: >" $orgName="<name of your Office 365 organization, example: contosotoycompany>" $userCredential = Get-Credential -UserName $adminUPN -Message "Type the password." Connect-SPOService -Url https://$orgName-admin.sharepoint.com -Credential $userCredential set-spotenant -DisableCustomAppAuthentication $false Please note: Fill in the values for the $adminUPN and $orgName variables (replacing all the text between the quotes, including the <… Read more »