

Last Updated on March 22, 2025
Having inconsistent data in SharePoint lists?
In this guide, let’s talk about list validation rules in SharePoint Online including implementation.
Let’s get started.
Table of Contents:
What is list validation?
List validation is simply a way to control, to “validate”, what kind of data can enter into a list.
It lets you set rules that check the values across multiple columns before allowing someone to save or update a list item.
For example, you can set a rule that says:
- The end date must be after the start date
- The quantity field must be greater than 0
If someone tries to enter something that breaks that rule, they will get an error message that you have defined beforehand.
You create these rules using formulas, which is quite similar to how you would do it in Excel, in the list settings.
List validation is quite useful when you want to enforce data quality without having to write a single line of code.
Though depending on how you define it, you still need to supply the formula as the rule. 😅
Sign up for exclusive updates, tips, and strategies
Types of List Validation
There are 2 main types of list validation in SharePoint Online.
1. Column Validation
From the name itself, this applies to a single column only.
Meaning, it checks the value entered into the column before saving without having to check on other columns in that list.
For example:
- Quantity must be greater than zero
- The email column must contain “@”
Both rules only need to check the user’s input.
2. List-Level Validation
In contrast, this type applies across multiple columns in the same list item.
This will compare values from different columns in the list and run when the item is being saved or updated.
For example:
- The end date must be after the start date
- If the status is “completed”, then completion data must be filled in
In both examples, the rule has to check on the value of another column in the list to validate the user’s input.
How to Implement Column Validation
For this, let’s assume that the rule is about restricting the text length to a maximum of 50 characters.
Step 1: Go to column settings
The first step is to open the list, click the column header, then select Column settings > Edit.
In this example, we will have the comments column header:

This will open the column setup panel on the right.
Step 2: Add a validation formula
On the panel, scroll down and click the More options button then open the column validation option:
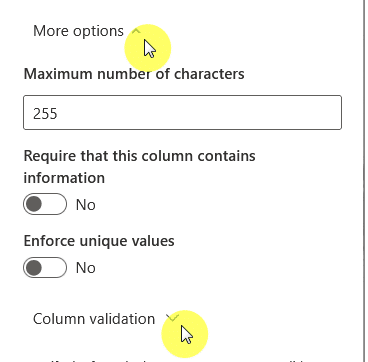
Note that some column types don’t support column validation directly.
Anyway, there will then be a box where you can enter the formula or the column validation rule.
In our example, let’s use the formula:
=LEN([Comments]) <= 50
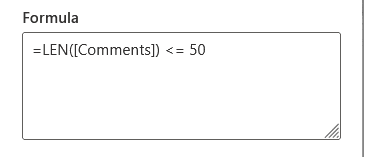
This formula will check if the length of the text entered is 50 characters or less.
Step 3: Write an error message
There will be another box for a user message.
For example:
Please enter 50 characters or fewer.
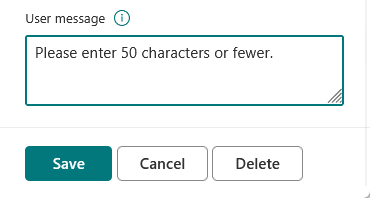
After entering the user message, click the Save button.
Now, to test the demo, I purposely entered information that could trigger the list validation.
See the error message it produces:
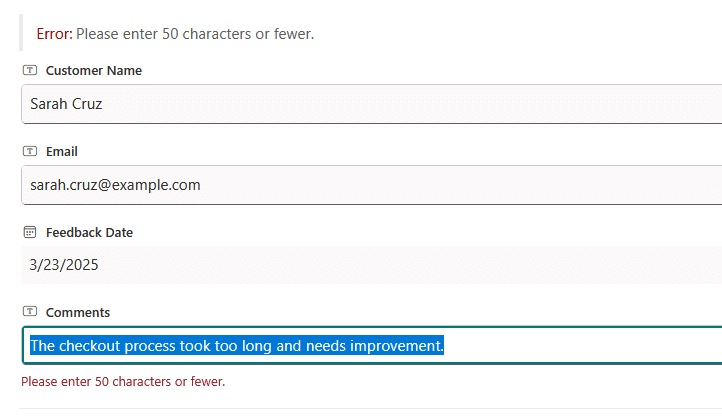
Nice! 🙂
How to Implement List-Level Validation
For this, let’s say the rule is to make sure that the end date is after the start date.
The steps are the same, though the difference here is that we need to go to the list settings instead of the column settings.
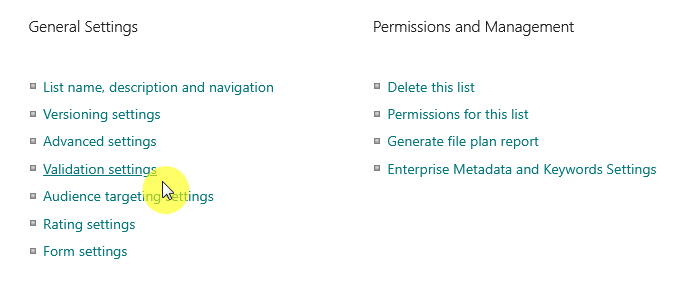
Step 1: Open List Settings
To start, go to the list and then click the gear icon (⚙️) in the top-right corner then select List settings from the dropdown.
On the settings page for the list, click Validation settings under the general settings group.
It’s the fourth option from the top:
Then let’s get to the main point:
Step 2: Add a list validation formula
You should see 2 boxes here, 1 for the formula and another for the user message.
Besides the formula box, there’s another box there that contains the columns that can be inserted into the formula.
Assuming that the date column titles are “End Date” and “Start Date”, we can use the following formula:
=[End Date] > [Start Date]
In the user message, let’s use this warning message:
End Date must be after Start Date.
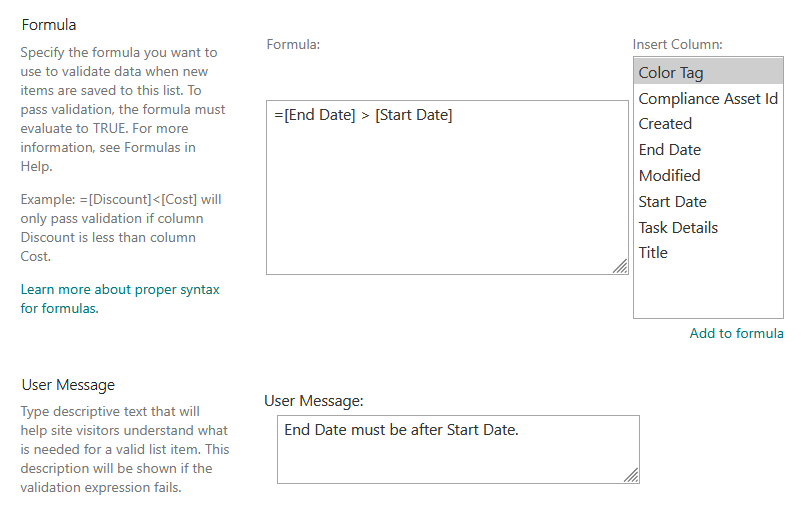
Don’t forget to click the Save button.
Step 3: Save and test it
Now let’s try adding an item where the end date is before the start date and see if it triggers the rule.
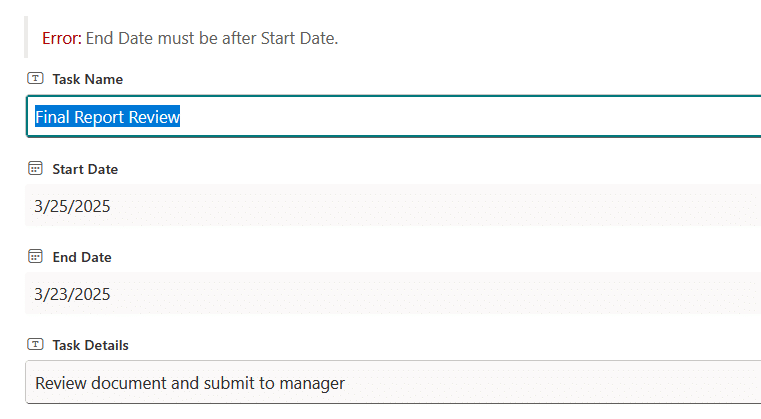
You can see, the error message will pop out if the start date is earlier than the end date.
Success! 🥳
Apply Best Practices for Validation Rules
As you can see, it isn’t that complicated as long as your formula is correct. 🙂
To give the best experience for your users, try applying these things:
- Use user-friendly error messages with clear guidance on input errors
- Test validation rules in a development environment
- Balance strictness with user needs
Do you have any questions about SharePoint list validation rules? Let me know in the comments.
For any business-related queries or concerns, contact me through the contact form. I always reply. 🙂


