

Last Updated on August 8, 2024
Need to disable external sharing on some sites?
In this guide, I will walk you through the steps of disabling external sharing on sensitive sites in SharePoint Online.
Let’s get started.
Table of Contents:
What is external sharing?
Basically, external sharing in SharePoint allows users to share content with people outside your organization.
Levels of external sharing:
- Anyone links: These links allow anyone with the link to access the content without signing in.
- New and existing guests: Users can share with guests who authenticate with a work, school, or Microsoft account.
- Existing guests: Sharing is limited to guests already in your organization’s directory.
- Only people in your organization: This entirely prevents sharing content outside your organization.
Well, this feature is actually helpful in collaboration, but it also poses security risks if not managed properly.
As for the management of external sharing, it can be configured at both the organization and site levels.
This in turn allows administrators to control who can share content and what content can be shared.
👉 Related: External Sharing in SharePoint Online: How Does It Work
Sign up for exclusive updates, tips, and strategies
Identifying Sensitive Sites
Sensitive SharePoint sites contain information that requires restricted access and heightened security.
Because of that, you need to identify these sites to help protect critical data from unauthorized access.
If you’re not sure how to identify such sites, here are some criteria you can apply:
- Confidential business data: Sites with trade secrets, financial records, or business strategies.
- Personal information: Sites holding employee or customer personal data.
- Regulatory compliance: Sites that need to comply with laws like GDPR or HIPAA.
- Intellectual property: Sites with patents, trademarks, or copyrighted material.
- High-level management: Sites used by executives or senior management for strategic planning.
Things can change, so it’s important to regularly review and classify sites to ensure they are appropriately protected.
This includes understanding the types of data stored and the potential impact if the data is compromised.
This way, you would be able to better manage your SharePoint environment and mitigate risks associated with data breaches.
👉 Related: How to Protect Confidential Content on SharePoint Online
Disabling External Sharing
As I explained earlier, there are two levels where you can disable external sharing:
- Tenant
- Site collection
I’ll explain each one:
Organization-Wide External Sharing Settings
From the name itself, this setting controls how information is shared across all the sites in the tenant.
Despite the advantages (like consistent policies), you need to be mindful since you would be affecting the whole organization. 🙂
Here’s how to do it:
Go to any sites in your organization or on any Microsoft 365 page.
Then click the app launcher icon on the top left corner > admin button:
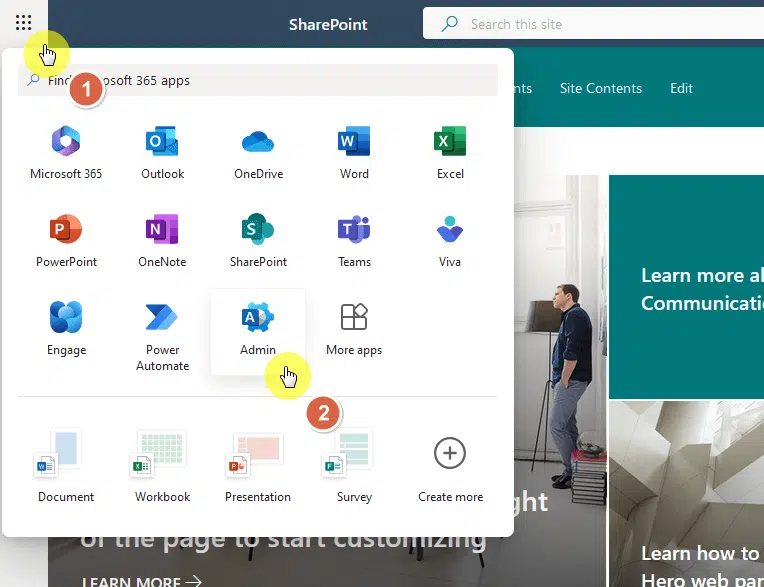
This will bring you to the Microsoft 365 admin center.
Now, expand all the admin center options in the left panel and select SharePoint from the list.
Like this:

Nice! 🙂
👉 Related: The SharePoint Admin Role (Complete Guide for Beginners)
Step 2: Set sharing to specific levels
You’re now in the SharePoint admin center.
The next step is to go to the policies > sharing page:
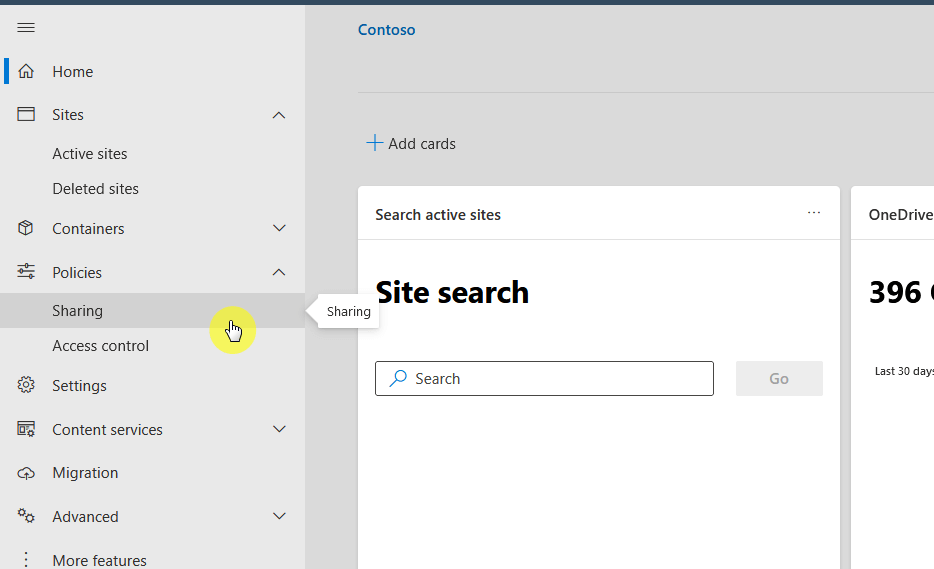
You will then see various sharing settings for the whole tenant.
What you need to do first here is to set the external sharing to the “least permissive” configuration.
Like this:

If you drag the SharePoint slider down, the slider for OneDrive also gets dragged down automatically.
Step 3: Check file and folder links
Well, technically, this would be set automatically to “only people in your organization”.
But to be sure, it wouldn’t hurt to check it and the option below it (since both are just below external sharing).
Here:

The option below is about the default permission for sharing links.
Since we’re talking here about disabling external sharing, the only people who can open the links are those in the organization.
It doesn’t hurt though to set this to “view” since you can manually change this per link when necessary. 🙂
👉 Related: SharePoint File Sharing With External Users: Quick Guide
Site Collection-Level Settings
Since this is specific to a site, this will allow you to control external sharing for specific site collections.
This is a bit more flexible since you could do more stringent control over specific sites without affecting the entire tenant.
Here’s how to do it:
This is similar to the first step in the previous section.
Basically:
- Find the app launcher > admin
- Expand the options in the left panel
- Select the SharePoint option
Feel free to review the earlier section. 🙂
Step 2: Select the site collection
Now that you’re in the SharePoint admin center, you need to get to the sites > active sites page.
Like this:
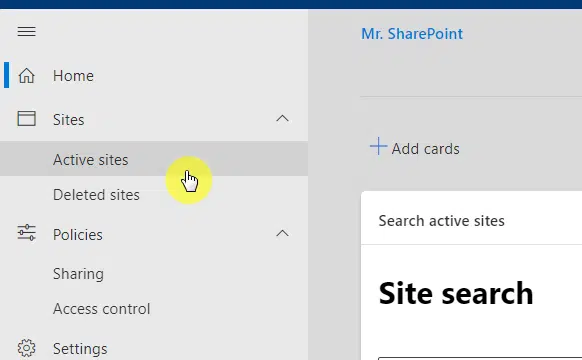
You should be able to see all the active sites in the tenant.
All you have to do here is to find the site collection that you want to manage.
If you have lots of active sites, you can always use the search function to find the site directly. 🙂
After locating the site, select it by clicking on the radio button on the left side of the name (don’t click on the name).
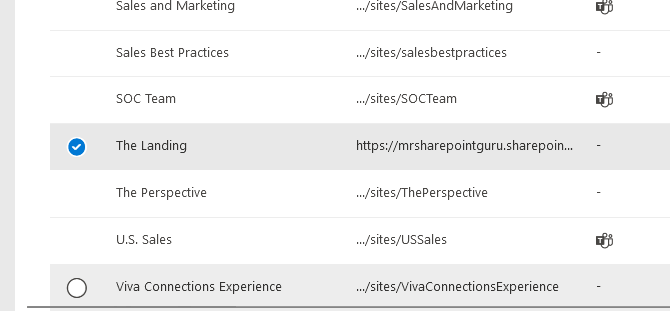
Easy! 👍
Step 3: Adjust the sharing settings
While the site is selected, click the sharing button from the command bar.
Depending on your screen resolution, it may be hidden in the list, like this:
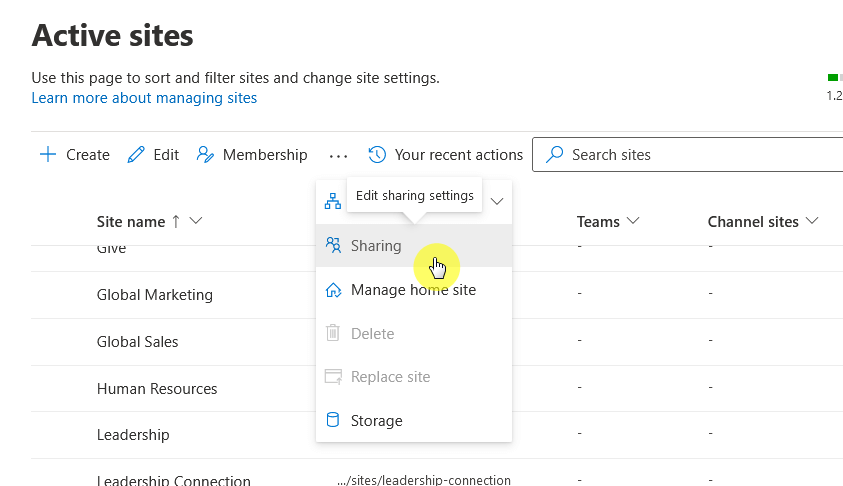
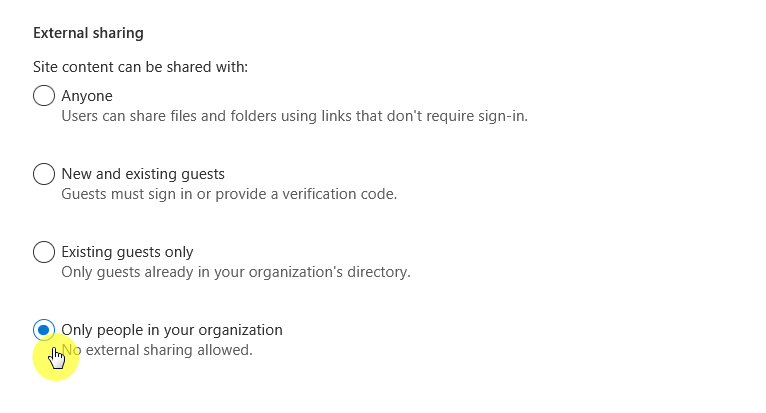
The first setting here would be external sharing.
What you need to do is select the “only people in your organization” option to disable external sharing.
Like this:
That’s it! 🙂
Depending on your requirements, you may like this more since this allows you to set a control on a per-site basis.
It only works if you have fewer sites you want to disable external sharing than sites to share with external users.
Configuring Domain Restrictions
Fortunately, you’re not only left disabling external sharing without other options.
Imagine the number of modifications you need to do to allow specific individuals access to specific sites. 😅
The other choice is to configure domain restrictions where you control which external domains can access your shared content.
Some situations where you might prefer this include:
- Collaboration with specific partners
- Regulations requiring data sharing to be restricted to certain domains
- Internal collaboration with subsidiaries or affiliates
- Select external sharing
- Mitigating risks of broad external sharing
Basically, this adds a layer of security by ensuring that only trusted domains can interact with your data.
Here’s how:
This is similar to the first step in the previous section.
Basically:
- Find the app launcher > admin
- Expand the options in the left panel
- Select the SharePoint option
Feel free to review the earlier sections. 🙂
Step 2: Enable the setting
After that, you need to go again to the policies > sharing page:
However, we won’t be touching the sliders (and external sharing can’t be “least permissive”), or the next settings are blocked.
Open the settings for “more external sharing settings” and you will see various options.
What you need to do is enable limit external sharing by domain and then click the add domains button:
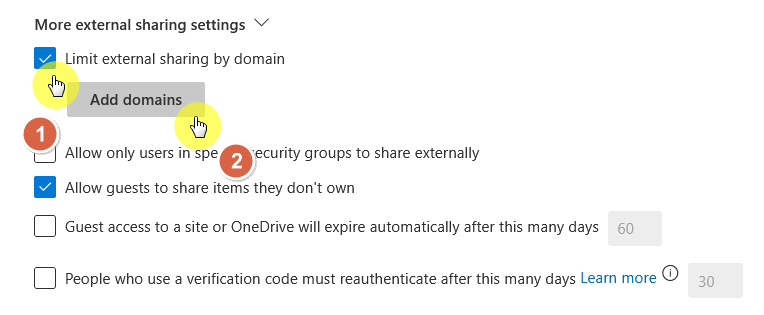
Nice! 🙂
Step 3: Add domains
After clicking the button, a right panel will appear.
When setting up domain restrictions, you can choose to:
- Allow sharing only with certain domains
- Block specific domains
Select the setting you prefer and add the domain in the box.
Like this:
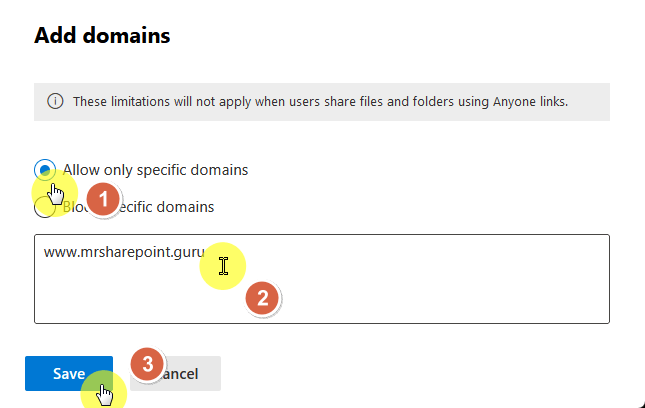
Hit save to save the changes. 🙂
You might want to combine domain restrictions with other external sharing settings to provide a comprehensive approach.
⚠️ Note: Domain restrictions won’t apply when users share files and folders using “anyone links”.
Using Security Groups for External Sharing
The problem with external sharing is “who shared what”.
What’s awesome about SharePoint is that you can set that only users from specific security groups can share externally.
It’s a nice way to provide an extra layer of security so that only authorized users can share externally.
Here’s how:
This is similar to the first step in the previous section.
Basically:
- Find the app launcher > admin
- Expand the options in the left panel
- Select the SharePoint option
Feel free to review the earlier sections. 🙂
Step 2: Enable the setting
After that, you need to go again to the policies > sharing page:
However, we won’t be touching the sliders (and external sharing can’t be “least permissive”), or the next settings are blocked.
Go to the same place where you can enable the earlier feature though this time, enable the feature next to it.
Like this:
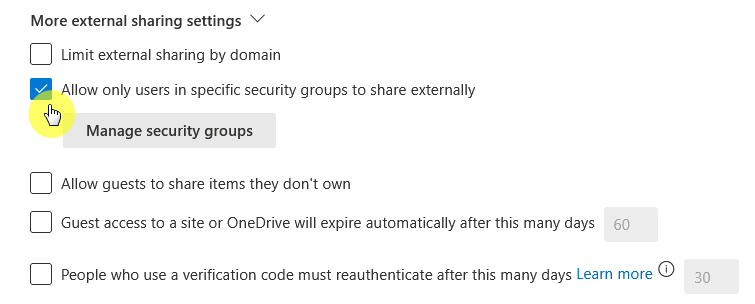
You need to check this setting to allow only users in specific security groups to share externally and manage it. 🙂
Step 3: Add security groups
After the setting has been enabled, click the manage security groups button.
This will open a right panel where you can enter or add a security group:
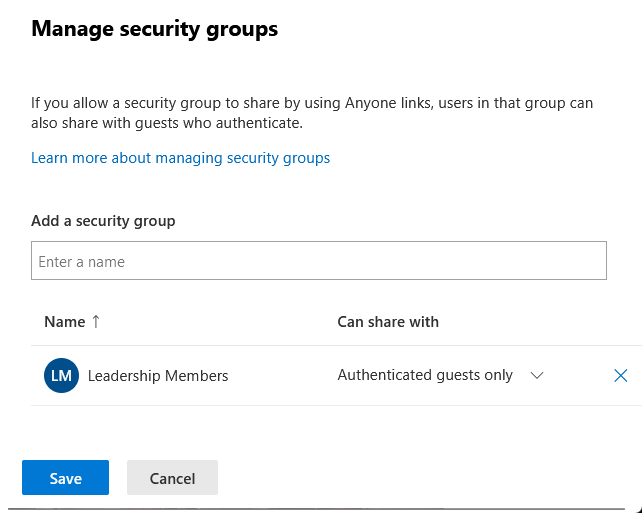
Once you have added a group, you will be able to configure who the users can share with:
- Authenticated guests only
- Anyone
Naturally, I recommend setting this to authenticated guests only so you can easily track who has access to what. 🙂
👉 Related: Beginner’s Guide to SharePoint Security Groups (Overview)
Advanced Settings and Tips
Since we’re talking about disabling external sharing on sensitive sites, some advanced settings can help.
Here’s what I recommend that you consider using:
- Link expiration: Set expiration dates for shared links to limit sharing long-term.
- Link permissions: Restrict link permissions to view-only or specific actions.
- Guest access expiration: Define how long guests can access shared content before their permissions expire.
- Default link settings: Choose the default type of link (e.g., specific people) for new shares.
These settings allow administrators to manage sharing more precisely, reducing the risk of unauthorized access.
I recommend sharing link expiration — shared links don’t remain active indefinitely (anti-long-term access).
It’s useful for temporary collaborations (external partners) where ongoing access isn’t required.
The same for guest access expiration (defined period), though you can extend guest sharing access when necessary.
Securing your SharePoint environment involves managing sharing settings and continuous monitoring.
The methods I discussed here are the following:
- Control organization-wide and site collection-level sharing to protect information.
- Use domain restrictions and security groups to limit access further.
- Advanced settings like link expiration and guest access expiration offer extra security.
As always, don’t forget to regularly review and adjust these settings to stay secure as things change over time.
Anyway, got any questions about disabling external sharing on sensitive sites? Let me know.
For any business-related queries or concerns, contact me through the contact form. I always reply. 🙂


