

Last Updated on July 3, 2024
Want to use PowerShell to upload files?
In this guide, I will walk you through the steps of using PowerShell to upload files to SharePoint Online.
Let’s get started.
Table of Contents:
Why use PowerShell to upload files?
Uploading files to SharePoint Online using PowerShell offers automation and efficiency.
Benefits:
- Automation: Schedule uploads to run automatically at specific times.
- Batch processing: Upload multiple files at once, reducing manual effort.
- Consistency: Ensure uniformity in how files are uploaded and stored.
- Customization: Tailor scripts to meet specific needs and requirements.
- Integration: Seamlessly integrate with other systems and workflows.
This approach is especially useful for IT administrators and power users who handle large volumes of data.
Additionally, PowerShell scripts can be modified and reused, making them a versatile tool for ongoing tasks.
Sign up for exclusive updates, tips, and strategies
Uploading a Single File
Uploading a single file to SharePoint Online using PowerShell is straightforward.
Here’s the complete PowerShell script:
# Connect to SharePoint Online
Connect-PnPOnline -Url "https://yourtenant.sharepoint.com/sites/yoursite" -Interactive

# Upload the file
Add-PnPFile -Path "C:\path\to\your\file.txt" -Folder "Shared Documents"
It will prompt you to log in to your SharePoint account.
Once logged in, the file will be uploaded to the specified SharePoint Online document library.
Here’s how I did mine:
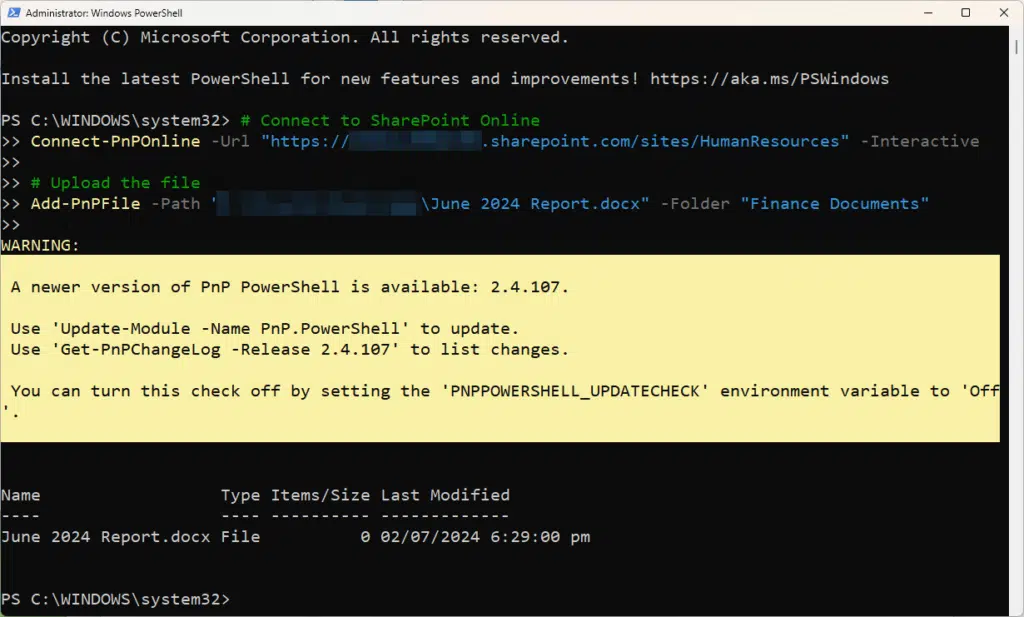
This method is efficient for quick, one-time uploads.
⚠️ Note: Since we’re using PNP PowerShell here, there’s no need to use shared web server extensions or any SharePoint CSOM assemblies.
Uploading Multiple Files
Uploading multiple files to SharePoint Online can be done efficiently using PowerShell.
First, connect to your SharePoint site, then use a loop to upload all files in a specified folder.
Here’s the complete script:
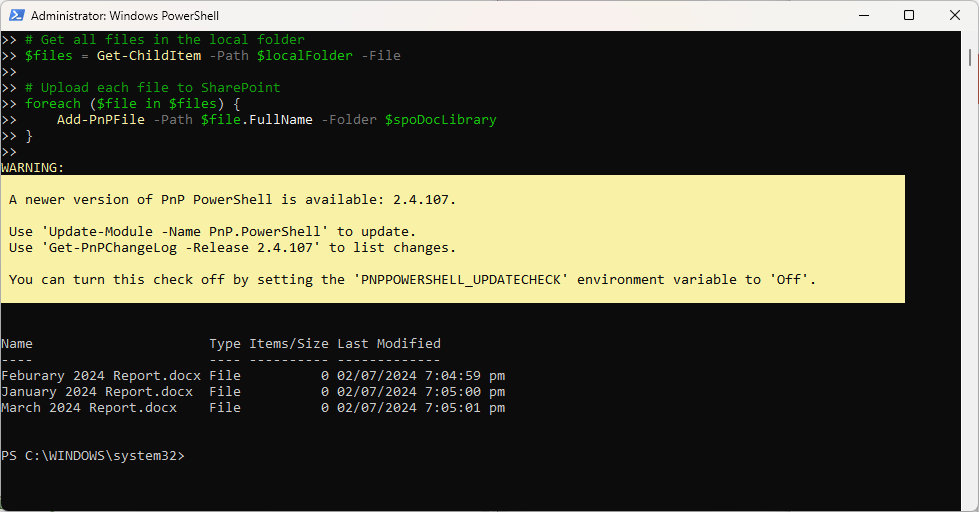
# Connect to SharePoint Online
Connect-PnPOnline -Url "https://yourtenant.sharepoint.com/sites/yoursite" -Interactive

# Define local folder and SharePoint document library
$localFolder = "C:\path\to\your\folder"
$spoDocLibrary = "Shared Documents"

# Get all files in the local folder
$files = Get-ChildItem -Path $localFolder -File

# Upload each file to SharePoint
foreach ($file in $files) {
    Add-PnPFile -Path $file.FullName -Folder $spoDocLibrary
}
⚠️ Note: Make sure to put all the files you want to upload in the same folder.
After logging in, the script will upload all files from the specified local folder (source file path) to the chosen library.
It looks like this in PowerShell:
Nice! 👏
Handling Common Issues
When uploading files to SharePoint Online with PowerShell, you may encounter some common issues.
Here are a few typical problems and how to solve them:”
Issue: Access Denied
Access denied errors often occur due to insufficient permissions.
Make sure your account has the necessary permissions to upload files to the SharePoint library.
You can find it in the advanced permissions settings of the site:
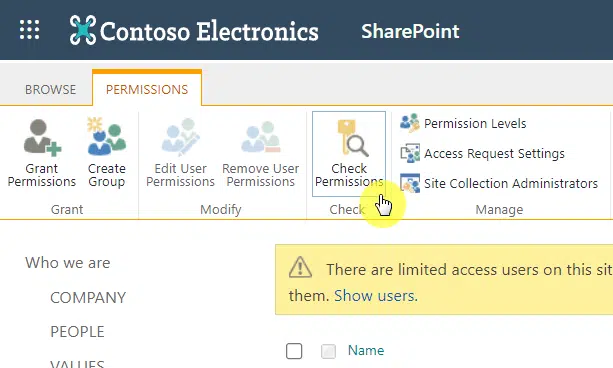
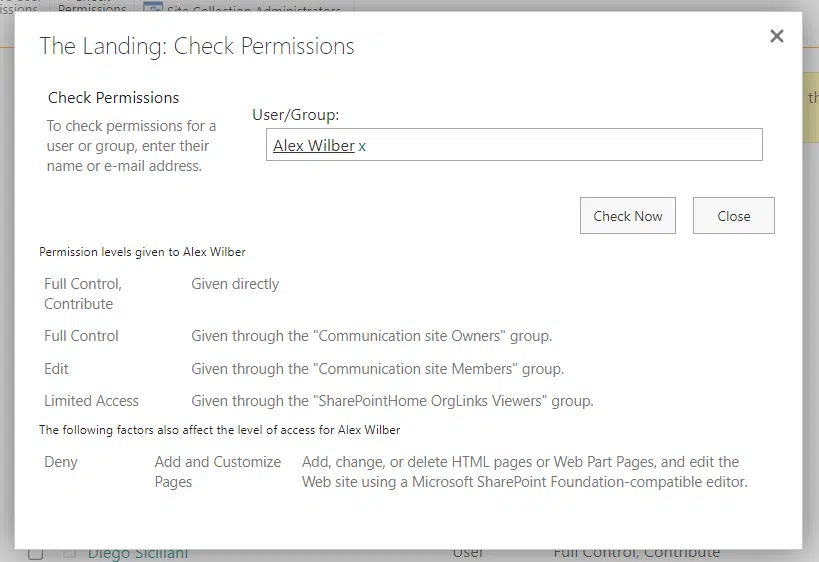
There’s a check permissions button in the ribbon once you get to the next page.
If you click on it, a small window will appear where you can enter the name of the user or group to check.
The results (which looks like a log file) look like this:
👉 Related: How to Check User Permissions in SharePoint Online (Guide)
Issue: Large File Uploads
Uploading large files may fail if they exceed the file size limit or if the connection times out.
How to resolve:
- Make sure the SharePoint Online library is configured to accept large files.
- If possible, split large files into smaller parts and upload them separately.
Well, you can also use chunked upload to handle large files.
You can try this script:
$filePath = "C:\path\to\largefile.zip"
$library = "Shared Documents"
$chunkSize = 10MB

$ctx = Get-PnPContext
$uploadStatus = Start-PnPFileUpload -Path $filePath -Library $library -ChunkSize $chunkSize -Context $ctx

while ($uploadStatus.Status -ne "Completed") {
    Start-Sleep -Seconds 5
    $uploadStatus = Resume-PnPFileUpload -UploadSession $uploadStatus.UploadSession -Context $ctx
}
Nice! 🙂
Issue: Connection Timeouts
Connection timeouts can occur if the upload process takes too long, especially with a slow internet connection or large files.
To resolve this, you need to increase the timeout settings in your PowerShell session:
$session = New-PSSessionOption -IdleTimeout (3600*1000)
Connect-PnPOnline -Url "https://yourtenant.sharepoint.com/sites/yoursite" -Interactive -SessionOption $session
It also helps if you have a faster internet connection to minimize timeouts.
Anyway, got any questions about using PowerShell to upload files to SharePoint? Let me know.
For any business-related queries or concerns, contact me through the contact form. I always reply. 🙂


Connect-PnPOnline -Url “https://yourtenant.sharepoint.com/sites/yoursite” -Interactive
Above command does not run anymore and gives below error:
WARNING: Connecting with -Interactive used the PnP Management Shell multi-tenant App Id for authentication. As of September 9th, 2024 this option is not available anymore. Refer to https://pnp.github.io/powershell/articles/registerapplication.html on how to register your own application.