
Last Updated on January 16, 2024
Do you want to change the site logo?
In this guide, you will learn how to change the site logo in SharePoint Online, the recommended dimensions and formats, and more.
Let’s get started.
Table of Contents:
Recommended Dimensions and Formats
Basically, it varies depending on the context in which the logo will be displayed.
Here are some guidelines:
| Item | Description | Recommended Size |
| Site logo thumbnail | A square logo used in search results, site cards, and other square logo requirements | 48×48 pixels or 64×64 pixels |
| Site logo | The logo displayed in the site header and can be transparent or non-transparent | 64×64 pixels |
| Extended layout site logos | Logos with extended width for specific layout requirements. | 192×64 pixels |
Keep in mind, these are recommended dimensions, and actual sizes may vary based on your SharePoint setup and site design.
Additionally, when designing a logo, it must maintain clarity and readability at the sizes it will be displayed.
Related: SharePoint Modern Pages Image Sizing and Scaling [Reference]
Sign up for exclusive updates, tips, and strategies
How to Change the Site’s Logo
Fortunately, changing the site’s logo in SharePoint is a straightforward process.
Here are the steps:
Step 1: Change the look
Navigate to the target site and do the following:
- Click the gear icon (site settings)
- Press the change the look option
Step 2: Header options
This will open another set of options in the panel.
From here, click the header button:
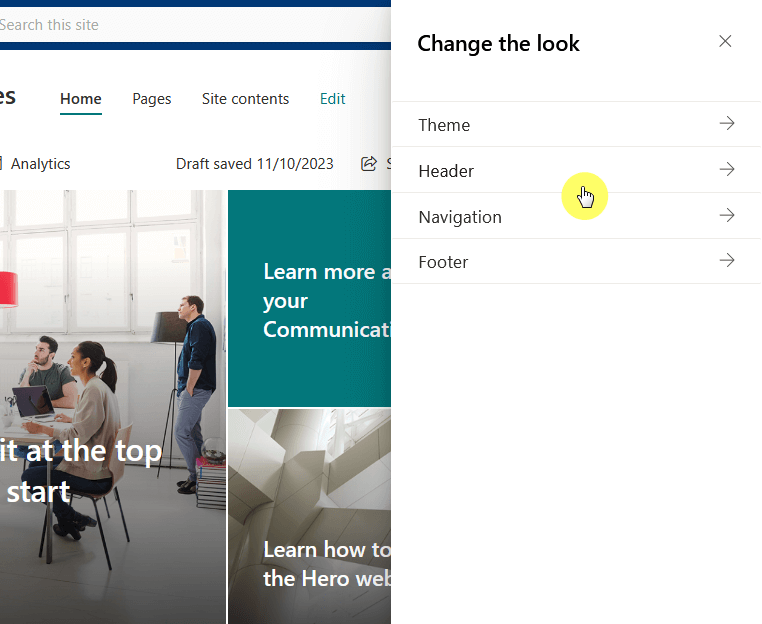
The site logo is in the header — which is why it’s in the header options.
Step 3: Upload the site logo
On the next screen, scroll down until you get to the display options.
There are two types of logos (more on this later) you can upload:
- Site logo thumbnail (square logo)
- Site logo (site header)
All you need to do is click on the change button and upload the file:
You can also try out a different site layout or logo placement.
Once you’re done with the logo settings, don’t forget to click the save button.
Site Logo vs Site Logo Thumbnail
What happens if you only upload one of them? Does it automatically fill out the others?
Site Logo
The site logo is the primary logo that appears in the site header.
It’s one of the first things site visitors see when they visit your SharePoint site (which is why it’s a key element in branding).
The site logo can be transparent or non-transparent, and its recommended size is 64×64 pixels.
However, for extended layout site logos, which have an extended width, the recommended size is 192×64 pixels.
If you only upload a site logo, all the places that need a small logo will show the site name’s abbreviation.
Site Logo Thumbnail
The site logo thumbnail, on the other hand, is a square logo that appears in the following places:
- Search results
- Site card
- Other places that require a square logo
You can even see it on OneDrive:
Its primary function is to provide a visual identifier for your site in these contexts.
Here’s another different thing:
Even if you only upload a thumbnail (no site logo), it will automatically become the site logo.
The recommended size for the site logo thumbnail is typically 48×48 pixels or 64×64 pixels.
Can you use PowerShell to change the logo?
Yes, you can use PowerShell to change the logo of a SharePoint site.
This method is particularly useful if you’re managing multiple classic/modern sites or prefer a more automated approach.
If you have the logo image already on the site, you can use the following code:
Connect-PnPOnline -Url https://yoursite.sharepoint.com -Credentials (Get-Credential)
Set-PnPWeb -SiteLogoUrl "https://yoursite.sharepoint.com/path/to/your/logo.jpg"
But if you haven’t uploaded it yet? What if you wanted an easier method to do it without uploading the logo yourself?
Well then, you can use the following command:
$SiteUrl = "https://yoursite.sharepoint.com/sites/site"
$LocalFilePath = "D:\folder\logo.png"
$SharePointLibraryPath = "https://yoursite.sharepoint.com/sites/site/SiteAssets"
Connect-PnPOnline -Url $SiteUrl -UseWebLogin
Add-PnPFile -Path $LocalFilePath -Folder $SharePointLibraryPath
Set-PnPWeb -SiteLogoUrl "https://yoursite.sharepoint.com/sites/site/SiteAssets/logo.png"
While using PowerShell is efficient, it requires a basic understanding of scripting and SharePoint administration.
If you’re not comfortable with PowerShell, consider using the SharePoint Online interface to change the site logo.
Why use a branded site logo?
Do you really have to use a site logo? Well, it’s not a requirement.
However, using a branded site logo in SharePoint is important for several reasons:
- Reinforces brand identity: Visually communicates your organization’s values, mission, and vision, strengthening recognition and creating a cohesive brand image.
- Enhances user experience: A unique logo captures users’ attention, sets the tone for their browsing experience, and makes site navigation easier.
- Improves communication: Customizing your site to match your brand’s elements builds trust, leading to smoother communication within your organization.
- Increases employee engagement: A well-branded SharePoint site fosters employee engagement by creating a familiar and appealing environment.
- Enhances professionalism and credibility: A professional and consistent logo boosts your organization’s professionalism and credibility.
If you have more questions about the process of changing your SharePoint site logo, feel free to leave a comment.
For additional inquiries or any business-related concerns, kindly use the site’s contact form. I will respond promptly.


If the site has a logo and you set the logo, the logo is not updated. Is that a caching thing?
Make sure you are updating right logo. The Site logo is the one you want to update. There should be no caching issues though: