

Last Updated on November 20, 2024
Need to change group permissions?
In this guide, I will show you how to change group permissions in three steps as well as using PowerShell as an alternative.
Let’s get started.
Table of Contents:
Prepare to Change Group Permissions
Before you start, make sure you’re ready to make changes.
This means understanding permissions, planning updates, and having the right access.
Here’s what I suggest:
- Understand first the current permissions structure
- Identify the changes you want to make
- Check your access rights
- Backup important data (just in case)
- Communicate the changes to users
Once you’ve completed these preparatory steps, you’re ready to start changing group permissions in SharePoint.
👉 Related: SharePoint Permissions Explained: How Permission Levels Work
Sign up for exclusive updates, tips, and strategies
How to Change Group Permissions
Here’s a step-by-step guide on how to do it:
Step 1: Access the advanced permissions page
For starters, get to the SharePoint site where the group is located.
Then do the following:
- Click the gear icon
- Click site permissions
This will open the basic permissions settings for the site.
Click the advanced permissions settings at the bottom:
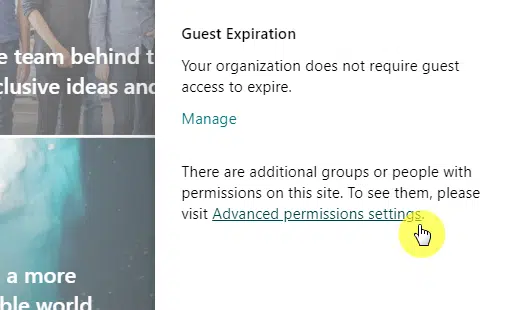
This section allows you to view and manage who has access to the site and what level of access they have.
⚠️ Note: You can also access this via the site settings page.
Step 2: Identify the group
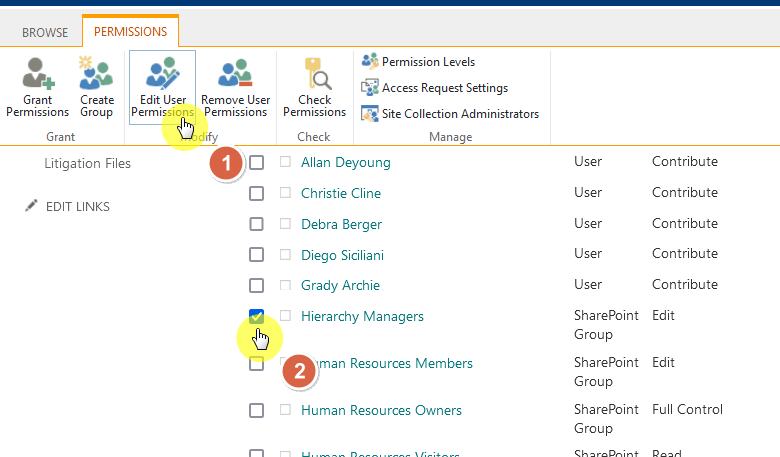
Within this page, you will see a list of groups and users who have access to the site.
Find the group whose permissions you want to change:
- Select that group using the check box (don’t click the name)
- Click the edit user permissions icon on the ribbon
⚠️ Note: You can use the search function if your site collection has many groups.
Step 3: Change the permissions
You can review the current permissions assigned to the group on this page.
If you want to add/remove permissions, simply check/uncheck the boxes.

Don’t forget to click the ok button to save the changes.
In most cases, you might want to create a custom permission level that fits the needs of the group.
👉 Related: How to Create a SharePoint Custom Permission Level (Guide)
Use PowerShell to change group permissions
PowerShell is pretty handy for bulk changes or when integrating scripts for automated management.
Here’s how:
Use the Connect-SPOService cmdlet to establish a connection to your SharePoint Online service.
You will need to provide the URL of your SharePoint admin center.
The command looks like this:
Connect-SPOService -Url https://yourdomain-admin.sharepoint.comAfter running this command, you will be prompted to enter your admin credentials for SharePoint Online.
⚠️ Note: Don’t forget to run PowerShell in administrator mode.
Step 2: Retrieve the group
Use the Get-PnPGroup cmdlet to retrieve the group you want to modify.
For instance:
$group = Get-PnPGroup -Identity "Your Group Name"Step 3: Assign permissions
To assign permissions to a group (like the contribute role), you have to use the role name.
For example:
$roleName = "Contribute"
$group = "YourGroupName" # Replace with the actual group name you want to assign permissions to

Set-PnPGroupPermissions -Identity $group -AddRole $roleName
If you’re not sure what role to give (or the role name), you can use the following command:
Get-PnPRoleDefinitionThis command will display a list of all role definitions.
You can then verify that the permissions have been updated correctly by using Get-PnPGroupPermissions.
This cmdlet will show the current permissions of the group.
Like anything, following some best practices can help you avoid common pitfalls.
Here’s what I recommend:
| Best Practice | Why It Matters | How to Apply It |
|---|---|---|
| Assign permissions to groups, not individuals | Simplifies management and reduces errors | Use predefined groups like Owners, Members, or create custom groups. |
| Review permissions regularly | Keeps access relevant and removes unnecessary rights | Schedule periodic reviews to audit and adjust permissions. |
| Use specific group names | Provides clarity on the purpose of the group | Name groups based on roles or tasks, like “Finance Team” or “Project Leads.” |
| Limit Full Control access | Prevents unauthorized or accidental changes | Grant Full Control only to trusted administrators or site owners. |
| Restrict sensitive data | Protects confidential information from unnecessary exposure | Use permissions like “Restricted Read” for sensitive libraries or documents. |
Managing SharePoint permissions effectively helps maintain security and usability.
Do you have any questions or need further clarification? Don’t hesitate to drop your questions in the comments.
For professional consultations or personalized assistance, kindly use the contact form. I’ll make sure to respond promptly.


Hi
Can we change default groups permissions like site owner, site members and site visitors group? which Access should we need to edit default permissions?