

Last Updated on August 16, 2023
Thinking of using a news carousel on your page?
In this guide, you will learn how to easily create a news carousel in a SharePoint Online page, and what to do if you want to display different news categories.
Let’s get started.
Table of Contents:
Benefits of a News Carousel
Today, with an overload of information, capturing your audience’s attention swiftly is important.
This is where the news carousel comes into play.
Here’s why you should consider integrating one into your page:
- Engagement boost: A rotating set of news items can instantly grab the attention of your visitors. It gives them a quick snapshot of the latest updates or most relevant content.
- Efficient space usage: Instead of cluttering your homepage with multiple news articles, a carousel allows you to showcase several pieces of content in the same visual space.
- Enhanced user experience: Users can easily navigate through different news items at their own pace. Plus, a visually appealing carousel adds aesthetic value to your site.
- Increased click-through rates: By highlighting multiple top stories, you can potentially drive more traffic to individual news pages.
Related: News vs Announcements SharePoint Web Parts (Comparison)
Sign up for exclusive updates, tips, and strategies
How to Create a News Carousel
Ready to add that dynamic touch to your site?
Let’s break down the steps to create a news carousel:
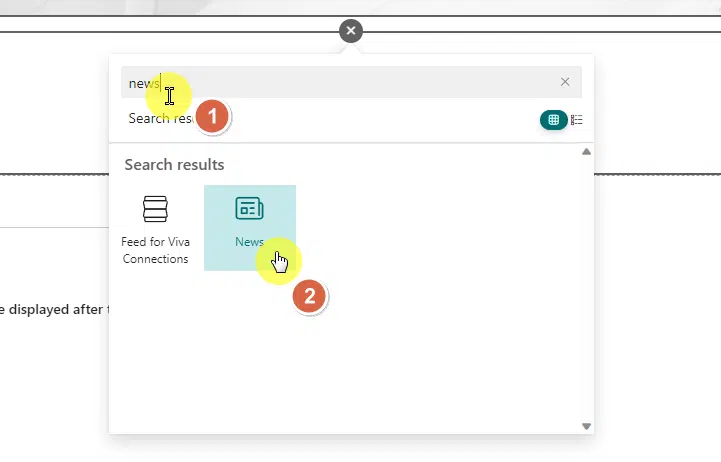
Step #1: Add a news web part
The first part is to navigate to the page where you want to create a news carousel.
That means you should already be in edit mode.
From there, all you have to do is add the news web part:
Step #2: Change the layout
Assuming you already have news posts on your site, your web part will automatically be populated with news.
By default, the layout is set to side-by-side. Naturally, you can always change it whenever you want.
Previously, you have to visit the web part properties to change the layout.
But now, there is a button for changing the layout option in the quick menu option:

For more detailed layout options, you will have to visit the web part properties:
- Click the pencil icon from the quick menu
- Select the carousel option
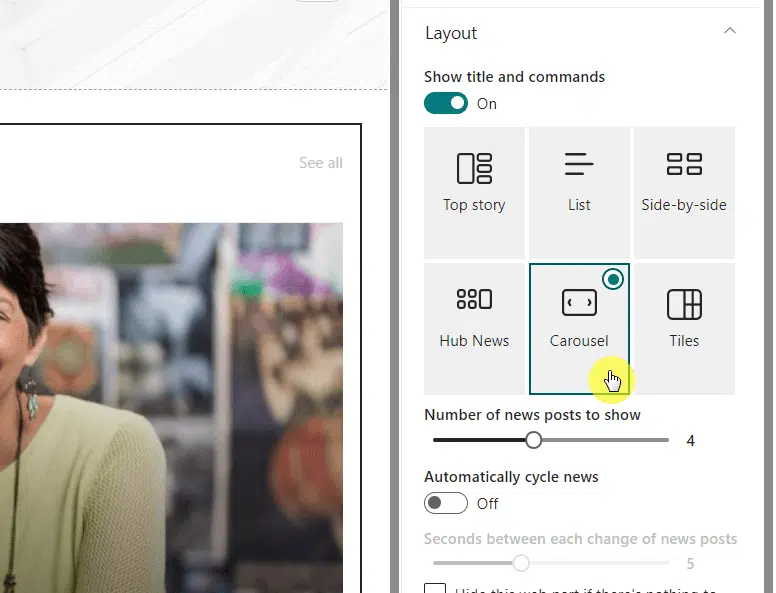
Step #3: Configure the carousel
From the image above, you can see that there are four configuration options available:
- Number of news posts to show
- Automatically cycle news
- Seconds between each change of news posts
- Hide this web part if there’s nothing to show
Take note, however, that if you want your carousel in SharePoint Online to look good, you must also use good pictures in your news post.
If all you want to show are images, you can use the image gallery web part to create an image carousel (think of it as the image carousel web part).
Related: Modern SharePoint Web Parts: List of All Available Web Parts
Creating Multiple News Carousels
If you have diverse news categories or segments, creating multiple news carousels can be beneficial.
The challenge here is that the news web part, by default, shows all the news pages on the site.
So how will you be able to show categorized news? The answer here lies in the site pages library.
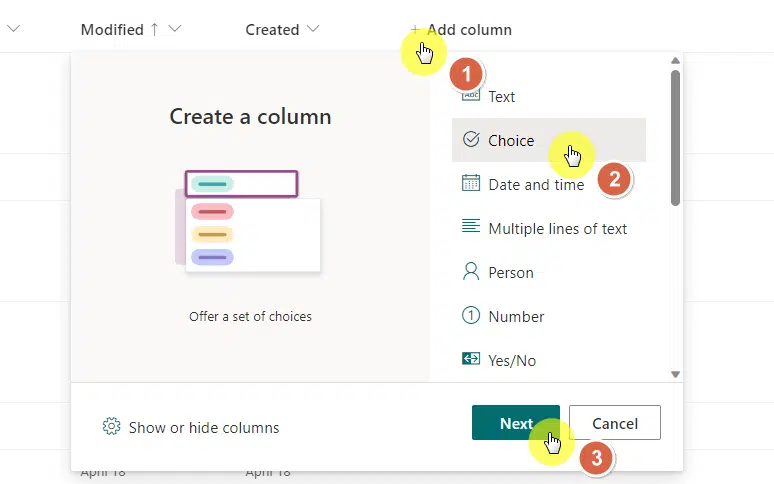
Step #1: Create a new column
The key here is to categorize the news posts first.
For that, you can create a choice column where you can indicate the category:
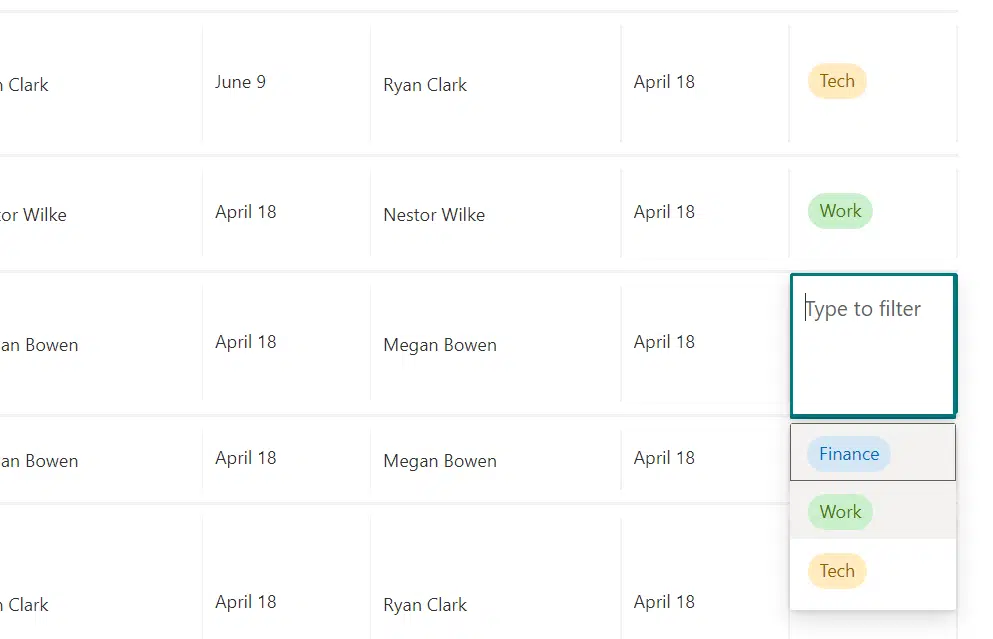
Step #2: Categorize your news posts
It’s important that you categorize your news posts, both the pre-existing ones and the new ones you will be publishing.
For the past ones, you can simply go into edit grid view and input the category of the news posts:
Step #3: Filter the new posts
Now, all that’s left is to configure your news carousels.
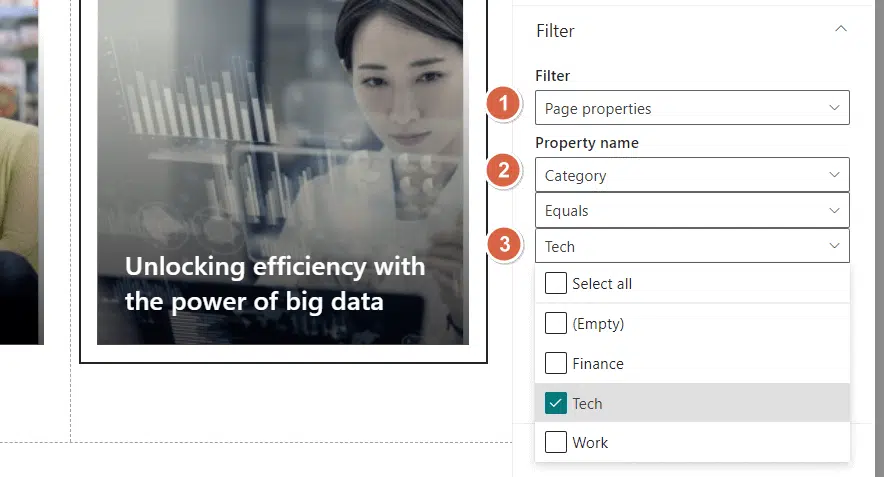
To show specific categories on specific carousels, follow the same steps in the web part properties:
- Filter: Page properties
- Property name: Category (or the column name you used)
- Select the category
That’s it! Simply repeat the steps on the other news web part and you’re done.
Got stuck somewhere? If yes, kindly comment down which step got you stuck and any other questions you have.
For business-related inquiries and messages, contact me through the form here and I’ll get back to you asap.


