

Last Updated on June 12, 2023
Got a document stuck in check out?
In this short guide, I will explain step-by-step how you can force check in a document so you can use it again freely.
Let’s get started.
Table of Contents:
If you’re new to SharePoint Online, you might be confused about what the check in/check out feature is.
Think of it as something related to how libraries work — you check out a book to read or edit and then return it (check in).
Documents in a document library in SharePoint work the same way as users check out documents for editing.
When a user checks out a document:
- The system locks the document so only the person who checked it out can make changes to it.
- This prevents other users from overwriting the work done on the document or creating conflicting edits (co-authoring).
- Other users can still read the document simultaneously — but they won’t be able to modify it until you check it back in.
- The user can add check in comments to help others understand what changes were made to the document.
Sign up for exclusive updates, tips, and strategies
Why will you need to check in a document?
After doing the edits, the user checks in the document to unlock it so others can check it out for their own edits.
There are cases though that checked out files will remain checked out, like:
- Forgot to check in the document
- The user is out of the office
- The user doesn’t belong to the organization anymore
Any of the scenarios above will prevent others from making the necessary changes to the checked out documents.
Fortunately, administrators and site owners have the ability to force check in the document and override the check out.
Reminder: Use this feature sparingly and only when needed to resolve issues to prevent work disruption.
For security, only site administrators and site owners can force check in documents.
The steps aren’t really that different from normally checking in documents in SharePoint Online.
Before forcing a check in
Before you do this, here are some reminders:
- Use it sparingly: Think of this feature as a resolution tool only (or a last resort tool) if the user is unavailable.
- Communicate with the user: Try to communicate with the user who checked out the document to avoid disrupting their work.
- Inform the team: Let the team know to ensure transparency and prevent confusion about why a document was suddenly available.
- Confirm no unsaved changes: Forcing it may discard unsaved changes, so it’s good to have a heads-up on this.
- Promote understanding: Make sure team members understand how the check in/check out system works and its complications.
Some important notes here:
- Unless the user had intermittent connections, the system will save the changes made by the user before you forced the check in.
- This will create another version of the document in the version history (so you can still revert to its previous state).
Step #1: Select the documents to check in
Navigate to the SharePoint document library where the checked out documents are located.
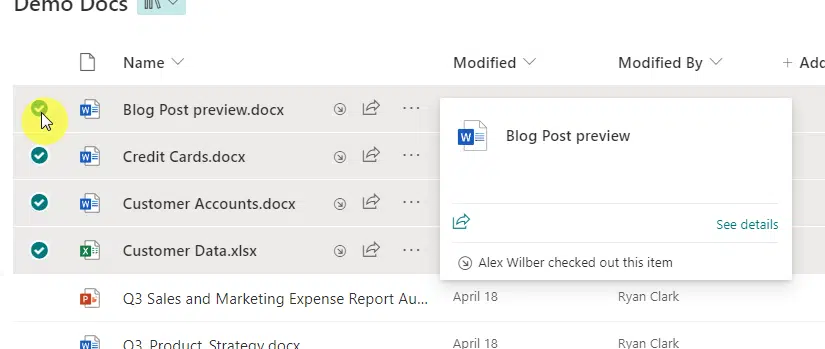
If you have multiple checked out documents, you can select all of them at once using the radio buttons on the left side of the name column:
Step #2: Check in the documents
After selecting the documents, click the three buttons from the command bar and then the check in button (down green arrow).
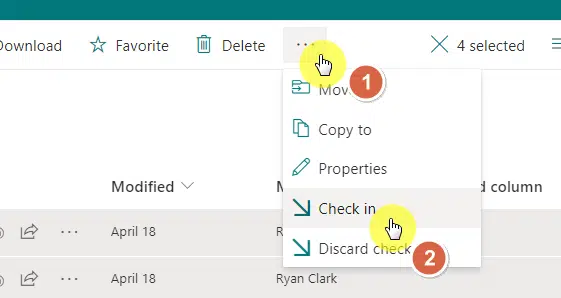
You can also achieve the same thing while doing a right-click on the documents > more option > check in button.
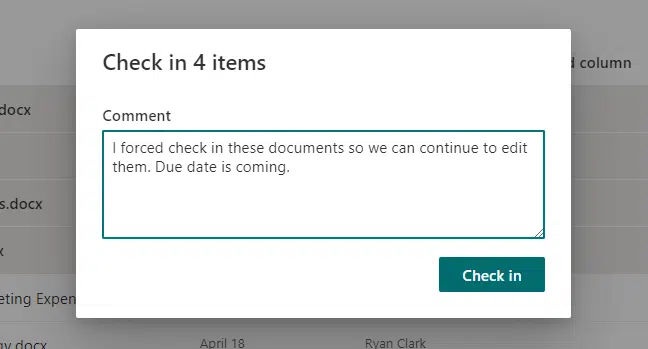
You can then write comments (optional) to describe what happened with these documents.
Then click the check in button:
This will make the document available for editing and allow multiple users to edit the documents (co-authoring).
By the way, you might notice that below the check in option, there is a discard check out button.
Here are some notes on this:
- This basically discards the past check out by the user and makes the document available for everyone.
- This will revert the document to its previous version before it was checked out (so any changes made are discarded).
Optional: Add a checked out to column
The steps above are easy when you only have a handful of documents to check in and they’re near each other.
But if you have a lot and they’re scattered in the SharePoint document library, it’s a hassle to select multiple files.
One thing you can do is add the checked out to column so you can sort/filter them out and see all the documents to check in at once.
For this, you need to edit the current view of the SharePoint library from the command bar:
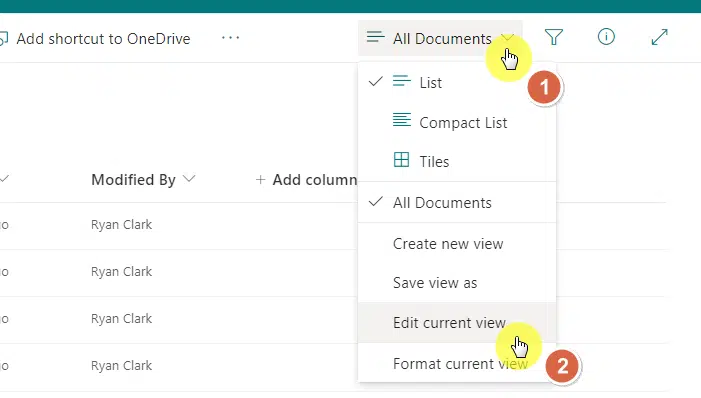
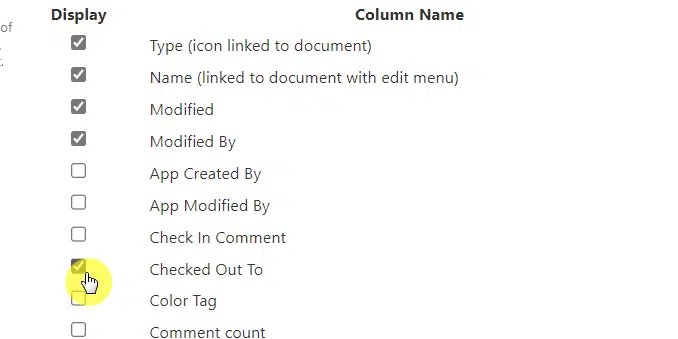
Check the checked out to option from the column name.
Click the ok button to apply the changes:
The column will then appear in the SharePoint document library and you can sort it out to pile the documents on top of each other.
You can also get fancy and show all the files without folders (in case you’re using folders in the library).
You can find the steps here:
Related: How to Create a SharePoint Custom List View (Quick Tutorial)
If you choose to hide the folders, I suggest you turn the feature back on after checking in the documents so you won’t mess up the organization.
How to prevent this problem from occurring in the future
There are a few good practices you can implement in your team to prevent the instances when documents must be forced check in.
Here are my recommendations:
- Check in promptly after editing: Check the document back in as soon as possible after making the changes.
- Use check in comments: Provide a brief summary of the changes you’ve made to help others understand what has changed.
- Discard check out if no changes were made: Check the document back in if you don’t need to make changes.
- Encourage regular check ins: Users must check in documents regularly especially when they will be out of the office or become unavailable.
In fact, I will even go as far as suggesting that you teach users to check in documents as soon as the workday is over.
Got any questions regarding the steps I explained? If so, kindly drop your questions in the comments.
For business inquiries and concerns, feel free to use the form here and I’ll get back to you asap.


