

Last Updated on October 20, 2023
Unsure of how to create a flow with multiple conditions?
In this guide, I will walk you through the steps in creating a multiple conditions flow in Power Automate in a way that newbies can understand.
Let’s get started.
Table of Contents:
Different options for creating a complex flow
The same in Excel, there are various methods you can use in Power Automate to achieve the complex flow you want.
It also depends on the conditions in your flow, how nested the conditions are going to be, and the actions involved.
Before you start any complex flow, I suggest that you write the logic behind the flow so it’s easier for you to structure.
That is why you will see below that before I started the actual creation of the flow, I first explained the logic.
Sign up for exclusive updates, tips, and strategies
How to create a flow with multiple conditions
For the example, let us start with identifying the case.
Below is a blog content calendar table with the following columns:
- Title
- Description
- Category
- Status
- Created
- Due

The scenario is that I want to create more content for my blog by outsourcing the articles depending on the category.
For the category, I have:
- Word
- Excel
- PowerPoint
Each category has its own specific writer. So for word topics, we have someone, for Excel topics, we got another person, etc.
The flow I want to create is one where the system automatically sends an email to the writer when a new item is created.
Like this:
- A new item in the list is created
- Check the category in the item
- Send an email to the writer depending on the category
This case is an example only. There are better methods to achieve what I want to do here like adding those people to the list as visitors.
Now, let’s get started.
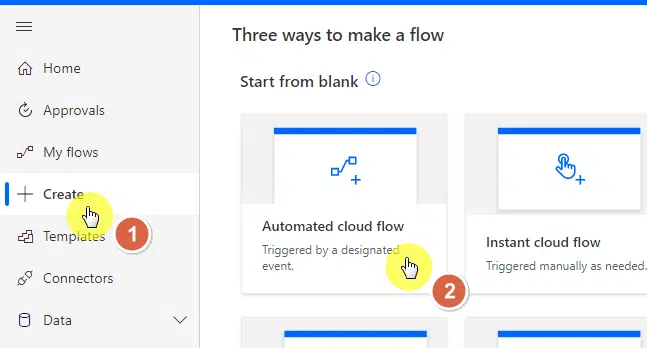
Step #1: Create an automated cloud flow
For the scenario above, the best flow to create is an automated cloud flow.
Navigate to Power Automate and go to create > automated cloud flow:
Note: For more info on the types of flow, check here: How to Streamline Business Processes With Power Automate.
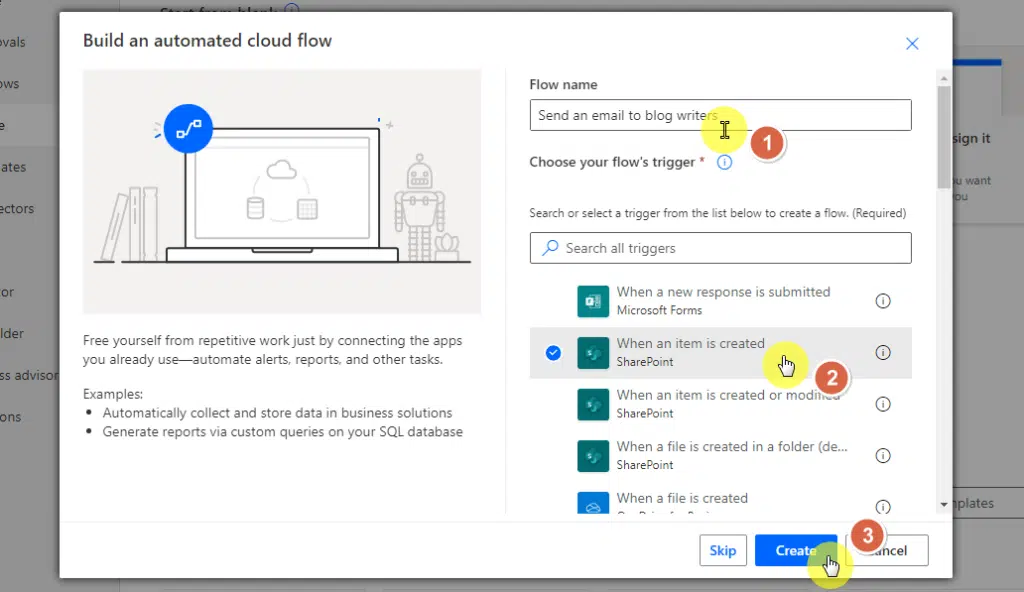
Step #2: Configure the flow trigger
Give the flow a name and select the option when an item is created as the flow’s trigger.
Click the create button:
You can actually opt to choose the trigger later too. But since the option is already there…
For the next part, complete the details of the trigger:
- Site address
- List name (or document library)
Click the next step button after that:

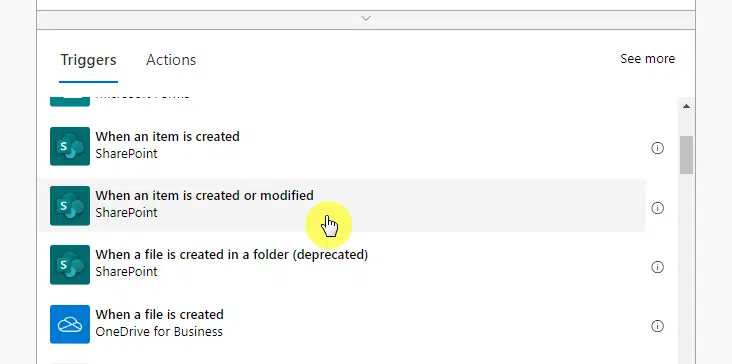
By the way, in case you want to switch to another trigger, there is no need to start over again.
Simply click the three dots of the trigger window > delete to use another trigger.
Confirm the decision on the prompt:

You will then see some suggestions on the triggers.
Select the new trigger for your flow and complete the information.
From here on out, remember that there is one way to achieve the flow that you want.
The method I will use below is one example. I will also use another method later to show you that it’s possible.
Step #3: Choose an operation
Another box will open that will allow you to decide what happens next.
Once again, here is what we wanted the flow to accomplish:
- A new item in the list is created
- Check the category in the item
- Send an email to the writer depending on the category
The step earlier completed the first one as the trigger.
Now it’s time to configure #2 in the list above using the switch case action.
Search for the switch case and click on it:

Before we proceed with configuring the cases, you need to specify the basis of the cases.
Since we’re basing the cases on category, the parameter is category value:

Choose the value parameter of the column since you want the flow to check the actual value of the column.
If you don’t do this, you will encounter an error later and the flow will fail.
The switch case action is a mechanism that allows you to create multiple flow conditions without making it complicated.
Notes on using this action:
- The only problem with the switch case action though is that it only accepts strings (texts) and integers in its field.
- There is a workaround though if you want to use a switch case with dates and ranges — by using the variable action.
Step #4: Complete the cases
The way a switch case works is that you can enter multiple cases (one condition per case) and specify their action.
For more advanced users, know that you can also complicate each case by adding more actions.
The cases or conditions in our scenario are the categories:
- Word
- Excel
- PowerPoint
By default, there is only one case added.
Click the add button found on either the bottom or left side of the first case box.
Make sure to have three cases.
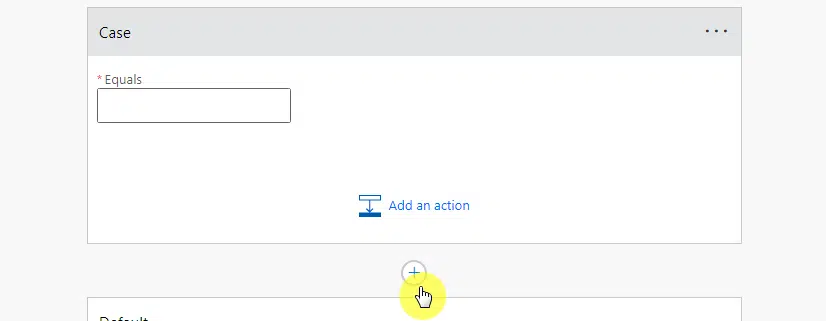
Now that you have three case boxes, you need to enter the condition in the equals field.
Like this:
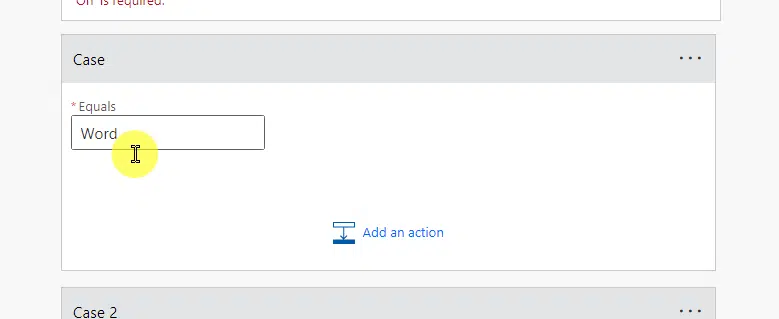
The matchup will be:
- Case 1: Word
- Case 2: Excel
- Case 3: PowerPoint
Step #5: Add an action
The steps earlier completed #2 of our Microsoft Flow actions.
It’s time to proceed to #3: Send an email to the writer depending on the category.
The key to this is the add an action button on each case.
Click on the button:

You will then see the familiar choose an operation box.
This time, search for email (or the action you want) in the search box.
Click the send an email option:
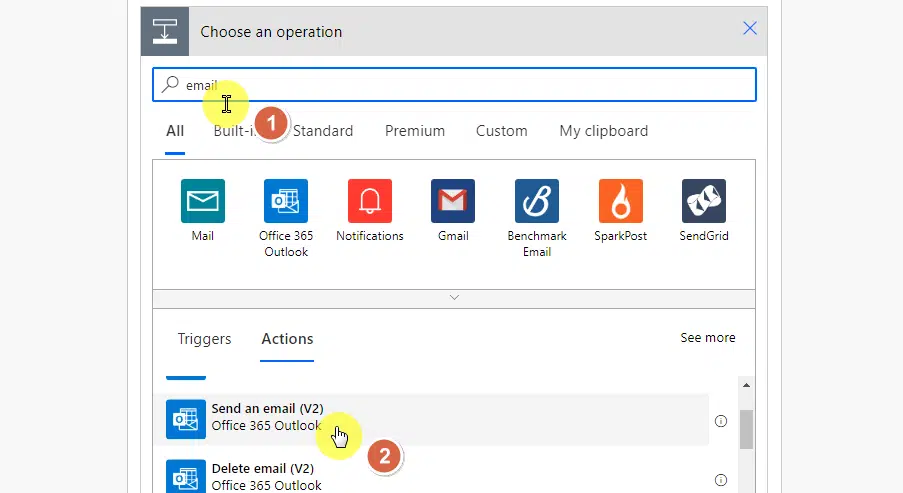
There are a lot of email options here. But since my writers aren’t on the site, I used this option to email them through Outlook.
You will then see fields where you can write:
- The recipient’s email address
- Email subject
- Email body
Here is an example of how I made mine:

You can see that I made use of the parameters in the column right inside the email body.
Do the same for all the cases.
By the way, the switch case also has a default action that will kick off if the flow doesn’t match with any of the cases/conditions.
It’s the last box in the flow. In my example, I didn’t fill it out since the category column is a choice type.
Step #6: Test the flow
Every time you finish creating a Microsoft Flow, it’s vital that you test it out first.
Click the save button on the top toolbar:
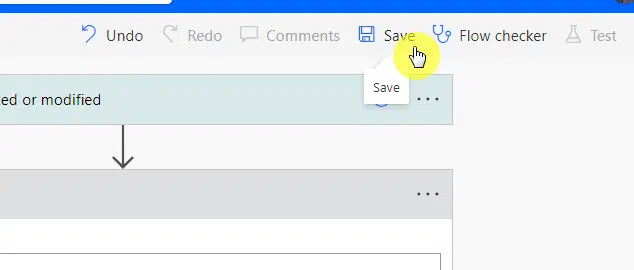
After pressing the save button, the flow will be ready for use.
Click the test button on the top toolbar and select the option that fits your flow:
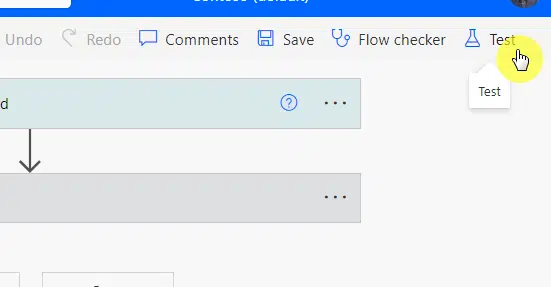
For testing, I created the following item:
- Title: How to create charts in Excel
- Description: Discuss how to create charts in Excel and provide a few examples.
- Category: Excel
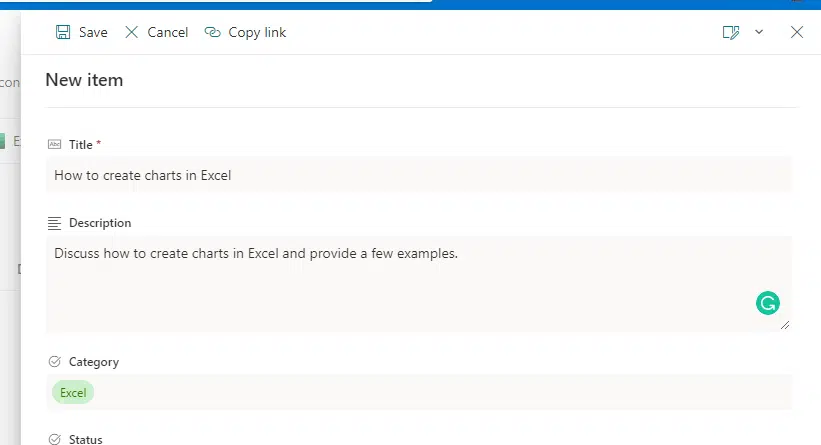
To know the results, I also added my email address to the Excel case.
I then received this email:
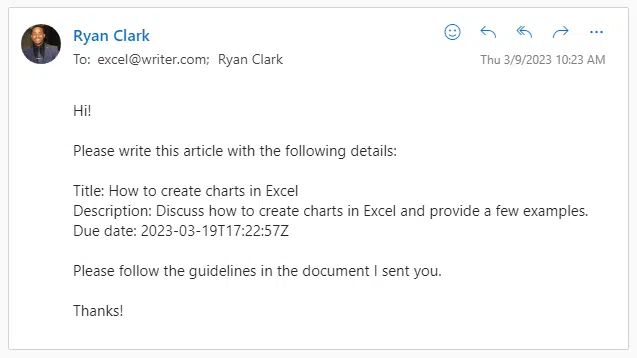
Operation success!
How to use the condition control operator
I explained earlier that there are more ways to create a Power Automate multiple conditions flow.
In this section, I want to show you how to use the condition control action that’s more often used in multiple conditions scenarios.
Once again, here is what we want our flow to do:
- A new item in the list is created
- Check the category in the item
- Send an email to the writer depending on the category
Assuming we have already finished #1, let’s proceed to the next step.
1. Select the condition control option
After you click the next step button, you will be faced once again with the operation box.
Click on the condition control option:

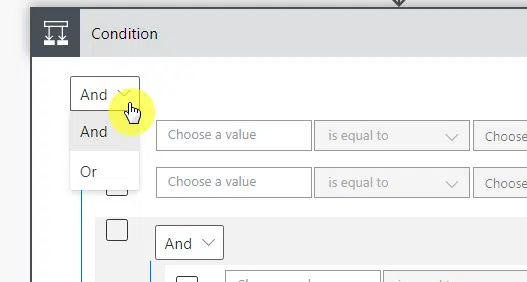
The condition control operator is a great option if you have multiple values to add as conditions.
You can specify the condition to trigger when:
- All the conditions are met
- If any one of the conditions is met
If you have multiple conditions or multiple values, simply click the add button > add row:
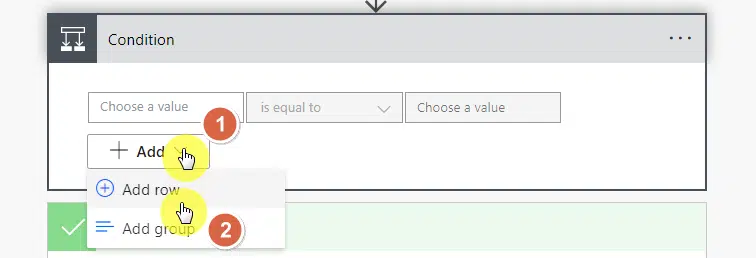
You can also add nested conditions using this operator.
Click the add button > add group:
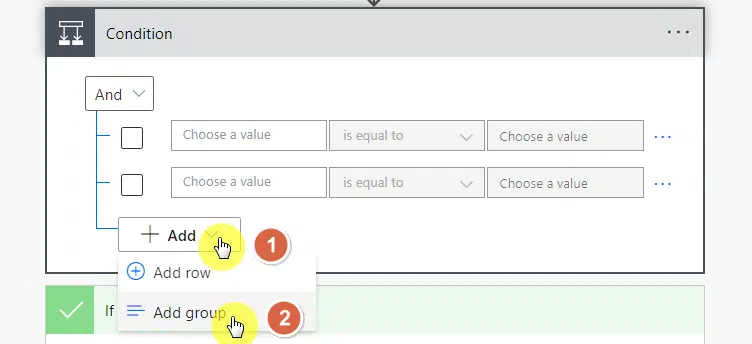
To switch between having all conditions met or just one of them, you can toggle the and/or button and choose.
And for meeting all conditions and or for meeting only one of the conditions:
2. Configure the condition
Since our conditions have specific actions, we don’t need to enter all the conditions at once.
Then we can start by specifying the value of the first condition, which is when the category value is equal to word:
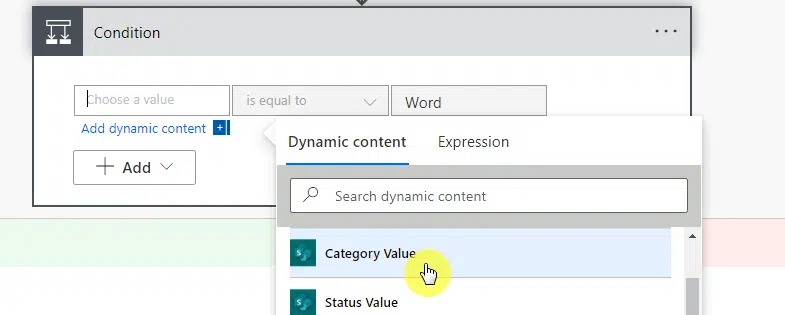
The next part is to configure what happens if the category value is word.
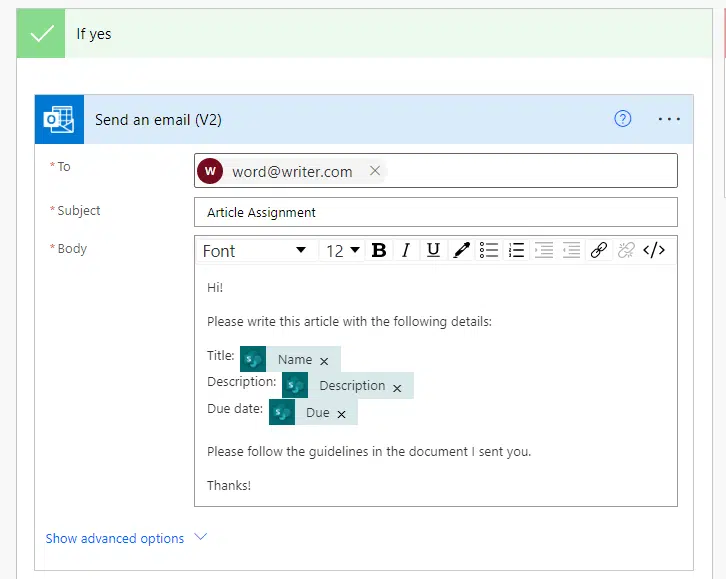
Focus your attention now on the if yes box and click the add an action button:

Similar to step #5 in the previous section, you will have to search for the send an email action.
Copying the same message earlier, here’s what we got for the first condition:
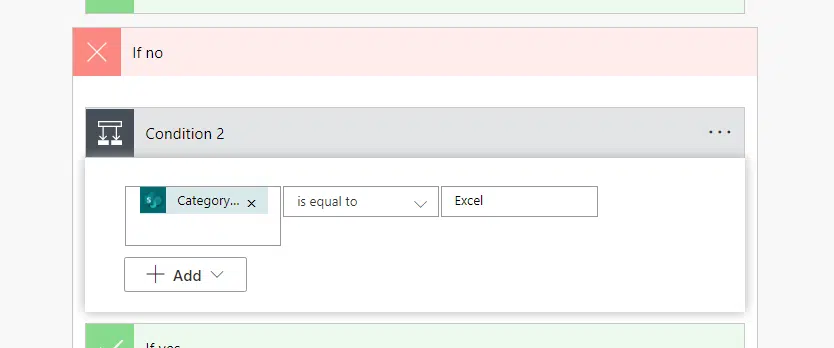
3. Set up the other conditions
The step earlier will start the action of the flow if the category or condition is as you indicated.
But if not, this is why we need to complete the other box — if no.
This is one of the cons of using the condition action in a flow similar to this — you will have to create nested conditions.
Click the add an action button again and start another condition.
Fill it out with the second condition — if the category value is Excel:
Go to the if yes box of condition #2 and add a new action.
The action here will be to send an email to the writer if the category is Excel:

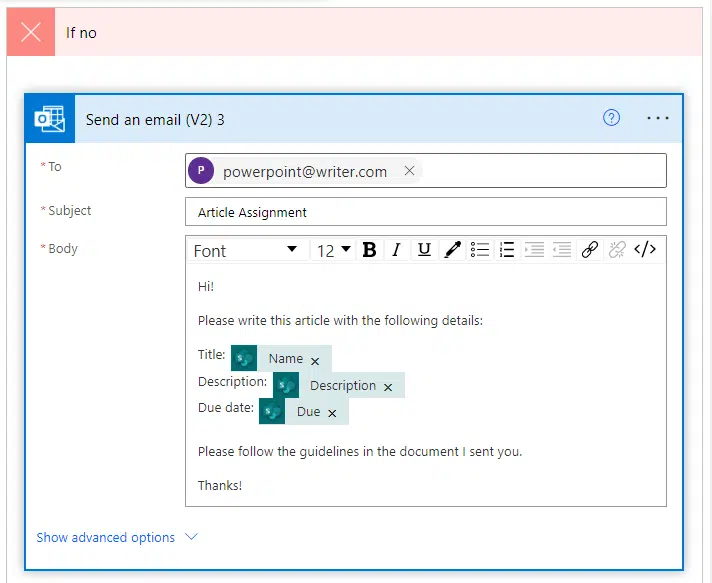
Finally, the contents if the if no box.
Since we only have three conditions, there is no need to add another condition.
If the category value isn’t Word or Excel, then it’s only the last option — PowerPoint.
Add an action on the if no box and create another email:
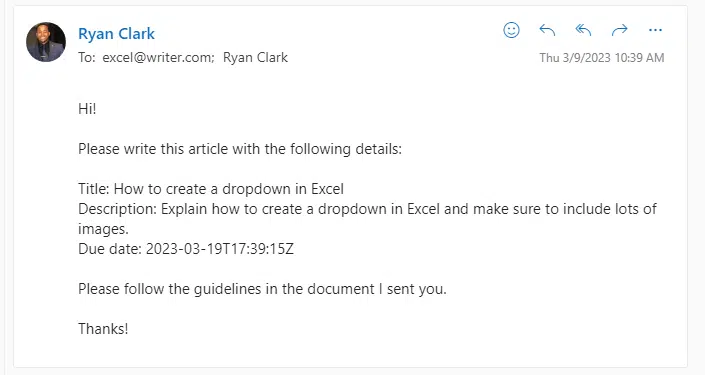
4. Test the flow first
Now that we’re done setting up the flow, it’s time to save and test it out.
For testing, I created the following item:
- Title: How to create a dropdown in Excel
- Description: Explain how to create a dropdown in Excel and make sure to include lots of images.
- Category: Excel
Success! We got the email once again (inserted my own email address on the if yes action of condition #2).
Using Power Automate multiple conditions
There is a lot more you can do when you create a Power Automate flow:
Here are a few more in terms of multiple conditions:
- Use the filter array action when you have to apply multiple conditions from different columns
- Go to the advanced mode in filter boxes to use expressions and simplify the flow chart
- Use the filter query action to extract date with multiple conditions from different columns
Not that difficult now that you’ve tried it, right? If you have further questions, kindly drop those down in the comments.
Need more professional help? Just send me a message through this form and I’ll get back to you asap.


