
![[Guide] How to Add Google Analytics to Sharepoint Online](https://www.mrsharepoint.com/wp-content/uploads/2022/01/analytical-expert-explaining-statistics-to-busines-1024x682.jpg)
Last Updated on June 17, 2024
Do you want to use Google Analytics on your SharePoint Online site?
Well, you can, though you may have to do some extra steps to make it happen. That’s because SharePoint Online has its own analytics feature.
Fortunately, it’s quite simple to do as long as you follow the instructions carefully.
In this article, I will teach you how to add Google Analytics to SharePoint Online — both for classic sites and modern sites.
Let’s get started.
Table of Contents:
How to set up Google Analytics (GA)
Before anything else, you need to set up your Google Analytics first and get the website tracking script.
Go to your Google Analytics account and sign in. Once there, click on the “Admin” button on the lower-left corner of the page.

Make sure that you’re using the correct account and property. Feel free to create a new account and property if you must.
There are buttons that say “Create Account” and “Create Property” you can click.
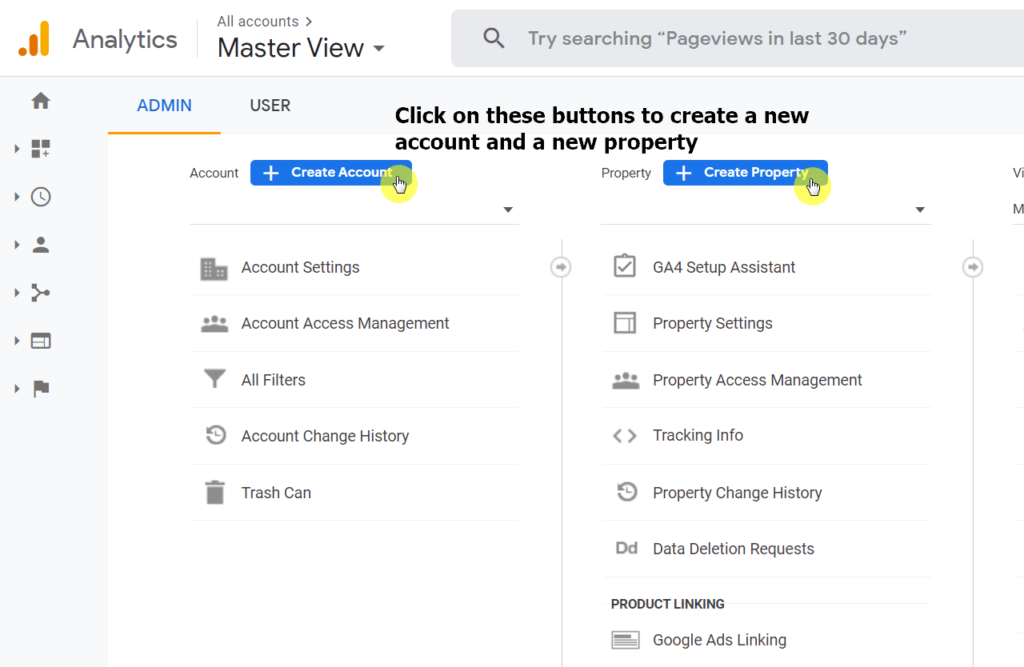
Since you already have an account, there’s almost no need to create one — unless you want one for business or SharePoint purposes only.
Note that you can only have 100 accounts maximum. You can also simply create a new Google account to use and that will simplify things.
Now, if you create a new property (which you will if you haven’t yet created one for your SharePoint site), then you will see the following page after hitting the button.

Enter your desired property name and make sure the reporting time zone and currency are accurate for you.
There’s a “Next” button below the box you can click if you want to proceed.
The next page is to simply provide some business information like the industry category, business size, and how you intend to use Google Analytics.
After that, click on the “Create” button and you will then have created a new property on Google Analytics.

Once you’re back to the admin panel, click on the “Tracking Info” option inside the “Property” column. It will then expand the options.
Click on the “Tracking Code”.
Take note of the global site tag inside the box, which should look like this:
<!-- Global site tag (gtag.js) - Google Analytics -->
<script async src="https://www.googletagmanager.com/gtag/js?id=UA-127400094-1"></script>
<script>
  window.dataLayer = window.dataLayer || [];
  function gtag(){dataLayer.push(arguments);}
  gtag('js', new Date());

  gtag('config', 'UA-127400000-1');
</script>
Better yet, copy it on a notepad or leave this page open. The tracking ID is the one that starts with “UA”.
You can also see it by clicking on “Property Settings” in the “Property” column.
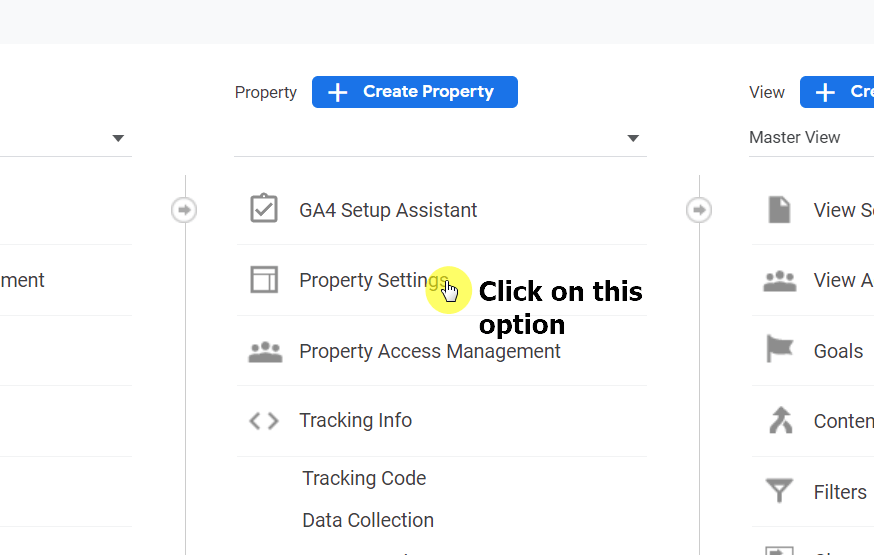
You will then see the tracking ID on the page as shown below.
Sign up for exclusive updates, tips, and strategies
If the SharePoint site where you want to add Google Analytics to is on the classic experience, then you need to use a declarative sandbox solution.
Now, you can create your own, or better yet, simply download a solution right away (credits to handsontek.net for creating one).
By the way, if you find this method impossible or hard to do, try the alternative solution you can use after I discuss this part.
Download and upload the solution
To download the solution, click on the link below:
http://handsontek.net/Downloads/SharePoint_GoogleAnalytics.zip
Note that your browser or computer may flag the solution as dangerous (due to the file’s nature). You can safely ignore the warning and download it to your computer.
Before you proceed, make sure to extract the WSP solution file from the zip file. If you don’t you will not be able to activate the feature on the site.
Then, go to the site settings page of your classic site (click on the gear icon on the upper-right corner and click on the “Site settings” option).
Under the “Web Designer Galleries” group, click on the “Solutions” option.
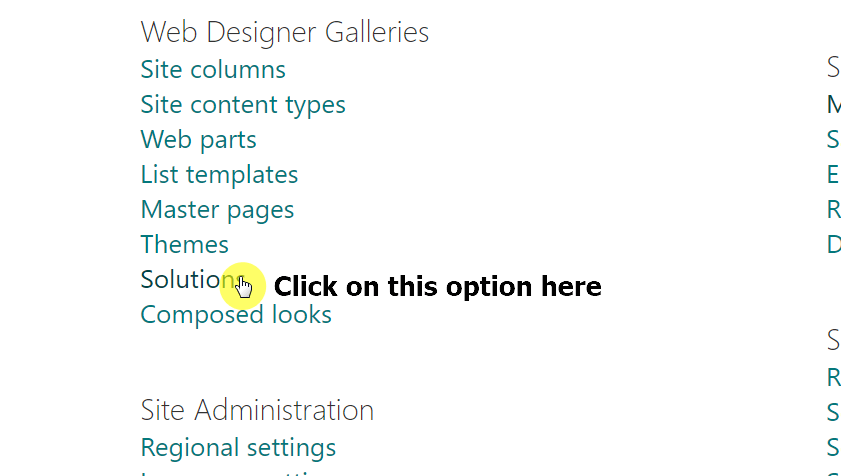
In case you don’t see this option on your site settings, try to activate the publishing infrastructure feature on both the site collection features and on the site features.
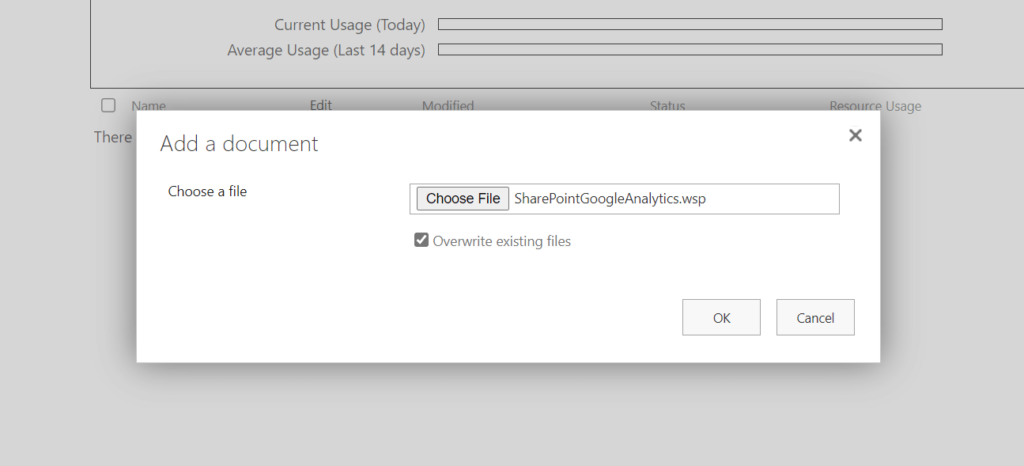
On the solutions page, click on the “Upload Solution” button in the upper-left corner of the page.
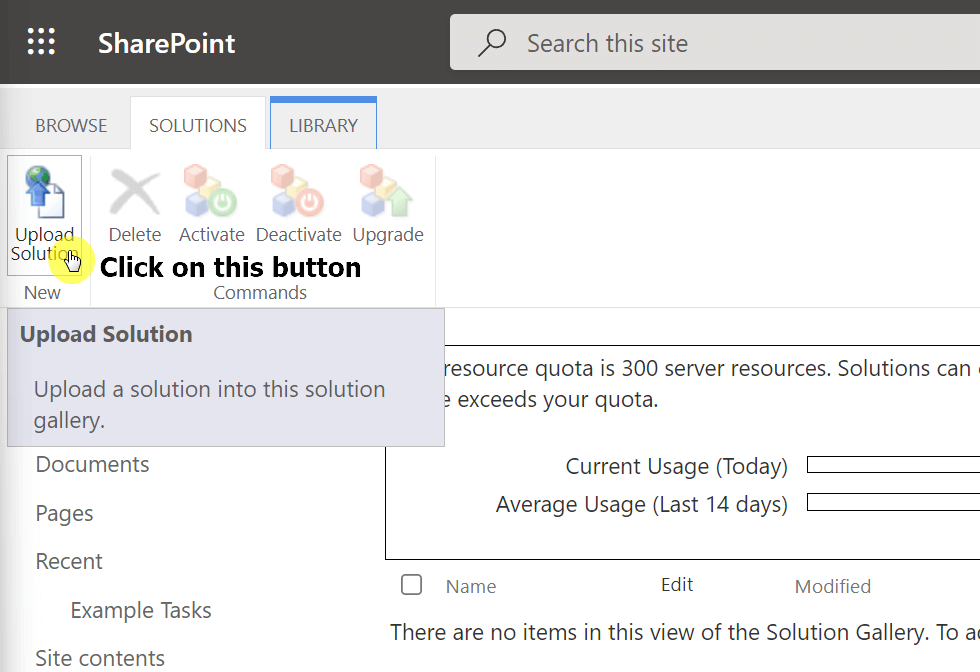
Click on the “Choose File” box, find the file on your computer, and click on the “OK” button to proceed.
Activate and customize the solution
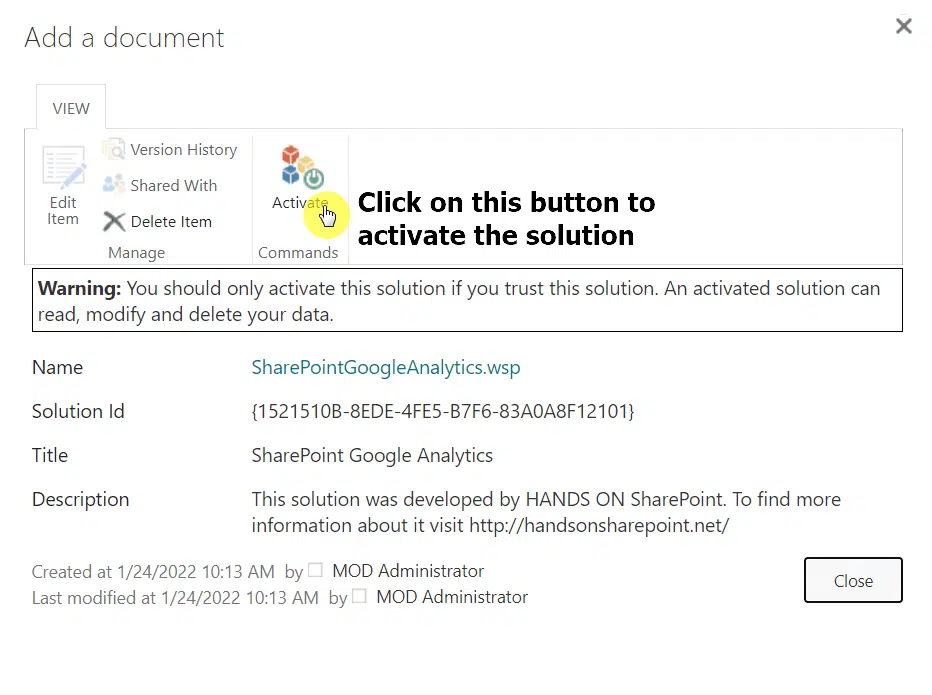
After the file has been successfully uploaded, all that’s left is to activate it.
You can do it straight from the notification window or go back to the solutions gallery, select the file, and click on the “Activate” button in the ribbon.
Note that if you find the “Activate” button greyed out, you have to enable custom scripting first. Simply open PowerShell in admin mode and enter the following commands one at a time:
Connect-SPOService https://yourtenant-admin.sharepoint.com/

Set-SPOSite https://yourtenant.sharepoint.com/sites/yoursite -DenyAddAndCustomizePages 0
With the solution activated, the script is now running on your site. Unfortunately, you still need to add the tracking ID to the script.
Again, you can find it on the global site tag or from the property settings.
For this, you need to have the SharePoint Designer application. You can also install it from the link below:
https://www.microsoft.com/en-us/download/details.aspx?id=35491
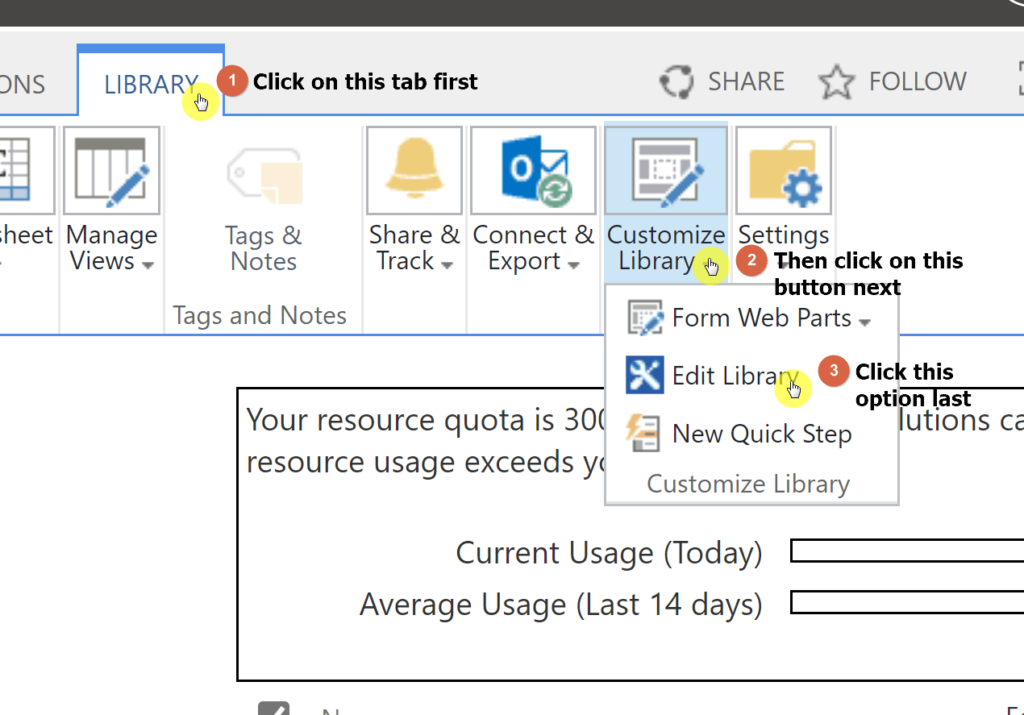
Open your site with SharePoint Designer. Once you have it installed, you can open it directly from the solutions page on your SharePoint site.
Click on the “Library” tab first in the ribbon. Then, click on the “Customize Library” button and then on the “Edit Library” option.
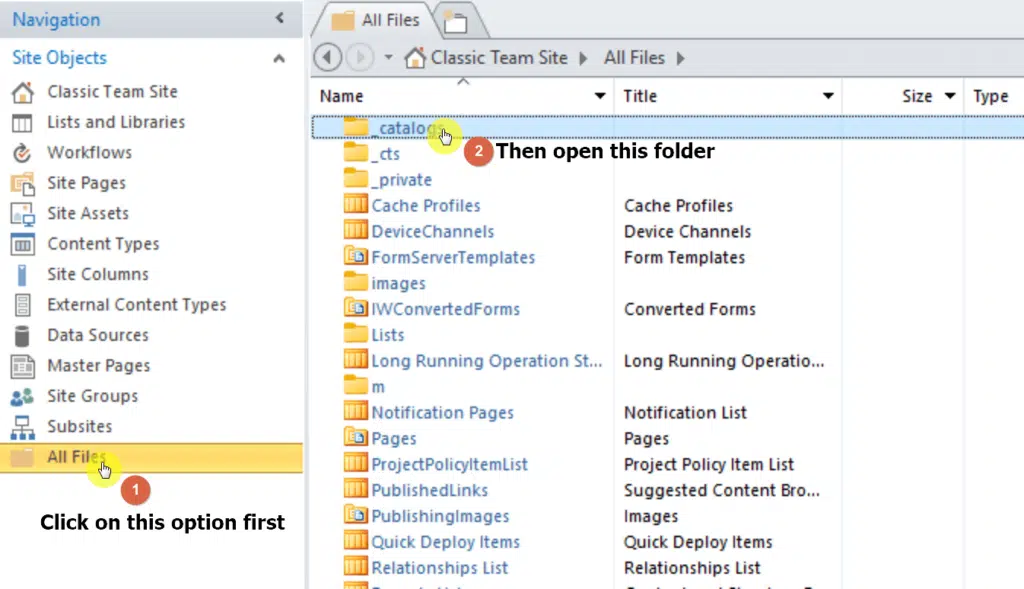
On the SharePoint Designer, navigate to the “All Files” folder from the navigation panel on the left and open “Style Library”.
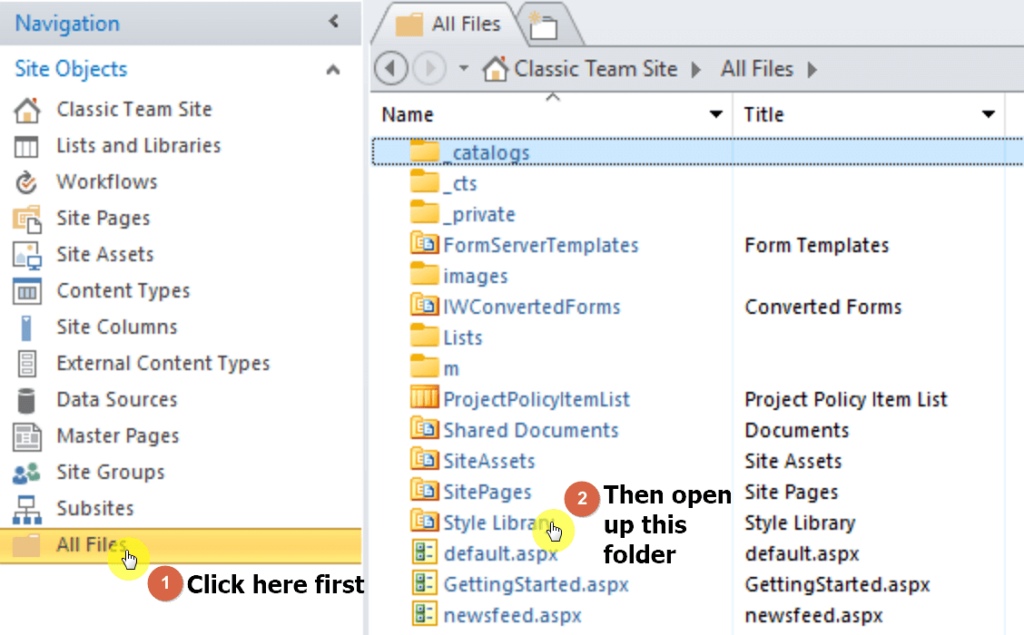
Then, open the “GoogleAnalytics” folder.
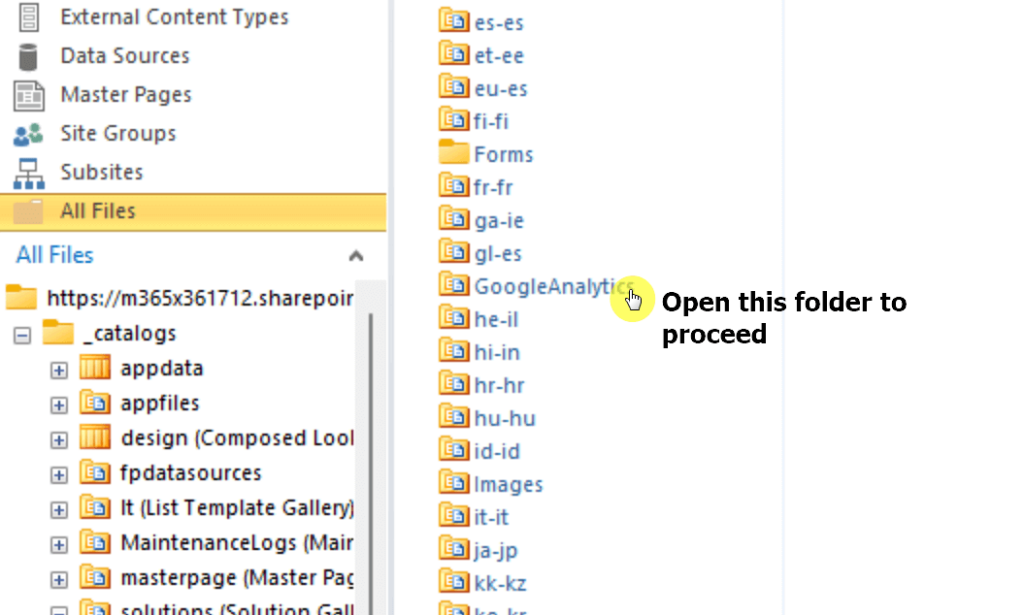
Open the “js” folder on the next page.
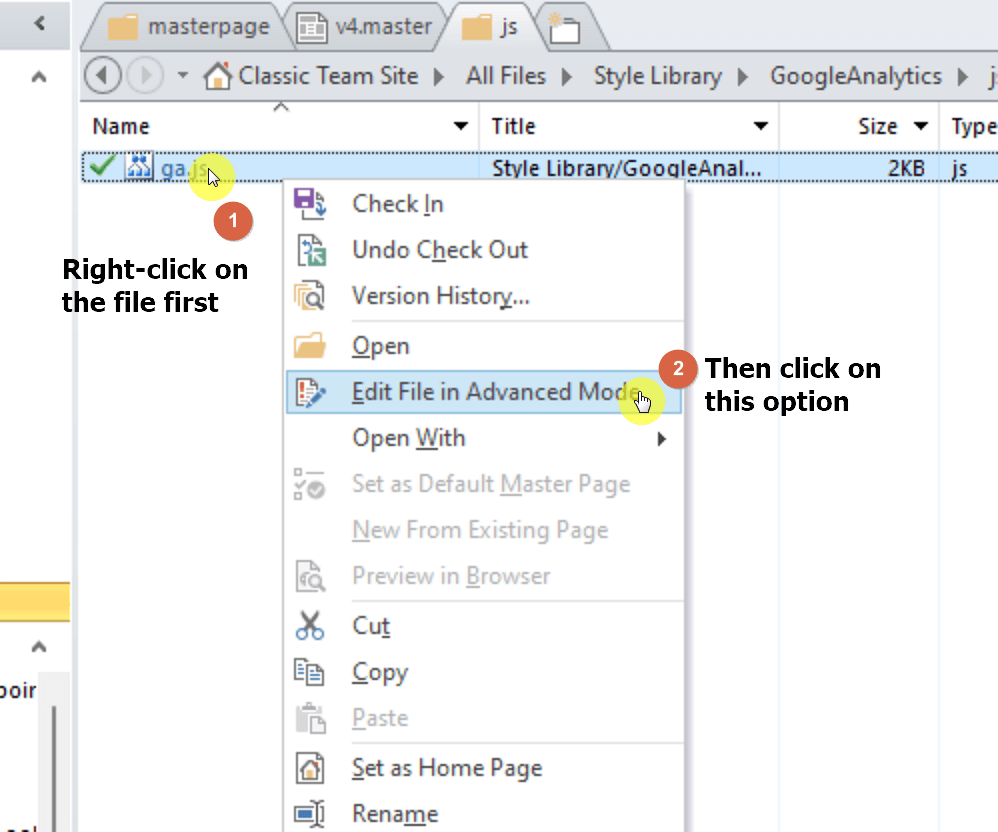
Inside the folder, you will find a single file called “ga.js”. Select the file and click on the “Check out” button.

After that, right-click on the file and select “Edit File in Advanced Mode”.
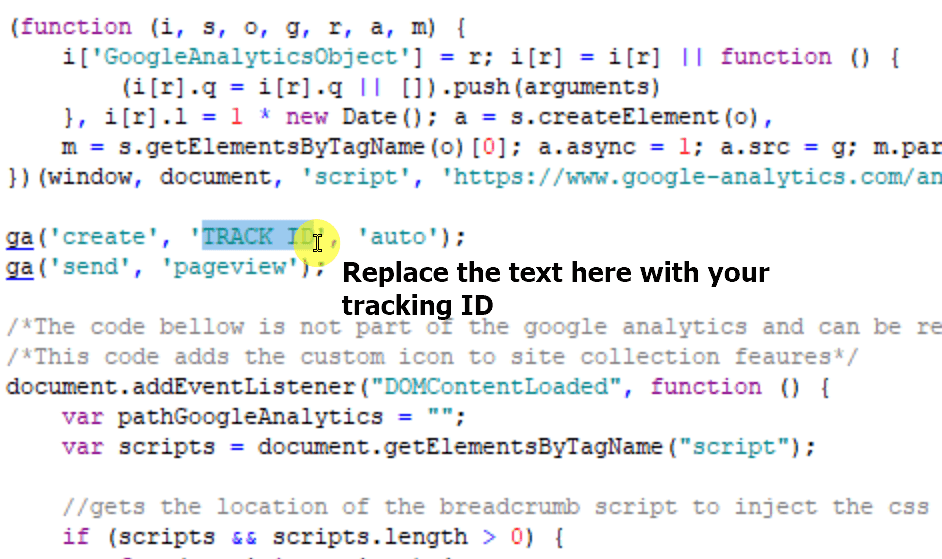
Find the code with the words “TRACK ID” and replace it with your own tracking ID from Google Analytics.
Once you’re done, save the file (press “Ctrl” + “S”) and go back to the “js” folder. Then, select the file again, click on the “Check in” button, and publish the file as a major version.
After doing this last step, Google Analytics will now track your classic site collection. Mission accomplished!
Deactivate Google Analytics tracking
So what do you need to do if you want to stop Google from tracking your site?
Simply go to the “Site collection features” on your site settings page (it’s under the “Site Collection Administration” settings).

Scroll to the bottom until you see the “SharePoint Google Analytics” feature and click on the “Deactivate” button.
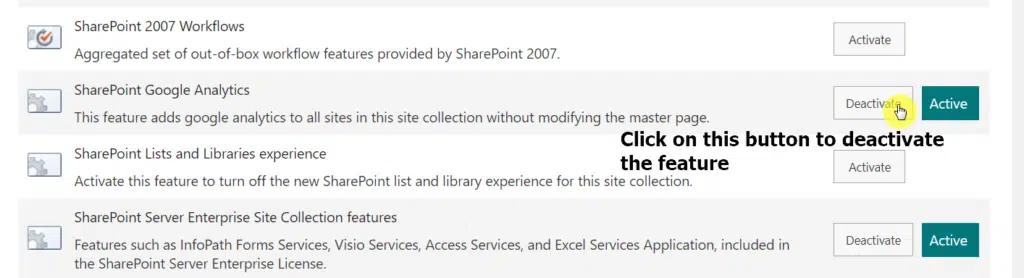
Google Analytics will now stop tracking your site.
Alternate solution: Edit the master page
For this other solution, you will still need the SharePoint Designer application. So you better not delete it yet if you find the earlier solution hard.
For this step, all you need to do is edit the master page of your classic site and paste the global site tag code from Google Analytics.
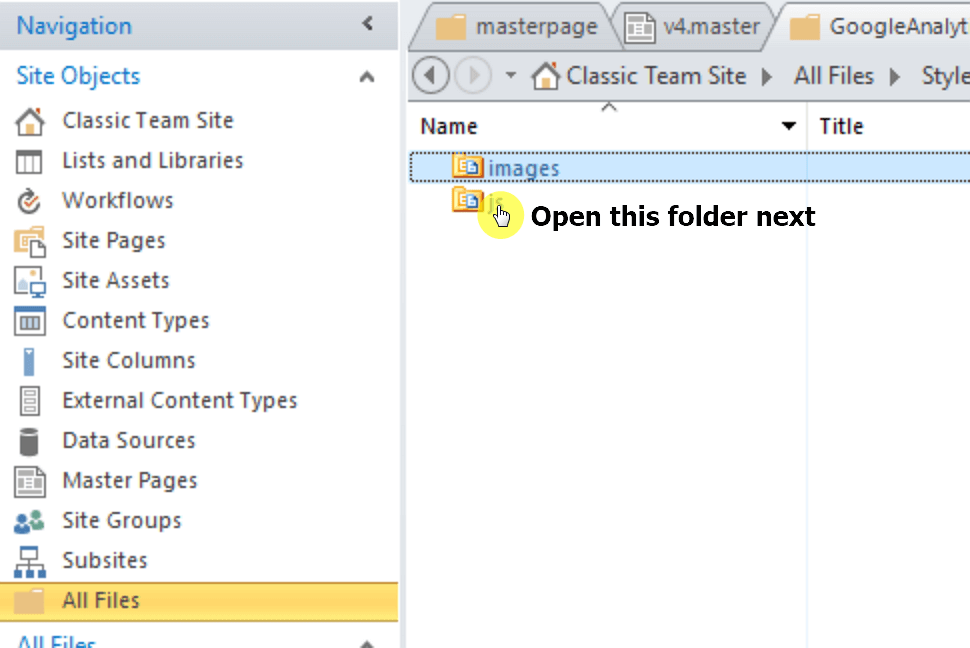
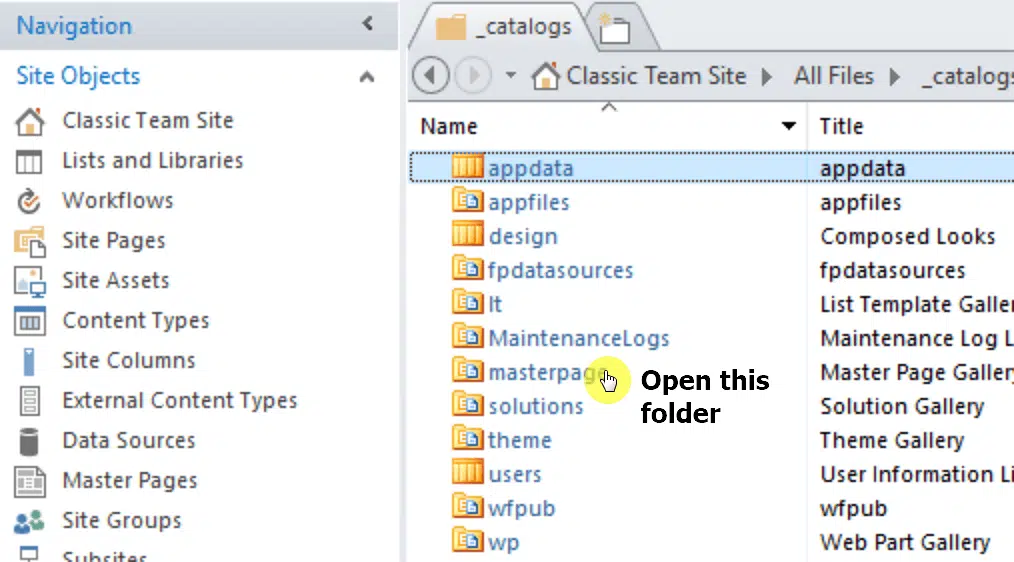
On your SharePoint Designer, navigate to the “All Files” view from the left-hand navigation panel. Then, open the “_catalogs” folder.
On the next page, open the “masterpage” folder.
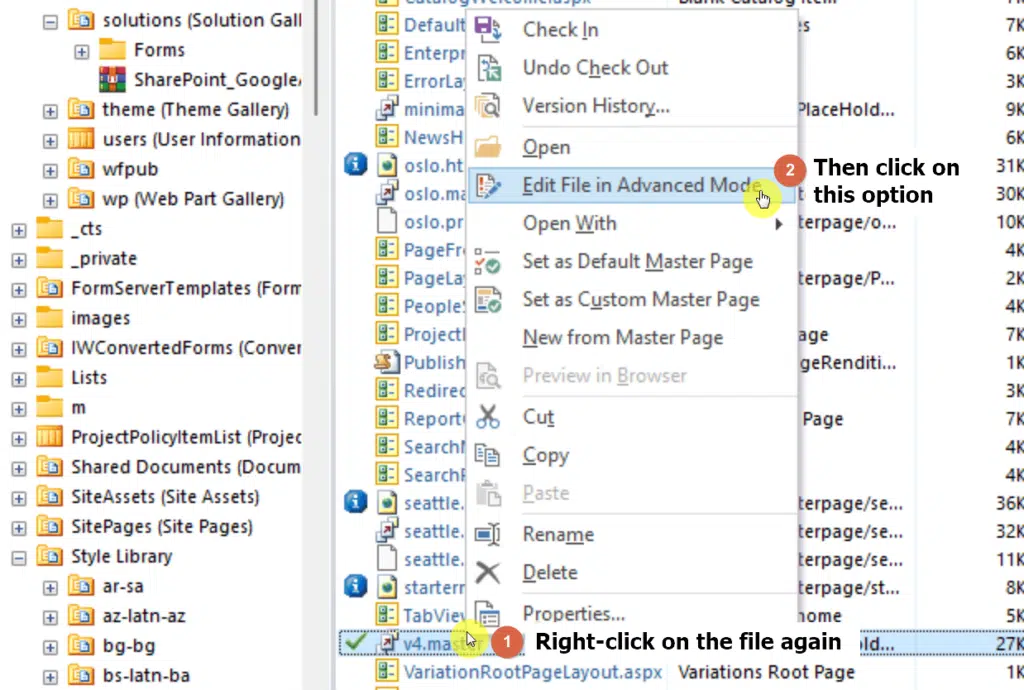
Inside the folder, find the master file (in the example below, it’s called v4.master). Once you do, right-click on it and select “Check Out”
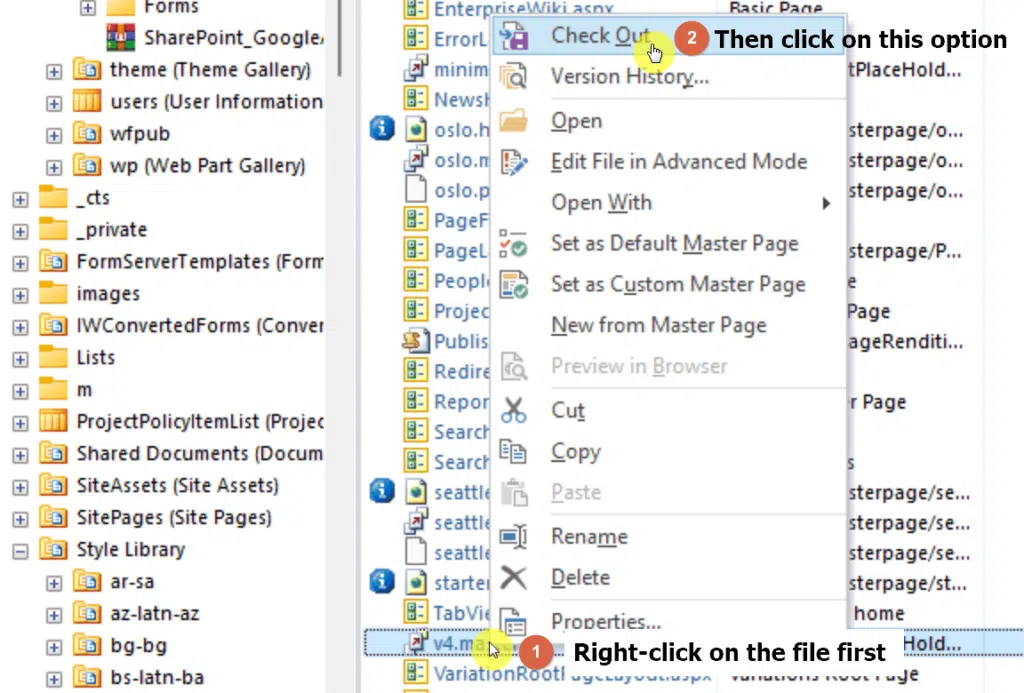
Right-click on the file again and this time, click on the “Edit File in Advanced Mode”.
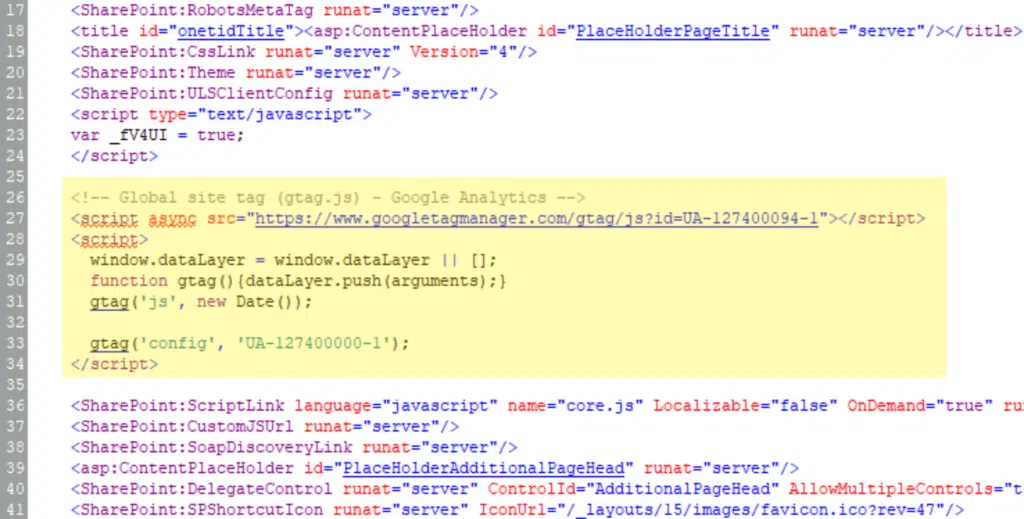
Now, remember the global site tag script from Google Analytics? All you have to do now is paste the script inside the <head> and </head> tags.
After this, save the changes by pressing “Ctrl” + “S” on your keyboard. Then, right-click again on the file and this time, choose the “Check In” option. Publish the file as a major version.
That’s it! Google Analytics will now track your classic site.
The steps I explained earlier work well with older, classic sites. Unfortunately, for modern team and communication sites, you need a different set of steps.
As you may have noticed, you won’t be able to see any solutions gallery with modern sites.
By the way, for any of the steps, I’ll discuss below, you don’t need to compile anything. The solutions are ready, thanks to Laurent Sittler, all you need to do is download them.
Let’s get started.
What you need to do first
Before you rush off, make sure you have your Google Analytics Tracking ID ready. Again, you can find it on the property settings in your account:
Then, you need to make sure your tenant app catalog is existent.
Click on the link below to go directly to the “More features” page of your admin center:
https://admin.microsoft.com/sharepoint?page=classicfeatures&modern=true
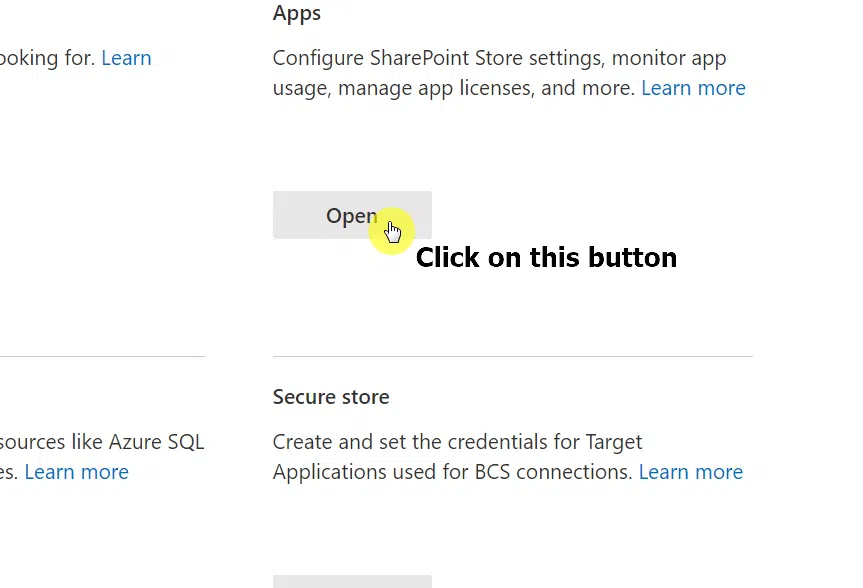
Once there, click on the “Open” button under “Apps”.
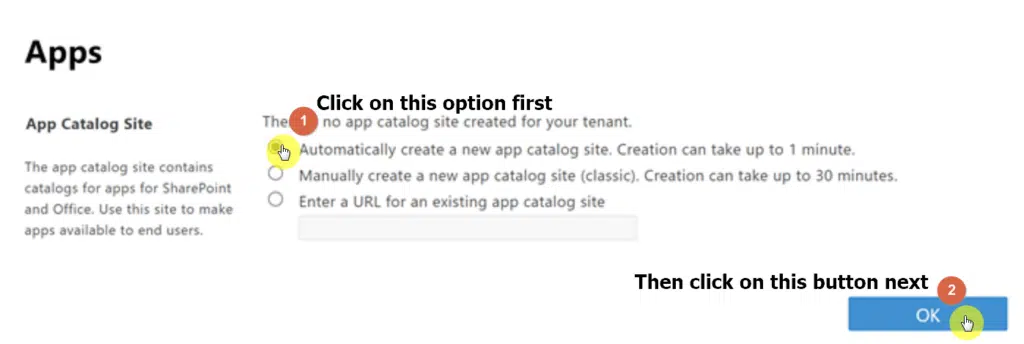
Then, click on “App Catalog” and see if you’re redirected to your app catalog site:

If you don’t have an app catalog site yet, the system will inform you. You can then choose to “Automatically create a new app catalog site” and click on the “OK” button.
This makes sure that you have a tenant app catalog. The steps mentioned below will deploy on the site collection app catalog, so to be sure, it’s better if you create one too.
If you want to use SharePoint Online Management Shell, enter the script below:
Connect-SPOService -Url https://yourtenant-admin.sharepoint.com
Add-SPOSiteCollectionAppCatalog -Site “https://yourtenant.sharepoint.com/sites/yoursite”
For SharePoint PnP PowerShell:
Connect-PnPOnline -Url https://yourtenant-admin.sharepoint.com
Add-PnPSiteCollectionAppCatalog -Site “https://yourtenant.sharepoint.com/sites/yoursite”
For Office 365 CLI:
spo login https://yourtenant-admin.sharepoint.com
spo site appcatalog add --url https://yourtenant.sharepoint/sites/yoursite
After that, you need to make sure you have the latest PnP PowerShell. Open your PowerShell and put in the following code:
Install-Module -Name PnP.PowerShellUse PowerShell for Windows users
To get started, download the solution from the link below first (select
ga-setup-powershell.zip):
https://gitlab.lsonline.fr/SharePoint/sp-dev-fx-webparts/analytics/-/releases
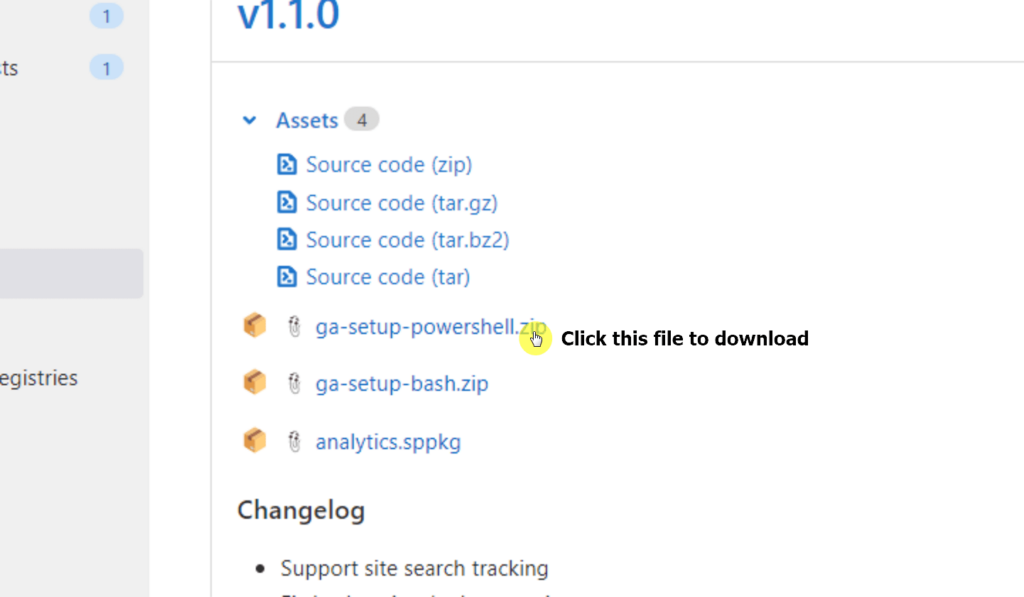
Don’t forget to extract the files from the zip folder.
After that, open your PowerShell terminal in admin mode and connect to the site where you want to add Google Analytics to.

Enter the following code (don’t forget to change the “yourtenant” and “yoursite”):
Connect-PnPOnline -Url https://yourtenant.sharepoint.com/sites/yoursiteThe system will then prompt you to enter your username and password.
The next step is to simply launch the setup file.
Enter the code below to your PowerShell with your target site and your own tracking ID:
.\setup.ps1 -siteUrl https://yourtenant.sharepoint.com/sites/yoursite -trackingID 'UA-127400000-1'Note that you need to run the script in the folder where you extracted the file.
To navigate through your folders using PowerShell, use “cd..” to go back one folder at a time and use “cd nameOfFolder” to open a folder.
If you encounter an error saying something like the script can’t be loaded because the execution of scripts is disabled, use the following code:
Set-ExecutionPolicy RemoteSignedNote that the solution is uploaded to your site collection app catalog.
For Linux, Mac, and Windows users
If you’re using Linux and Mac (or you’re a Windows user who simply prefers another method), then you can use this method.
However, make sure to have Bash and Office365-CLI first before you proceed.
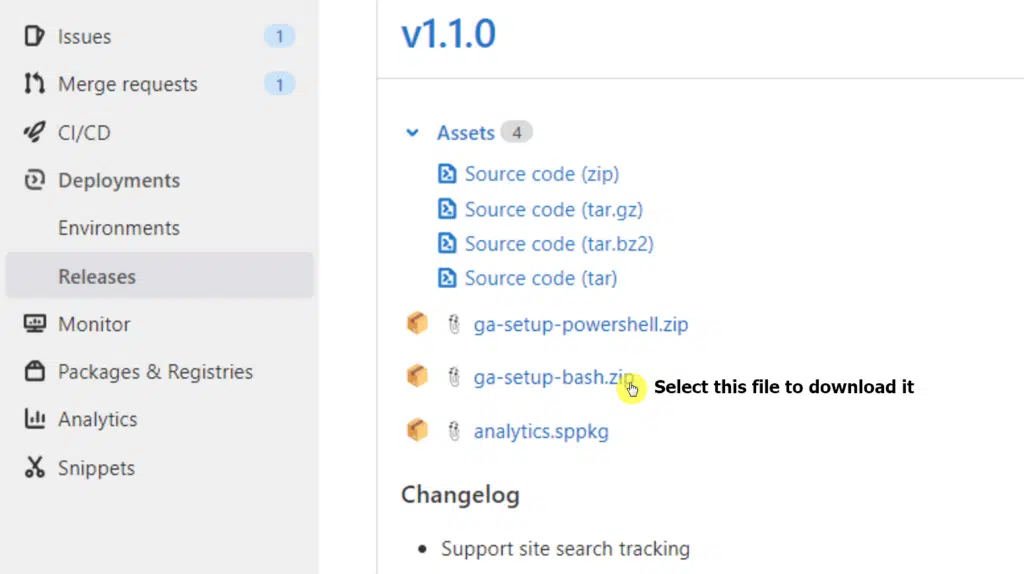
To start, download the solution for bash from the link below:
https://gitlab.lsonline.fr/SharePoint/sp-dev-fx-webparts/analytics/-/releases
Select the “ga-setup-bash.zip” file to download it. Extract the solution from the zip file.
To proceed, enter the code below on Bash to execute the script:
chmod +x ./setup.shAfter that, log in to your SharePoint Online and connect with the site collection you want to install Google Analytics to:
spo login https://yourtenant.sharepoint.com/sites/yoursiteFinally, launch the setup.sh file from your Bash terminal with the script below:
./setup.sh --siteUrl https://yourtenant.sharepoint.com/sites/yoursite -- trackingID 'UA-127400000-1'Similar to the earlier method, this will deploy the package directly to the site collection app catalog.
If you want to remove Google Analytics that was deployed from the sppkg file above then you will have to run the following PowerShell. This is required since the solution leverages application customizers. You can see this by viewing the source of a SharePoint page in a site that has Google Analytics deployed and do a search for your Google Analytics Property ID. You’ll see the application customizer is injected behind the scenes. This is what we want to remove by using the PowerShell I have listed below.
Make sure you uncomment and run #Remove-PnpApplicationCustomizer when you grab the Id from the Get-PnPApplicationCustomizer command.
#Remove Application Customizer

#Parameters
$SiteUrl = "https://yourtenant.sharepoint.com/Sites/yoursite"

#Connect to Site
Connect-PnPOnline $SiteUrl -Credentials (Get-Credential)

#'Get list of Custom Actions
Get-PnPApplicationCustomizer

#Remove the Custom Action
#Remove-PnPApplicationCustomizer -Identity [Id here from list above]Although SharePoint Online already has its own analytics feature that tracks visitors and engagements on modern sites, some may still prefer to use Google Analytics.
Fortunately, you can do this easily without having to create and compile the solution package yourself.
Just note that the steps for adding GA to a modern site and a classic site vary.
For classic sites, you can edit the masterpage directly or activate the solution on the solutions gallery.
For modern sites, you can use PowerShell for Windows or Bash if you’re on Linux or Mac.
If you have questions, feel free to drop them in the comment section so we can talk about them.
For inquiries and concerns, send me a message through my contact page and I’ll get back to you as soon as possible.


Hi Ryan
Can you please help me with this error?
S D:\Work\Analytics\ga-setup-powershell> .\setup.ps1 -siteUrl https://example -trackingID ‘the id’
Deploying the Analytics Package to the Site AppCatalog…
VERBOSE: Adding the Analytics Package to the Site AppCatalog https://example
Add-PnPApp: D:\Work\Analytics\ga-setup-powershell\setup.ps1:121
Line |
121 | $app = Add-PnPApp -Path $package -Scope Site
| ~~~~~~~~~~~~~~~~~~~~~~~~~~~~~~~~~~~~~
| {“odata.error”:{“code”:”-1, Microsoft.SharePoint.Client.ResourceNotFoundException”,”message”:{“lang”:”en-US”,”value”:”Cannot find resource for the
| request SP.RequestContext.current/web/sitecollectionappcatalog/.”}}}
Publish-PnPApp: D:\Work\Analytics\ga-setup-powershell\setup.ps1:133
Line |
133 | Publish-PnPApp -Identity $appId -Scope Site
| ~~~~~~~~~~~~~~~~~~~~~~~~~~~~~~~~~~~~~~~~~~~
| Cannot find app
Install-PnPApp: D:\Work\Analytics\ga-setup-powershell\setup.ps1:142
Line |
142 | Install-PnPApp -Identity $appId -Scope Site
| ~~~~~~~~~~~~~~~~~~~~~~~~~~~~~~~~~~~~~~~~~~~
| Cannot find app
I get the same error. Would be keen to know if you found a solution.
You don’t get the error when using the -tenantSolutionDeployment option.
Deployment succeeds ok.
However I don’t seem to receive any data when using GA4 TAG G-xxxxxxx
Did anyone successfully deployed this recently on modern Sharepoint online sites?
PS D:\Work\Analytics\ga-setup-powershell> .\setup.ps1 -siteUrl -trackingID ‘G-JE2M0YC38C’
Deploying the Analytics Package to the Site AppCatalog…
VERBOSE: Adding the Analytics Package to the Site AppCatalog
Add-PnPApp: D:\Work\Analytics\ga-setup-powershell\setup.ps1:121
Line |
121 | $app = Add-PnPApp -Path $package -Scope Site
| ~~~~~~~~~~~~~~~~~~~~~~~~~~~~~~~~~~~~~
| {“odata.error”:{“code”:”-1, Microsoft.SharePoint.Client.ResourceNotFoundException”,”message”:{“lang”:”en-US”,”value”:”Cannot find resource for the
| request SP.RequestContext.current/web/sitecollectionappcatalog/.”}}}
Publish-PnPApp: D:\Work\Analytics\ga-setup-powershell\setup.ps1:133
Line |
133 | Publish-PnPApp -Identity $appId -Scope Site
| ~~~~~~~~~~~~~~~~~~~~~~~~~~~~~~~~~~~~~~~~~~~
| Cannot find app
Install-PnPApp: D:\Work\Analytics\ga-setup-powershell\setup.ps1:142
Line |
142 | Install-PnPApp -Identity $appId -Scope Site
| ~~~~~~~~~~~~~~~~~~~~~~~~~~~~~~~~~~~~~~~~~~~
| Cannot find app
Enabling the Analytics extension…
It looks like you may be missing some files. Did you do anything differently then what I posted above?
Hi Ryan,
I tried pasting in the new G4 analytics code into the masterpage as you’ve instructed (right before the reference to the core.js file) and am getting an error that says the file isn’t XML-compliant.
How did you get around this issue?
Thanks,
Karen
Nevermind. Figured it out!
Great! Mind sharing what you fixed?
Here’s a potential error that might arise when trying to create a Site Collection App Catalog:
This can be fixed by being a:
Is this the same process when using the new GA4 tag?
I have not tried that yet but I can when I get a moment. When I do, I can update this blog post.
Did you find the time yet to confirm it’s working with GA4 tags? Many thanks.
I have the same question we are did you find any information related to GTM4 by any chance?
Hi Ryan, Can you do the same for a model-driven Power App?
Yes, but I would create a custom solution and just add it to the PowerApp directly.
Thanks for the response! Would you be able to outline the steps to do that?
Hi everyone does someone try to install the GTM and GA4 that has been successful? I can’t find any information related to this online and the current version will be available until June 30th, this needs to be replace since no more information will be gather from the sites.
Is it possible to use this approach to fire a JS function on every page that changes the site logo link to a custom URL?
My company has about 3000 Sharepoint sites, but only 70 or so fall into a Hub that acts as our company portal/intranet. I used to be able to split the hub and all of Sharepoint into two separate properties for UA, but am not seeing how to do that in GA4. Any ideas?
Hi Ryan,
For SharePoint Online,
We created an App Catalog, then in while running setup file which URL we need to pass?
Is it AppCatalog URL or Site URL?
Also will the scrip deploy app on Tenant level?