

Last Updated on November 15, 2023
Can you share an Excel sheet with others?
You want to share your Excel file with others, allow them to work on it, and make changes. Unless you’re a power user, collaborating with others with Excel may seem a bit tricky.
This is a corner where Google Sheets shines brighter than Microsoft Excel…
Recent changes to Excel may have made sharing somewhat easier, but it’s no way near the capabilities of Google Sheets.
So then, how do you go and share an Excel file with multiple users and allow them to make changes? How do you make sure you get the updated file?
In this article, I’ll show you two methods to share an Excel file — coauthoring and manual sharing.
Let’s get started.
Table of Contents:
Microsoft recommends coauthoring when it comes to sharing Excel files with multiple users. It’s the most intuitive way of sharing files for Microsoft product users that’s almost on par with Google.
Here are the steps to do that:
Step 1: Upload the Excel File to OneDrive
The simplest way is to click the “Share” button on Microsoft Excel and select which OneDrive to upload the file to.
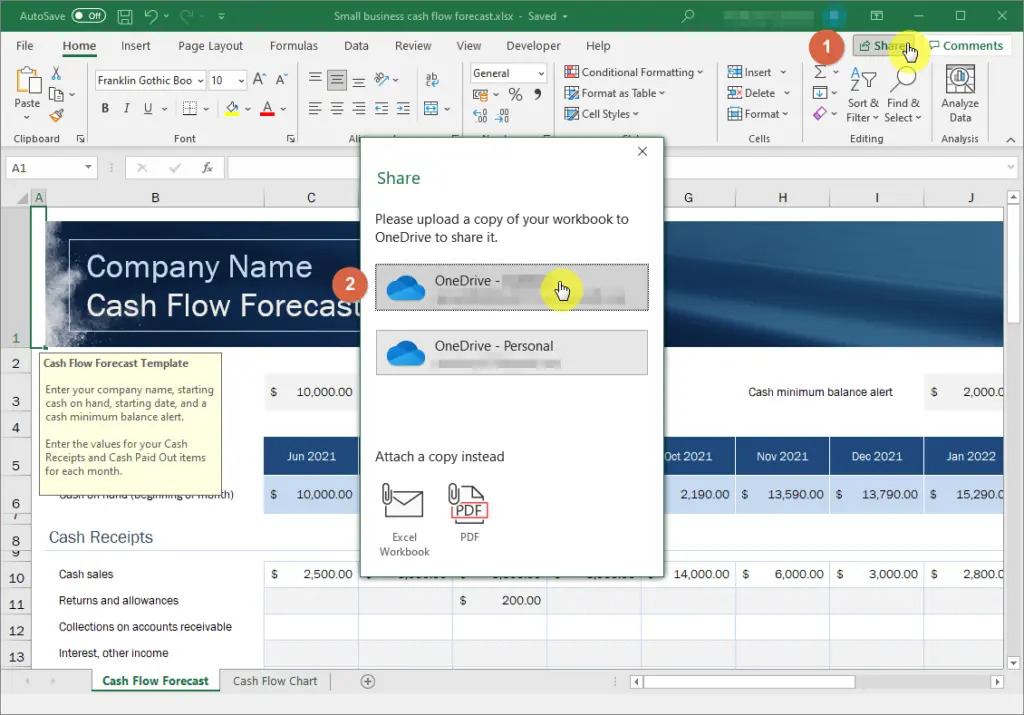
The alternative way of doing this is to visit your OneDrive folder and either drag the file directly to the folder or use the “Upload” button.
Related: How to Share Files on OneDrive With External Users (Guide)
If you used the “Share” button on Excel to upload the file, you will see a new window where you can edit the share link properties and directly share the file with other members through name, group, or email.
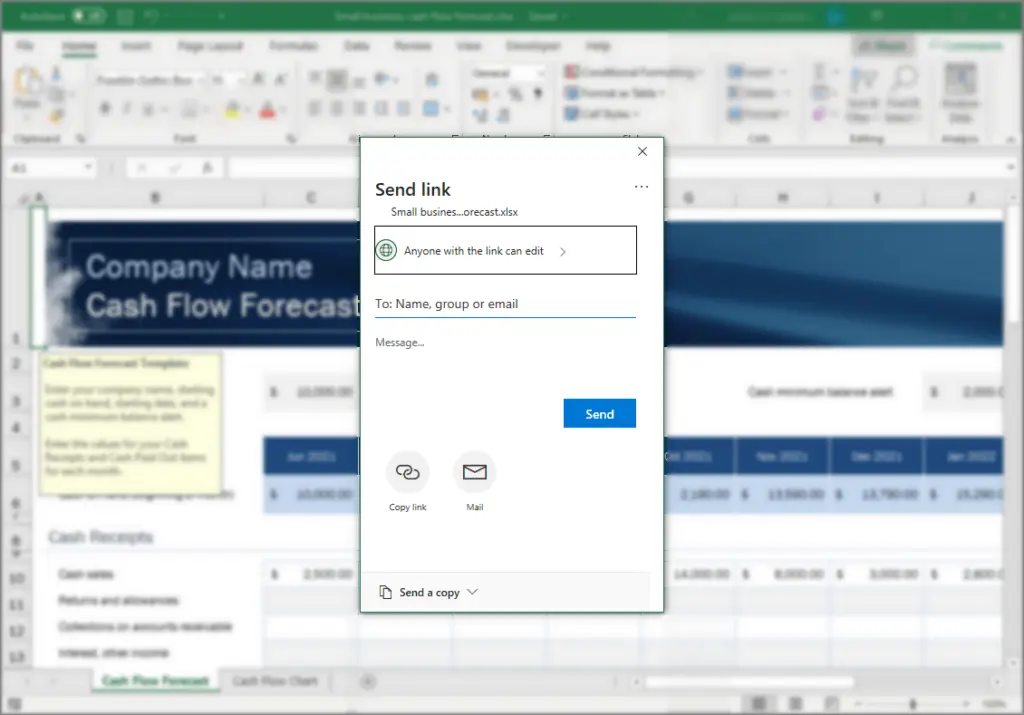
You can also copy the link and share the link directly through email with other OneDrive users.
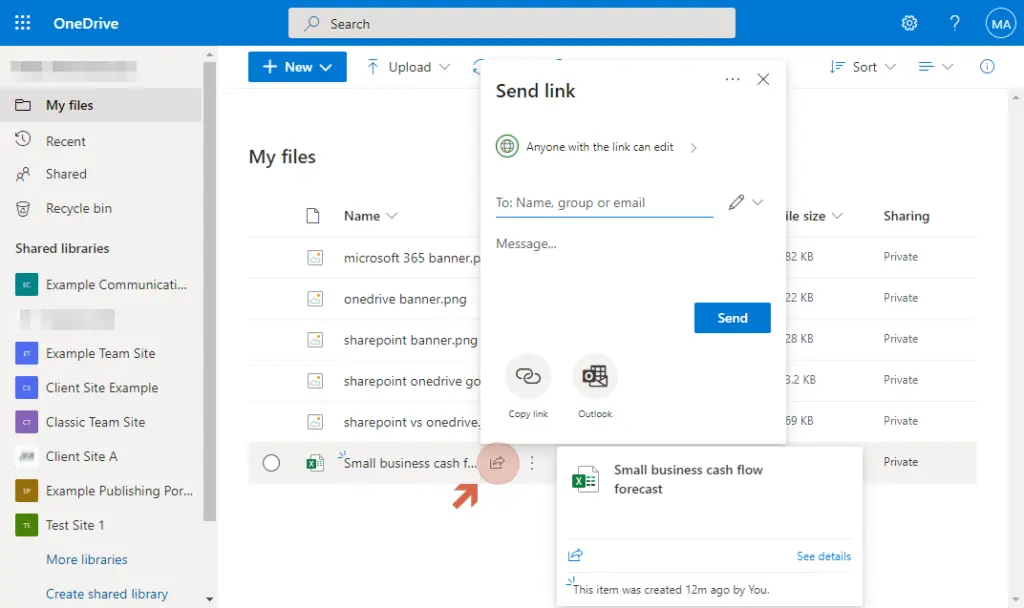
If you have uploaded the file via OneDrive without opening the Excel file on your desktop, you can share it with others by clicking the “Share” button beside the filename and copying the link from there.
Through this method, other persons with whom you shared the file will be able to make changes to the Excel document.
The downside to this is that you will not be able to track any changes on any coauthored documents. But if you’re working on it at the same time, you will be able to see what the other users are changing in the document.
Sign up for exclusive updates, tips, and strategies
Method 2: Sharing Excel File With Tracked Changes
With Excel live collaboration, coauthoring is definitely the best.
On the other hand, you can also try the traditional method of sharing, which is equivalent to passing a copy of the file around.
You might wonder how the changes made will be compiled. Don’t worry about that as we will also cover it in one of the steps below.
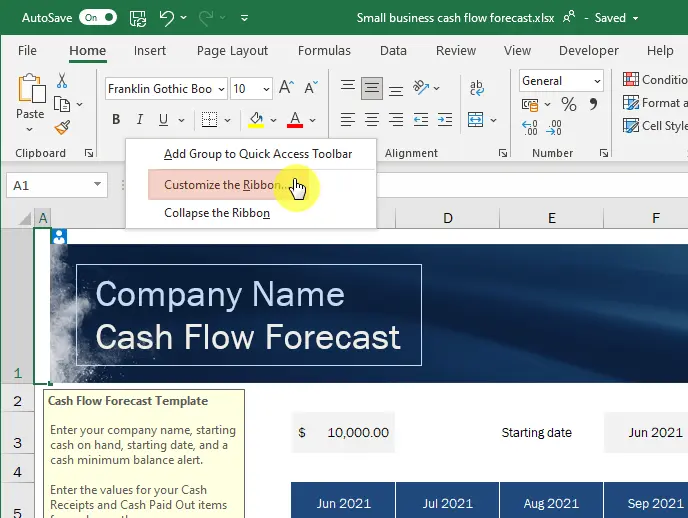
Step 1: Customize Quick Access Toolbar
Most of what you need to traditionally share the others are part of the legacy commands. To use them, you need to bring them out first on the toolbar.
Right-click on the ribbon first and select “Customize the Ribbon” from the options.
In the new window, select “Commands Not in the Ribbon” and add the following commands:
- Compare and Merge Workbooks (Legacy)
- Protect Sharing (Legacy)
- Share Workbook (Legacy)
- Track Changes (Legacy)
If you encounter an error, that means you need to either select an existing tab on the toolbar first or create a new tab and group.
Below, you will see that the commands are under the Extra tab > Traditional Sharing.
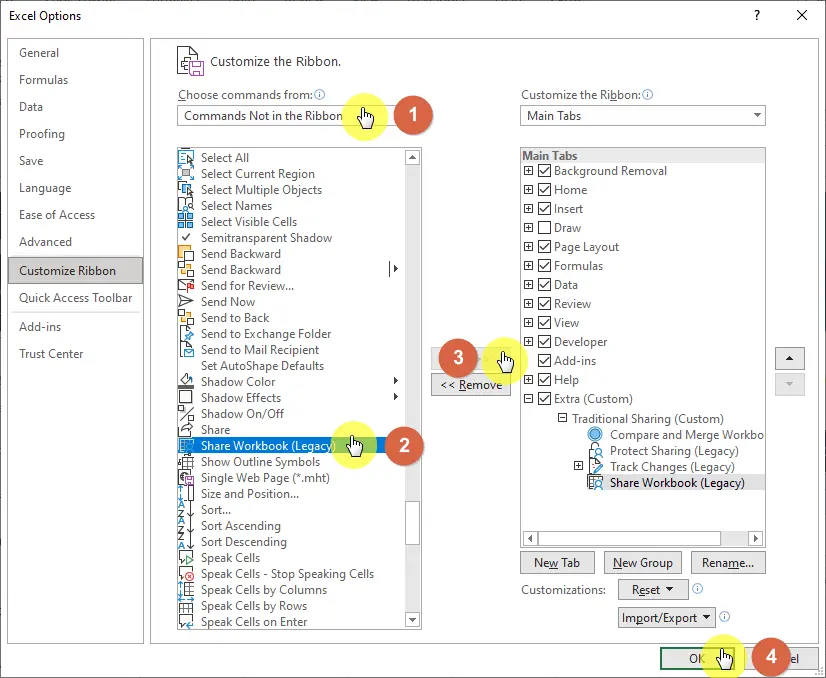
Don’t forget to hit the “OK” button once you’re done.
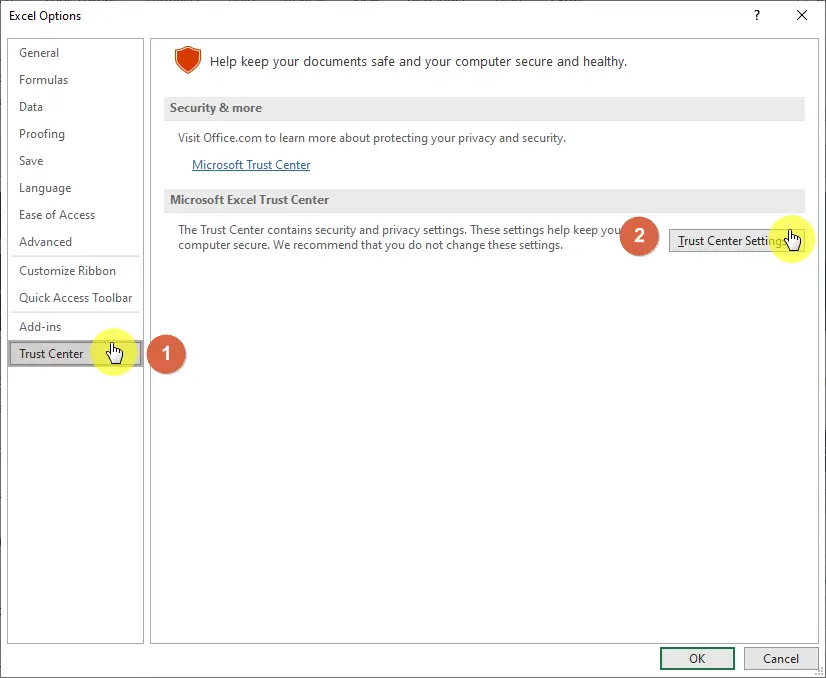
Step 2: Change Property Options
Before you can track the changes, you must change a setting first on the property options.
Follow these steps:
- Visit Excel Options (File > Options)
- Navigate to the “Trust Center” tab
- Click the “Trust Center Settings” box
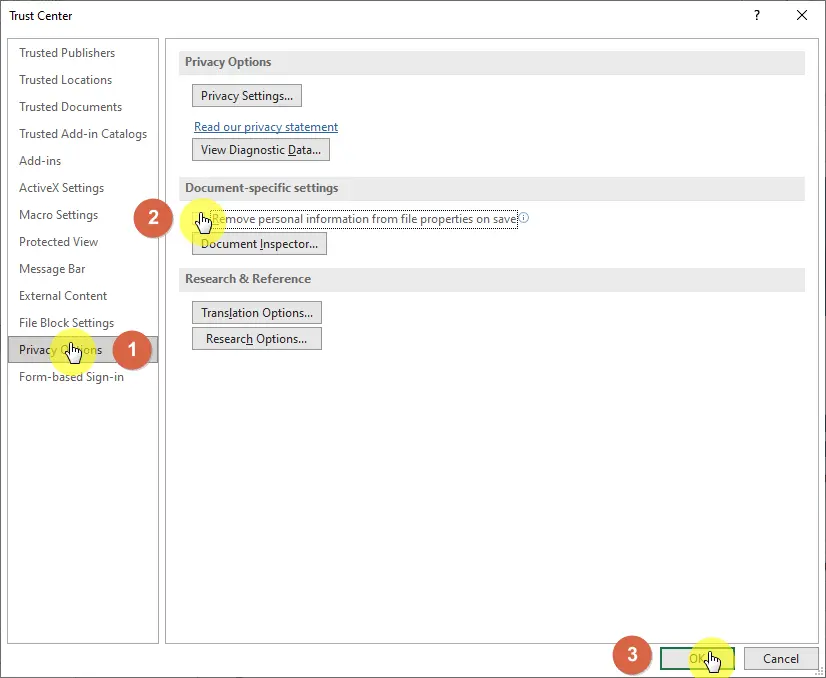
In the Trust Center window, do the following:
- Navigate to the “Privacy Options” tab
- Disable (uncheck) the “Remove personal information…” setting
- Click “OK”
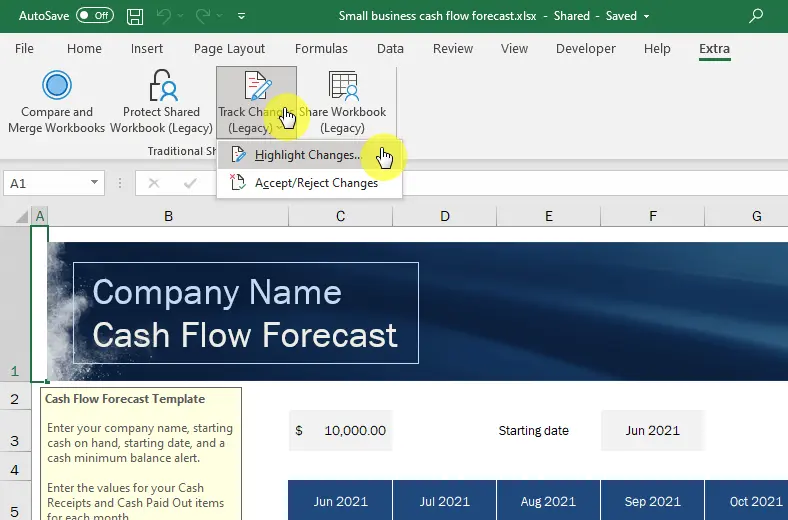
Step 3: Track Changes
Since you will be passing the shared Excel file around, it’s important to know what changes have been made.
To track the changes:
- Go to the tab where you added the command (in my case, it’s on the newly created “Extra” tab)
- Click “Track Changes”
- Select “Highlight Changes”
Enable the track changes while editing mode and enable the “When: All” and “Who: Everyone” options as shown below.
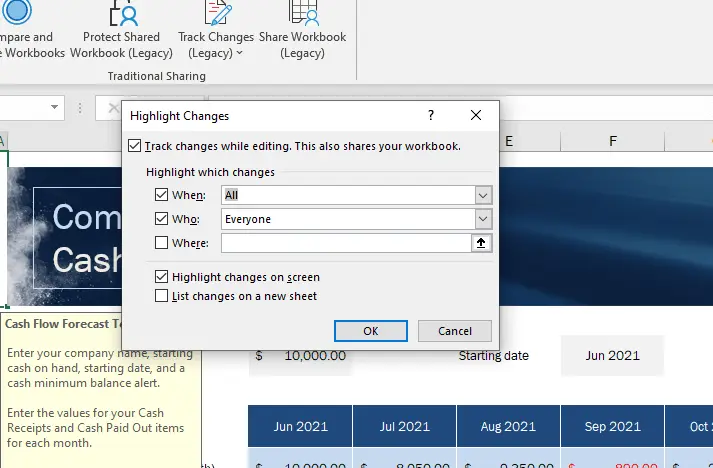
Click “OK” to save the changes.
This command doesn’t literally share the workbook with others. However, this allows you to track who has the workbook open and allows workbook merging later on.
You can also edit the advanced options including the change history and choosing between conflict changes.

Leave the default options and click “OK” to proceed.
Step 5: Protect Sharing
To make sure the change history will not be removed by any users, activate the “Protect Shared Workbook” command.
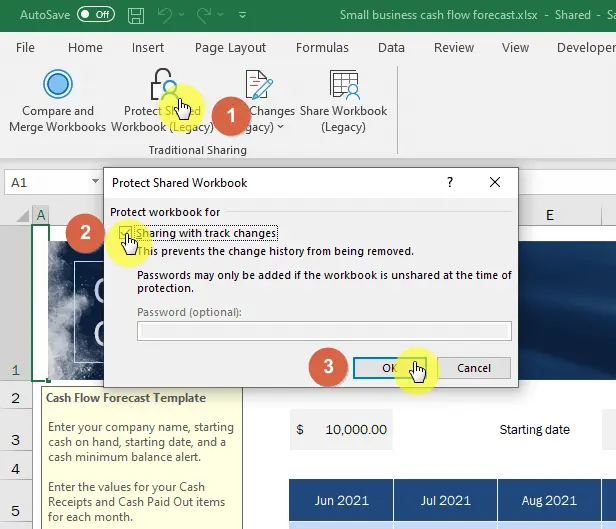
Check the “Sharing with track changes” options and click the “OK” button.
Related: How to Protect a Worksheet in Excel (The Beginner’s Guide)
Step 6: Send the File to Others
All that’s left now is to send the same Excel workbook file to others. You can use whatever means of distributing the file, whether online or offline.
Once you get the file back, you can then use the compare and merge command. For this, you need to give each copy you receive a different name and save them in the same folder.
The more copies you have, the longer it will take to compare and merge all of them, as you will have to do them one by one.
For this reason, coauthoring is the less hassle way of sharing spreadsheet with your team members. It may not track changes, but it’s easier to implement than the traditional way of sharing with others.
Since tracking changes is a legacy command, you will not be able to use it when co-authoring.
Do you have questions concerning sharing an Excel file with other users? If so, simply drop them down below in the comments section. You can also send me a private message on my contact page.


